Canon VIXIA HF M30 VIXIA HF M30 / HF M31 / HF M300 Instruction Manual - Page 144
Connecting to the Computer and Uploading your Videos
 |
View all Canon VIXIA HF M30 manuals
Add to My Manuals
Save this manual to your list of manuals |
Page 144 highlights
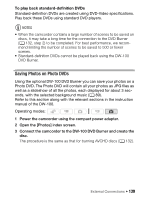
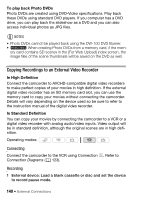
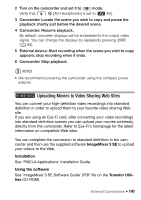
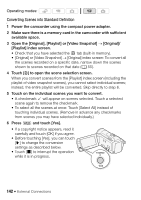
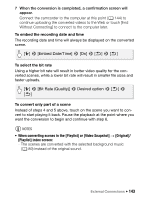
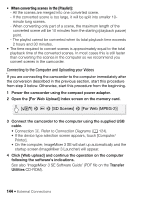
• When converting scenes in the [Playlist]: - All the scenes are merged into one converted scene. - If the converted scene is too large, it will be split into smaller 10minute long scenes. - When converting only part of a scene, the maximum length of the converted scene will be 10 minutes from the starting (playback pause) point. - The playlist cannot be converted when its total playback time exceeds 2 hours and 30 minutes. • The time required to convert scenes is approximately equal to the total playback time of the converted scenes. In most cases this is still faster than converting the scenes in the computer so we recommend you convert scenes in the camcorder. Connecting to the Computer and Uploading your Videos If you are connecting the camcorder to the computer immediately after the conversion described in the previous section, start this procedure from step 3 below. Otherwise, start this procedure from the beginning. 1 Power the camcorder using the compact power adapter. 2 Open the [For Web Upload] index screen on the memory card. [b] 8 g 8 [SD Scenes] 8 [For Web (MPEG-2)] 3 Connect the camcorder to the computer using the supplied USB cable. • Connection D. Refer to Connection Diagrams (0 124). • If the device type selection screen appears, touch [Computer/ Printer]. • On the computer, ImageMixer 3 SE will start up automatically and the startup screen (ImageMixer 3 Launcher) will appear. 4 Click [Web upload] and continue the operation on the computer following the software's indications. See also 'ImageMixer 3 SE Software Guide' (PDF file on the Transfer Utilities CD-ROM). 144 Š External Connections
-
 1
1 -
2
-
3
-
4
-
5
-
6
-
7
-
8
-
9
-
10
-
11
-
12
-
13
-
14
-
15
-
16
-
17
-
18
-
19
-
20
-
21
-
22
-
23
-
24
-
25
-
26
-
27
-
28
-
29
-
30
-
31
-
32
-
33
-
34
-
35
-
36
-
37
-
38
-
39
-
40
-
41
-
42
-
43
-
44
-
45
-
46
-
47
-
48
-
49
-
50
-
51
-
52
-
53
-
54
-
55
-
56
-
57
-
58
-
59
-
60
-
61
-
62
-
63
-
64
-
65
-
66
-
67
-
68
-
69
-
70
-
71
-
72
-
73
-
74
-
75
-
76
-
77
-
78
-
79
-
80
-
81
-
82
-
83
-
84
-
85
-
86
-
87
-
88
-
89
-
90
-
91
-
92
-
93
-
94
-
95
-
96
-
97
-
98
-
99
-
100
-
101
-
102
-
103
-
104
-
105
-
106
-
107
-
108
-
109
-
110
-
111
-
112
-
113
-
114
-
115
-
116
-
117
-
118
-
119
-
120
-
121
-
122
-
123
-
124
-
125
-
126
-
127
-
128
-
129
-
130
-
131
-
132
-
133
-
134
-
135
-
136
-
137
-
138
-
 139
139 -
 140
140 -
 141
141 -
 142
142 -
 143
143 -
 144
144 -
 145
145 -
 146
146 -
 147
147 -
 148
148 -
 149
149 -
150
-
151
-
152
-
153
-
154
-
155
-
156
-
157
-
158
-
159
-
160
-
161
-
162
-
163
-
164
-
165
-
166
-
167
-
168
-
169
-
170
-
171
-
172
-
173
-
174
-
175
-
176
-
177
-
178
-
179
-
180
-
181
-
182
-
183
-
184
-
185
-
186
-
187
-
188
-
189
-
190
-
191
-
192
-
193
-
194
-
195
-
196
-
197
-
198
-
199
-
200
-
201
-
202
-
203
-
204
-
205
-
206
-
207
-
208
-
209
-
210
 |
 |