Canon VIXIA HF M30 VIXIA HF M30 / HF M31 / HF M300 Instruction Manual - Page 45
About the Power Save mode, When taking photos
 |
View all Canon VIXIA HF M30 manuals
Add to My Manuals
Save this manual to your list of manuals |
Page 45 highlights
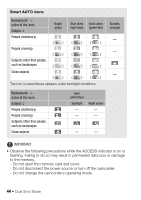
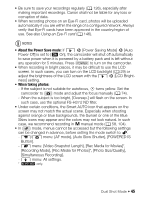
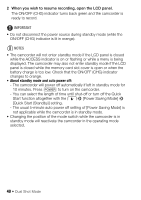
• Be sure to save your recordings regularly (0 126), especially after making important recordings. Canon shall not be liable for any loss or corruption of data. • When recording photos on an Eye-Fi card, photos will be uploaded automatically if you are within the range of a configured network. Always verify that Eye-Fi cards have been approved in the country/region of use. See also Using an Eye-Fi card (0 146). NOTES • About the Power Save mode: If 6 8 [Power Saving Mode] 8 [Auto Power Off] is set to [A On], the camcorder will shut off automatically to save power when it is powered by a battery pack and is left without any operation for 5 minutes. Press x to turn on the camcorder. • When recording in bright places, it may be difficult to use the LCD screen. In such cases, you can turn on the LCD backlight (0 29) or adjust the brightness of the LCD screen with the 6 8 [LCD Bright- ness] setting. • When taking photos: - If the subject is not suitable for autofocus, h turns yellow. Set the camcorder to mode and adjust the focus manually (0 74). - When the subject is too bright, [Overexp.] will flash on the screen. In such case, use the optional FS-H37U ND filter. • Under certain conditions, the Smart AUTO icon that appears on the screen may not match the actual scene. Especially when shooting against orange or blue backgrounds, the Sunset or one of the Blue Skies icons may appear and the colors may not look natural. In such case, we recommend recording in y manual mode (0 58, 104). • In mode, menus cannot be accessed but the following settings can be changed in advance, before setting the mode switch to 5. - 7/8 menu: [AF mode], [Auto Slow Shutter], [POWERED IS Button]. - 8 menu: [Video Snapshot Length], [Rec Media for Movies]*, [Recording Mode], [Rec Media for Photos]*, [Photo Size/Quality], [Simultaneous Recording]. - 6 menu: All settings. * e only. Dual Shot Mode Š 45
-
 1
1 -
2
-
3
-
4
-
5
-
6
-
7
-
8
-
9
-
10
-
11
-
12
-
13
-
14
-
15
-
16
-
17
-
18
-
19
-
20
-
21
-
22
-
23
-
24
-
25
-
26
-
27
-
28
-
29
-
30
-
31
-
32
-
33
-
34
-
35
-
36
-
37
-
38
-
39
-
 40
40 -
 41
41 -
 42
42 -
 43
43 -
 44
44 -
 45
45 -
 46
46 -
 47
47 -
 48
48 -
 49
49 -
 50
50 -
51
-
52
-
53
-
54
-
55
-
56
-
57
-
58
-
59
-
60
-
61
-
62
-
63
-
64
-
65
-
66
-
67
-
68
-
69
-
70
-
71
-
72
-
73
-
74
-
75
-
76
-
77
-
78
-
79
-
80
-
81
-
82
-
83
-
84
-
85
-
86
-
87
-
88
-
89
-
90
-
91
-
92
-
93
-
94
-
95
-
96
-
97
-
98
-
99
-
100
-
101
-
102
-
103
-
104
-
105
-
106
-
107
-
108
-
109
-
110
-
111
-
112
-
113
-
114
-
115
-
116
-
117
-
118
-
119
-
120
-
121
-
122
-
123
-
124
-
125
-
126
-
127
-
128
-
129
-
130
-
131
-
132
-
133
-
134
-
135
-
136
-
137
-
138
-
139
-
140
-
141
-
142
-
143
-
144
-
145
-
146
-
147
-
148
-
149
-
150
-
151
-
152
-
153
-
154
-
155
-
156
-
157
-
158
-
159
-
160
-
161
-
162
-
163
-
164
-
165
-
166
-
167
-
168
-
169
-
170
-
171
-
172
-
173
-
174
-
175
-
176
-
177
-
178
-
179
-
180
-
181
-
182
-
183
-
184
-
185
-
186
-
187
-
188
-
189
-
190
-
191
-
192
-
193
-
194
-
195
-
196
-
197
-
198
-
199
-
200
-
201
-
202
-
203
-
204
-
205
-
206
-
207
-
208
-
209
-
210
 |
 |