Canon XF100 XF100 / XF105 Instruction Manual - Page 102
Embedding Custom Picture Settings in a Recording, Available Custom Picture Settings
 |
View all Canon XF100 manuals
Add to My Manuals
Save this manual to your list of manuals |
Page 102 highlights
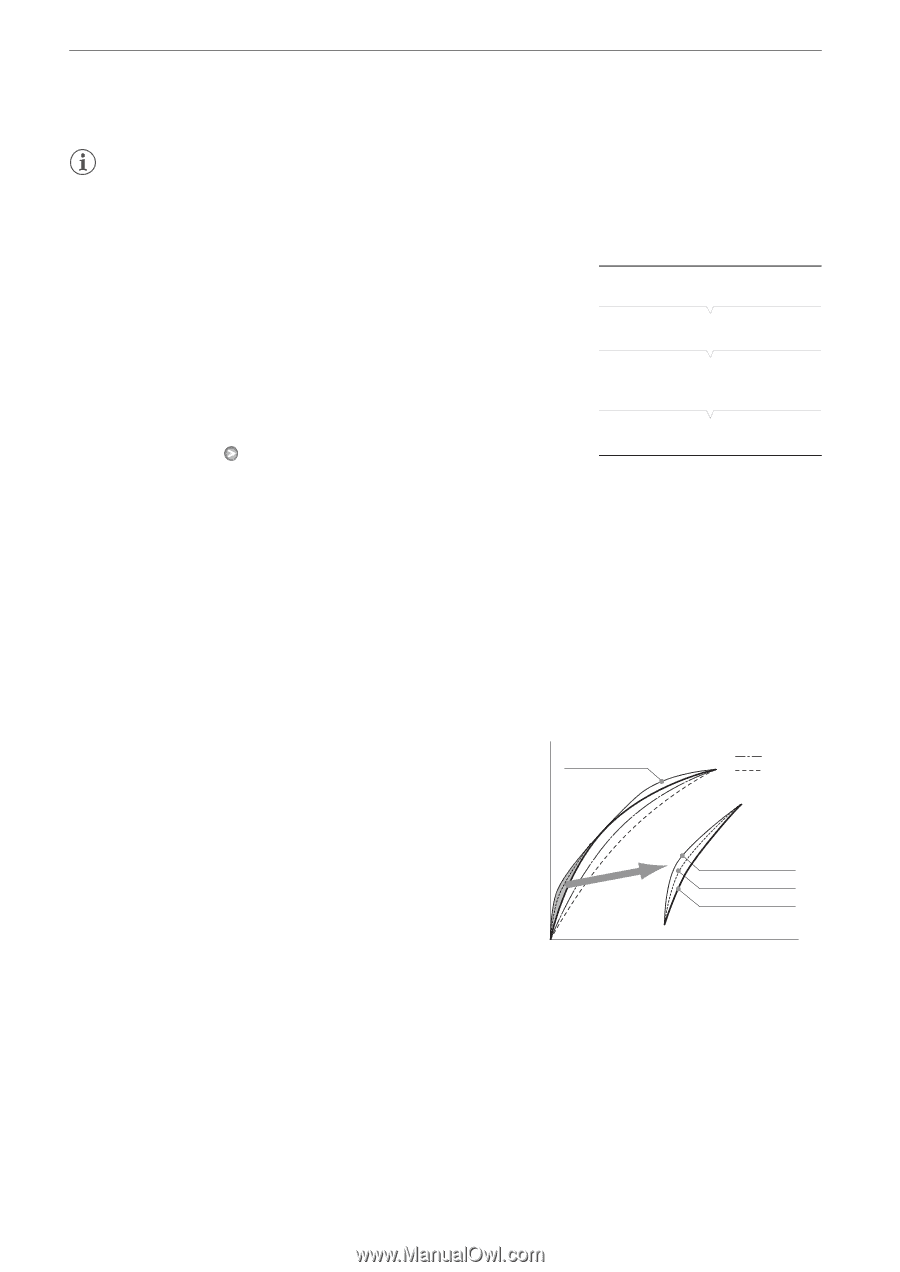
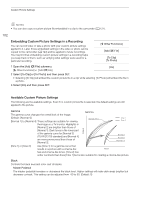
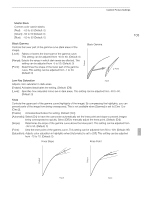
Custom Picture Settings NOTES • You can also copy a custom picture file embedded in a clip to the camcorder (0 121). 102 Embedding Custom Picture Settings in a Recording You can record video or take a photo with your custom picture settings applied to it. Later, those embedded settings in the video or photo can be copied to the camcorder (0 143) and be applied to future recordings. You may find that embedding custom picture settings in a recording helps you keep track of them, such as verifying what settings were used for a particular recording. [J Other Functions] [Add X File] [To Clip] [To Photo] 1 Open the [Add X File] submenu. [On] [J Other Functions] [Add X File] 2 Select [To Clip] or [To Photo] and then press SET. • Selecting [To Clip] will embed the custom picture file in a clip while selecting [To Photo] will embed the file in a photo. 3 Select [On] and then press SET. Available Custom Picture Settings The following are the available settings. Even if no custom picture file is selected, the default settings are still applied to the picture. Gamma The gamma curve changes the overall look of the image. (Default: [Normal 1]) [Normal 1] to [Normal 4]: These settings are suitable for viewing the image on a TV monitor. Highlights in [Normal 2] are brighter than those of [Normal 1]. Dark tones in the lower part of the gamma curve for [Normal 3] (ITU-R BT.709 standard) and [Normal 4] are more pronounced than those of [Normal 2]. Output Gamma Normal 2/3/4 Cine 1 Cine 2 Normal 4 Normal 3 Normal 1/2 [Cine 1] or [Cine 2]: Use [Cine 1] for a gamma curve that results in a picture with a cinema-like Input feel and cinema-like tones. [Cine 2] has softer contrasts than does [Cine 1] but is also suitable for creating a cinema-like picture. Black Controls the black level and color cast of blacks. Master Pedestal The master pedestal increases or decreases the black level. Higher settings will make dark areas brighter but decrease contrast. This setting can be adjusted from -50 to 50. (Default: 0)
-
 1
1 -
2
-
3
-
4
-
5
-
6
-
7
-
8
-
9
-
10
-
11
-
12
-
13
-
14
-
15
-
16
-
17
-
18
-
19
-
20
-
21
-
22
-
23
-
24
-
25
-
26
-
27
-
28
-
29
-
30
-
31
-
32
-
33
-
34
-
35
-
36
-
37
-
38
-
39
-
40
-
41
-
42
-
43
-
44
-
45
-
46
-
47
-
48
-
49
-
50
-
51
-
52
-
53
-
54
-
55
-
56
-
57
-
58
-
59
-
60
-
61
-
62
-
63
-
64
-
65
-
66
-
67
-
68
-
69
-
70
-
71
-
72
-
73
-
74
-
75
-
76
-
77
-
78
-
79
-
80
-
81
-
82
-
83
-
84
-
85
-
86
-
87
-
88
-
89
-
90
-
91
-
92
-
93
-
94
-
95
-
96
-
 97
97 -
 98
98 -
 99
99 -
 100
100 -
 101
101 -
 102
102 -
 103
103 -
 104
104 -
 105
105 -
 106
106 -
 107
107 -
108
-
109
-
110
-
111
-
112
-
113
-
114
-
115
-
116
-
117
-
118
-
119
-
120
-
121
-
122
-
123
-
124
-
125
-
126
-
127
-
128
-
129
-
130
-
131
-
132
-
133
-
134
-
135
-
136
-
137
-
138
-
139
-
140
-
141
-
142
-
143
-
144
-
145
-
146
-
147
-
148
-
149
-
150
-
151
-
152
-
153
-
154
-
155
-
156
-
157
-
158
-
159
-
160
-
161
-
162
-
163
-
164
-
165
-
166
-
167
-
168
-
169
-
170
-
171
-
172
-
173
-
174
-
175
-
176
-
177
-
178
-
179
-
180
-
181
-
182
-
183
-
184
-
185
-
186
 |
 |