Canon XF100 XF100 / XF105 Instruction Manual - Page 58
Adjusting the Aperture
 |
View all Canon XF100 manuals
Add to My Manuals
Save this manual to your list of manuals |
Page 58 highlights
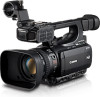
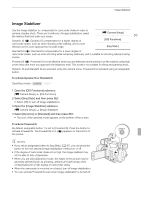
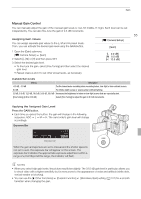
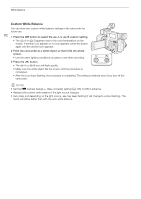
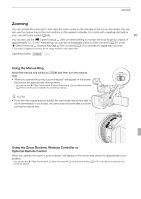
Adjusting the Aperture Adjusting the Aperture You can affect the brightness of your recordings or change the depth of field by adjusting the aperture. Increase the aperture value (F8) so that objects that are close and far away will be in focus. You can have the camcorder 58 adjust the aperture automatically or you can manually adjust it to give you more control over your recording. Operating modes: Automatic Aperture Control The camcorder automatically adjusts the aperture based on the brightness of the subject. If manual aperture control is activated, follow the procedure below to activate automatic aperture control. Press the IRIS button. • The A icon appears next to the aperture value on the screen. • When you set the camcorder to full auto mode (0 42), the camcorder automatically controls the aperture. Manual Aperture Control When automatic aperture control is not activated, follow the procedure below to adjust the aperture manually. 1 Move the manual ring switch to IRIS(ND). • Alternatively, you can use the CUSTOM dial to manually adjust the aperture (0 47). 2 Turn the manual ring to adjust the aperture. • The f-number displayed on the screen will be in 1/4-stop increments. Available aperture settings F1.8 F2.0 F2.2 F2.4 F2.6 F2.8 F3.2 F3.4 F3.7 F4.0 F4.4 F4.8 F5.2 F5.6 F6.2 F6.7 F7.3 F8.0 F8.7* F9.5* F10* F11* F12* F14* F15* F16* F17* F19* F21* F22* CLOSE* * Can be selected only when the [J Other Functions] [Custom Function] [Iris Limit] setting is set to [Off]. NOTES • If you set [l Camera Setup] [ND Filter] to [Automatic], the ND filter will activate automatically depending on the recording conditions. • When the gain and aperture are set to manual and the shutter speed is not set to auto, the exposure bar will appear on the screen (0 55). • You can use the [J Other Functions] [Custom Function] [Iris Limit] setting (0 107) to prevent the aperture from closing below the diffraction limit of the lens (F8.0). When it is on, the maximum aperture value is [F8.0]. When it is off, you can fully close the aperture but aperture values that exceed the diffraction limit will appear in gray. Using aperture values displayed in gray will cause diffraction blur.
-
 1
1 -
2
-
3
-
4
-
5
-
6
-
7
-
8
-
9
-
10
-
11
-
12
-
13
-
14
-
15
-
16
-
17
-
18
-
19
-
20
-
21
-
22
-
23
-
24
-
25
-
26
-
27
-
28
-
29
-
30
-
31
-
32
-
33
-
34
-
35
-
36
-
37
-
38
-
39
-
40
-
41
-
42
-
43
-
44
-
45
-
46
-
47
-
48
-
49
-
50
-
51
-
52
-
 53
53 -
 54
54 -
 55
55 -
 56
56 -
 57
57 -
 58
58 -
 59
59 -
 60
60 -
 61
61 -
 62
62 -
 63
63 -
64
-
65
-
66
-
67
-
68
-
69
-
70
-
71
-
72
-
73
-
74
-
75
-
76
-
77
-
78
-
79
-
80
-
81
-
82
-
83
-
84
-
85
-
86
-
87
-
88
-
89
-
90
-
91
-
92
-
93
-
94
-
95
-
96
-
97
-
98
-
99
-
100
-
101
-
102
-
103
-
104
-
105
-
106
-
107
-
108
-
109
-
110
-
111
-
112
-
113
-
114
-
115
-
116
-
117
-
118
-
119
-
120
-
121
-
122
-
123
-
124
-
125
-
126
-
127
-
128
-
129
-
130
-
131
-
132
-
133
-
134
-
135
-
136
-
137
-
138
-
139
-
140
-
141
-
142
-
143
-
144
-
145
-
146
-
147
-
148
-
149
-
150
-
151
-
152
-
153
-
154
-
155
-
156
-
157
-
158
-
159
-
160
-
161
-
162
-
163
-
164
-
165
-
166
-
167
-
168
-
169
-
170
-
171
-
172
-
173
-
174
-
175
-
176
-
177
-
178
-
179
-
180
-
181
-
182
-
183
-
184
-
185
-
186
 |
 |