Canon XF100 XF100 / XF105 Instruction Manual - Page 80
Adjusting the Audio Level - xlr
 |
View all Canon XF100 manuals
Add to My Manuals
Save this manual to your list of manuals |
Page 80 highlights
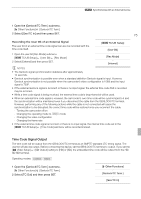
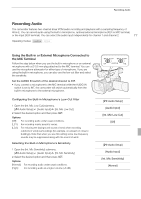
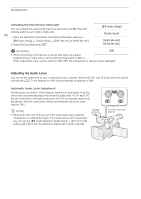
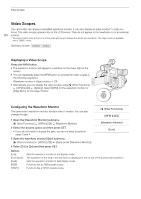
Recording Audio Activating the Microphone Attenuator You can activate the external microphone's attenuator (20 dB) if the XLR terminal switch is set to MIC or MIC+48V. 80 1 Open the desired XLR terminal's microphone attenuator submenu. [m Audio Setup] [Audio Input] [XLR1 Mic Att.] or [XLR2 Mic Att.] 2 Select [On] and then press SET. [m Audio Setup] [Audio Input] [XLR1 Mic Att.] [XLR2 Mic Att.] IMPORTANT [Off] • When connecting a microphone or device that does not support phantom power, make sure to set the XLR terminal switch to MIC or LINE, respectively. If you set the switch to MIC+48V, the microphone or device may be damaged. Adjusting the Audio Level You can set the audio level to auto or manual for each channel. When both CH1 and CH2 are set to the built-in microphone (0 77), the settings for CH1 will automatically be applied to CH2. Automatic Audio Level Adjustment Set the audio level switch of the desired channel to A (automatic) to let the camcorder automatically adjust that channel's audio level. If CH1 and CH2 are set to the built-in microphone and you set CH1 to automatic audio level adjustment, then the camcorder will also automatically adjust the audio level for CH2. NOTES • When both CH1 and CH2 are set to the same audio input (external microphone or external line input), if the audio level is set to automatic, you can use the [m Audio Setup] [Audio Input] [XLR ALC Link] setting (0 148) to link the audio level adjustment of both channels. CH1/CH2 audio level switches
-
 1
1 -
2
-
3
-
4
-
5
-
6
-
7
-
8
-
9
-
10
-
11
-
12
-
13
-
14
-
15
-
16
-
17
-
18
-
19
-
20
-
21
-
22
-
23
-
24
-
25
-
26
-
27
-
28
-
29
-
30
-
31
-
32
-
33
-
34
-
35
-
36
-
37
-
38
-
39
-
40
-
41
-
42
-
43
-
44
-
45
-
46
-
47
-
48
-
49
-
50
-
51
-
52
-
53
-
54
-
55
-
56
-
57
-
58
-
59
-
60
-
61
-
62
-
63
-
64
-
65
-
66
-
67
-
68
-
69
-
70
-
71
-
72
-
73
-
74
-
 75
75 -
 76
76 -
 77
77 -
 78
78 -
 79
79 -
 80
80 -
 81
81 -
 82
82 -
 83
83 -
 84
84 -
 85
85 -
86
-
87
-
88
-
89
-
90
-
91
-
92
-
93
-
94
-
95
-
96
-
97
-
98
-
99
-
100
-
101
-
102
-
103
-
104
-
105
-
106
-
107
-
108
-
109
-
110
-
111
-
112
-
113
-
114
-
115
-
116
-
117
-
118
-
119
-
120
-
121
-
122
-
123
-
124
-
125
-
126
-
127
-
128
-
129
-
130
-
131
-
132
-
133
-
134
-
135
-
136
-
137
-
138
-
139
-
140
-
141
-
142
-
143
-
144
-
145
-
146
-
147
-
148
-
149
-
150
-
151
-
152
-
153
-
154
-
155
-
156
-
157
-
158
-
159
-
160
-
161
-
162
-
163
-
164
-
165
-
166
-
167
-
168
-
169
-
170
-
171
-
172
-
173
-
174
-
175
-
176
-
177
-
178
-
179
-
180
-
181
-
182
-
183
-
184
-
185
-
186
 |
 |