Canon XF100 XF100 / XF105 Instruction Manual - Page 31
Using the LCD Panel, Using the Viewfinder and LCD Screen Simultaneously, Adjusting the Viewfinder/ - sharpness
 |
View all Canon XF100 manuals
Add to My Manuals
Save this manual to your list of manuals |
Page 31 highlights
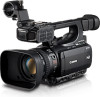
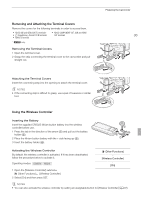
Preparing the Camcorder Using the LCD Panel Open the LCD panel 90 degrees. • You can rotate the panel 90 degrees downward or 180 degrees toward 31 the lens. NOTES • By default, the viewfinder screen is turned off while you use the LCD screen. However, you can also use both displays simultaneously. See the following section. • You can set the LCD screen to black & white (0 32). • When you use a commercially available lens adapter and the image on the screen is inverted, you can use the [J Other Functions] [Custom Function] [Scan Reverse Rec] setting to return the image to the correct orientation. Using the Viewfinder and LCD Screen Simultaneously By default, the viewfinder screen is turned off while you use the LCD screen. Follow the procedure below to use both of them simultaneously. Operating modes: 1 Open the [LCD/VF Simul.] submenu. [M LCD/VF Setup] [LCD/VF Simul.] 2 Select [On] and then press SET. [M LCD/VF Setup] [LCD/VF Simul.] [Off] Adjusting the Viewfinder/LCD Screen You can adjust the brightness, contrast, color, sharpness*, and backlight of the viewfinder and LCD screen independently of each other. These adjustments will not affect your recordings. * The viewfinder's sharpness cannot be adjusted. Operating modes: 1 Open the setup menu for the viewfinder or LCD screen. [M LCD/VF Setup] [LCD Setup] or [VF Setup] 2 Select [Brightness], [Contrast], [Color], [Sharpness] or [Backlight] and then press SET. 3 Adjust the setting and then press SET. • Repeat steps 2 and 3 to adjust other settings as necessary. [M LCD/VF Setup] [LCD Setup] [VF Setup] [Brightness: 0] [Contrast: 0] [Color: 0] [Sharpness: 2]* [Backlight: Normal] * The viewfinder's sharpness cannot be adjusted. NOTES • If you set an assignable button to [LCD Setup] (0 97), you can press the button to open the [LCD Setup] submenu.
-
 1
1 -
2
-
3
-
4
-
5
-
6
-
7
-
8
-
9
-
10
-
11
-
12
-
13
-
14
-
15
-
16
-
17
-
18
-
19
-
20
-
21
-
22
-
23
-
24
-
25
-
 26
26 -
 27
27 -
 28
28 -
 29
29 -
 30
30 -
 31
31 -
 32
32 -
 33
33 -
 34
34 -
 35
35 -
 36
36 -
37
-
38
-
39
-
40
-
41
-
42
-
43
-
44
-
45
-
46
-
47
-
48
-
49
-
50
-
51
-
52
-
53
-
54
-
55
-
56
-
57
-
58
-
59
-
60
-
61
-
62
-
63
-
64
-
65
-
66
-
67
-
68
-
69
-
70
-
71
-
72
-
73
-
74
-
75
-
76
-
77
-
78
-
79
-
80
-
81
-
82
-
83
-
84
-
85
-
86
-
87
-
88
-
89
-
90
-
91
-
92
-
93
-
94
-
95
-
96
-
97
-
98
-
99
-
100
-
101
-
102
-
103
-
104
-
105
-
106
-
107
-
108
-
109
-
110
-
111
-
112
-
113
-
114
-
115
-
116
-
117
-
118
-
119
-
120
-
121
-
122
-
123
-
124
-
125
-
126
-
127
-
128
-
129
-
130
-
131
-
132
-
133
-
134
-
135
-
136
-
137
-
138
-
139
-
140
-
141
-
142
-
143
-
144
-
145
-
146
-
147
-
148
-
149
-
150
-
151
-
152
-
153
-
154
-
155
-
156
-
157
-
158
-
159
-
160
-
161
-
162
-
163
-
164
-
165
-
166
-
167
-
168
-
169
-
170
-
171
-
172
-
173
-
174
-
175
-
176
-
177
-
178
-
179
-
180
-
181
-
182
-
183
-
184
-
185
-
186
 |
 |