Canon XF100 XF100 / XF105 Instruction Manual - Page 49
Using the Focus Assistance Functions
 |
View all Canon XF100 manuals
Add to My Manuals
Save this manual to your list of manuals |
Page 49 highlights
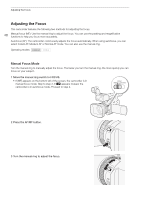
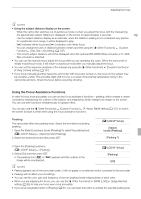
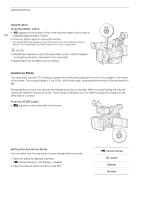
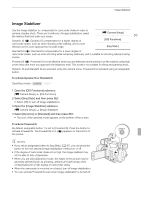
Adjusting the Focus NOTES • Using the subject distance display on the screen: - When the camcorder switches out of autofocus mode or when you adjust the focus with the manual ring, the approximate subject distance is displayed on the screen for approximately 3 seconds. 49 - Use the subject distance display as an estimate; when the distance reading is not considered very precise for a particular zoom range, it will be displayed in gray. - [f] indicates infinity focus and [f-] indicates over infinity focus. - You can change the units of distance between meters and feet using the [J Other Functions] [Custom Function] [Obj. Dist. Unit] setting (0 107). - The correct subject distance will not be displayed when the optional WD-H58W Wide-converter or TL-H58 Tele-converter is attached. • You can use the manual ring to adjust the focus while you are operating the zoom. When the camcorder is initially in autofocus mode, it will return to autofocus mode after you manually adjust the focus. • You can set the response sensitivity of the manual ring using the [J Other Functions] [Custom Function] [F. Ring Control] setting (0 107). • If you focus manually and then leave the camcorder with the power turned on, the focus on the subject may be lost after a while. This possible slight shift in focus is a result of the internal temperature rising in the camcorder and lens. Check the focus before resuming shooting. Using the Focus Assistance Functions In order to focus more accurately, you can use two focus assistance functions - peaking, which creates a clearer contrast by emphasizing the outlines of the subject, and magnifying, which enlarges the image on the screen. You can use both functions simultaneously for greater effect. You can also use the [J Other Functions] [Custom Function] [F. Assist. B&W] setting (0 107) to switch the screen to black & white while using the focus assistance functions. Peaking The camcorder offers two peaking levels. Select the level before activating peaking. 1 Open the [Select] submenu (under [Peaking]) to select the peaking level. [M LCD/VF Setup] [Select] (under [Peaking]) 2 Select the desired level and then press SET. [M LCD/VF Setup] [Select] (under [Peaking]) [Peaking 1] 3 Open the [Peaking] submenu. [M LCD/VF Setup] [Peaking] 4 Select [On] and then press SET. • The peaking icon (a or b) appears and the outlines in the image will be emphasized. [M LCD/VF Setup] [Peaking] [Off] NOTES • Peaking appears only on the camcorder screen. It will not appear on an external monitor connected to the camcorder. • Peaking will not affect your recordings. • You can set the color, gain and frequency of the two peaking levels independently of each other. • When you are adjusting the focus, you can use the [J Other Functions] [WFM (LCD)] [Edge Monitor] setting (0 85) to help you focus even more accurately. • If you set an assignable button to [Peaking] (0 97), you can press the button to activate the selected peaking level.
-
 1
1 -
2
-
3
-
4
-
5
-
6
-
7
-
8
-
9
-
10
-
11
-
12
-
13
-
14
-
15
-
16
-
17
-
18
-
19
-
20
-
21
-
22
-
23
-
24
-
25
-
26
-
27
-
28
-
29
-
30
-
31
-
32
-
33
-
34
-
35
-
36
-
37
-
38
-
39
-
40
-
41
-
42
-
43
-
 44
44 -
 45
45 -
 46
46 -
 47
47 -
 48
48 -
 49
49 -
 50
50 -
 51
51 -
 52
52 -
 53
53 -
 54
54 -
55
-
56
-
57
-
58
-
59
-
60
-
61
-
62
-
63
-
64
-
65
-
66
-
67
-
68
-
69
-
70
-
71
-
72
-
73
-
74
-
75
-
76
-
77
-
78
-
79
-
80
-
81
-
82
-
83
-
84
-
85
-
86
-
87
-
88
-
89
-
90
-
91
-
92
-
93
-
94
-
95
-
96
-
97
-
98
-
99
-
100
-
101
-
102
-
103
-
104
-
105
-
106
-
107
-
108
-
109
-
110
-
111
-
112
-
113
-
114
-
115
-
116
-
117
-
118
-
119
-
120
-
121
-
122
-
123
-
124
-
125
-
126
-
127
-
128
-
129
-
130
-
131
-
132
-
133
-
134
-
135
-
136
-
137
-
138
-
139
-
140
-
141
-
142
-
143
-
144
-
145
-
146
-
147
-
148
-
149
-
150
-
151
-
152
-
153
-
154
-
155
-
156
-
157
-
158
-
159
-
160
-
161
-
162
-
163
-
164
-
165
-
166
-
167
-
168
-
169
-
170
-
171
-
172
-
173
-
174
-
175
-
176
-
177
-
178
-
179
-
180
-
181
-
182
-
183
-
184
-
185
-
186
 |
 |