Canon XF100 XF100 / XF105 Instruction Manual - Page 42
Custom Picture Settings, Using Metadata - video camera
 |
View all Canon XF100 manuals
Add to My Manuals
Save this manual to your list of manuals |
Page 42 highlights
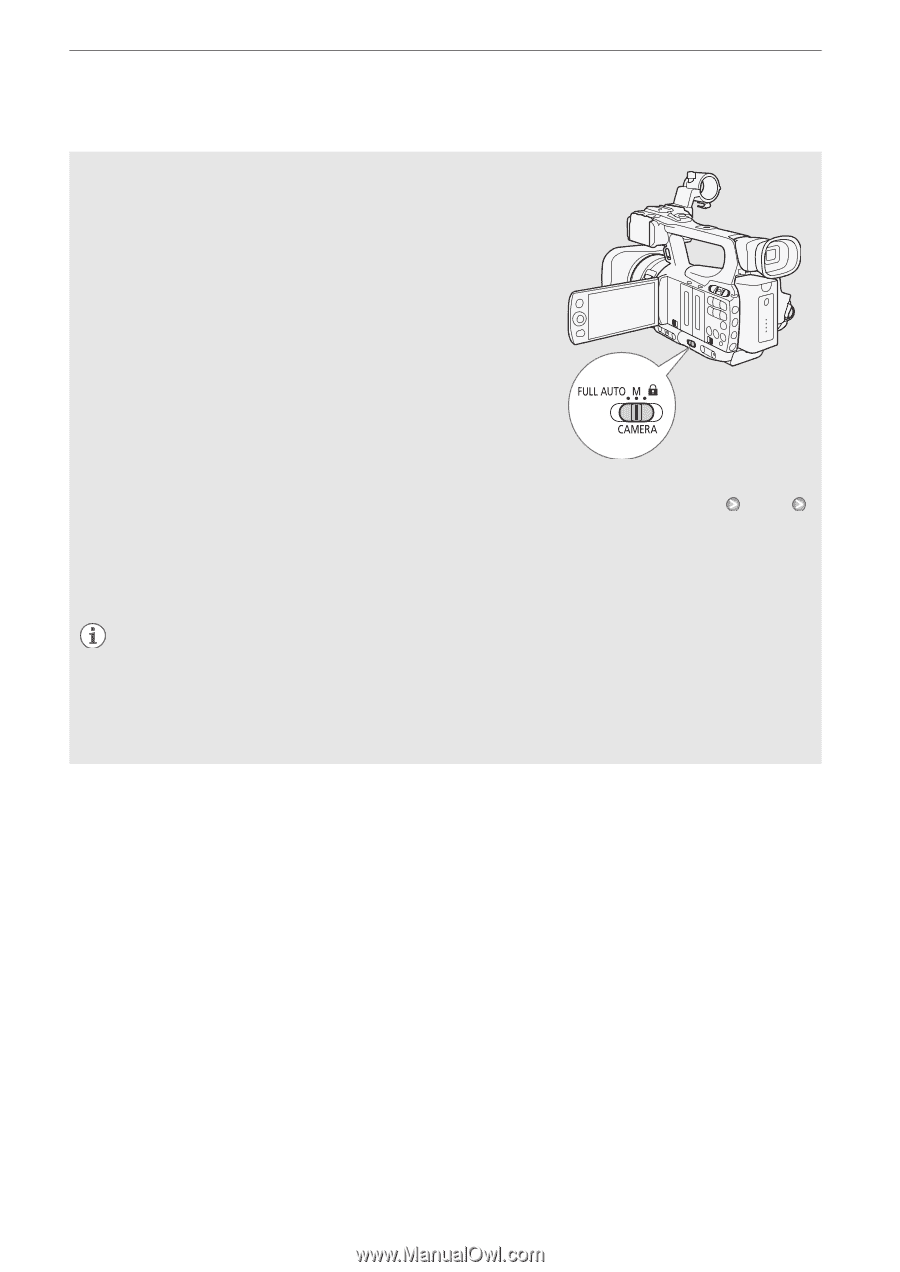
Recording Video Recording in Full Auto Mode Move the CAMERA switch to FULL AUTO to change the camcorder to full auto mode. In full auto mode, the camcorder automatically sets the 42 iris, gain, shutter speed, and white balance. The camcorder will continuously adjust the brightness and white balance automatically*. In full auto mode, however, the autofocus will not be turned on. * The light metering mode (0 59) will be set to [Standard], the AE level (0 59) will be set to [±0] and the AGC limit (0 54) will be set to [Off/24 dB]. Locking Buttons Moving the CAMERA switch to R will lock the following buttons: IRIS, GAIN, SHUTTER, WB, S, AF/MF. Doing so will also lock the settings of the corresponding functions. This is useful in preventing settings from being changed due to inadvertently pressing one of the buttons. About Clips When the camcorder records a clip, it also assigns a 6-character clip name consisting of a 2-letter prefix and 4 numerals (for example, "AA0001"). The numerals increase every time a clip is recorded. You can set the initial clip name in advance using the [J Other Functions] [Clips] [Title Prefix] and [Number Setting] settings. You cannot change the clip name after the clip is recorded. The video file (stream) in a clip will be split approximately every 2 GB for clips with a long recording time. Even in such case, playback will be continuous. NOTES • If you are recording with two CF cards and the CF card you are using becomes full while recording, the clip will continue uninterrupted on the other CF card when relay recording (0 39) is activated. In such case, the recording will be recorded as separate clips. • If you record using the custom picture and metadata settings, those settings will be recorded with the clip. For more details, refer to Custom Picture Settings (0 99) and Using Metadata (0 82).
-
 1
1 -
2
-
3
-
4
-
5
-
6
-
7
-
8
-
9
-
10
-
11
-
12
-
13
-
14
-
15
-
16
-
17
-
18
-
19
-
20
-
21
-
22
-
23
-
24
-
25
-
26
-
27
-
28
-
29
-
30
-
31
-
32
-
33
-
34
-
35
-
36
-
 37
37 -
 38
38 -
 39
39 -
 40
40 -
 41
41 -
 42
42 -
 43
43 -
 44
44 -
 45
45 -
 46
46 -
 47
47 -
48
-
49
-
50
-
51
-
52
-
53
-
54
-
55
-
56
-
57
-
58
-
59
-
60
-
61
-
62
-
63
-
64
-
65
-
66
-
67
-
68
-
69
-
70
-
71
-
72
-
73
-
74
-
75
-
76
-
77
-
78
-
79
-
80
-
81
-
82
-
83
-
84
-
85
-
86
-
87
-
88
-
89
-
90
-
91
-
92
-
93
-
94
-
95
-
96
-
97
-
98
-
99
-
100
-
101
-
102
-
103
-
104
-
105
-
106
-
107
-
108
-
109
-
110
-
111
-
112
-
113
-
114
-
115
-
116
-
117
-
118
-
119
-
120
-
121
-
122
-
123
-
124
-
125
-
126
-
127
-
128
-
129
-
130
-
131
-
132
-
133
-
134
-
135
-
136
-
137
-
138
-
139
-
140
-
141
-
142
-
143
-
144
-
145
-
146
-
147
-
148
-
149
-
150
-
151
-
152
-
153
-
154
-
155
-
156
-
157
-
158
-
159
-
160
-
161
-
162
-
163
-
164
-
165
-
166
-
167
-
168
-
169
-
170
-
171
-
172
-
173
-
174
-
175
-
176
-
177
-
178
-
179
-
180
-
181
-
182
-
183
-
184
-
185
-
186
 |
 |