Canon XF100 XF100 / XF105 Instruction Manual - Page 117
Using the Clip Menu, Displaying Clip Information
 |
View all Canon XF100 manuals
Add to My Manuals
Save this manual to your list of manuals |
Page 117 highlights
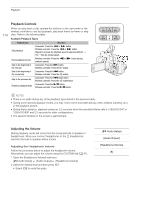
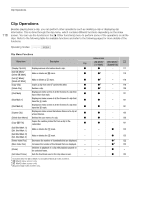
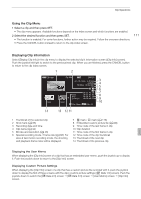
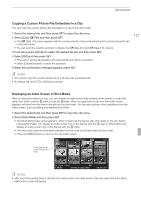
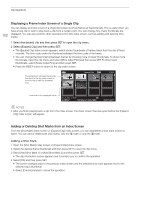
Clip Operations Using the Clip Menu 1 Select a clip and then press SET. • The clip menu appears. Available functions depend on the index screen and which functions are enabled. 2 Select the desired function and then press SET. • The function is enabled. For some functions, further action may be required. Follow the onscreen directions. • Press the CANCEL button instead to return to the clip index screen. 117 Displaying Clip Information Select [Display Clip Info] in the clip menu to display the selected clip's information screen ([Clip Info] screen). Push the joystick left/right to switch to the previous/next clip. When you are finished, press the CANCEL button to return to the clip index screen. 1 2 3 4 5 6 7 8 9 10 14 13 12 11 1 Thumbnail of the selected clip 2 Shot mark (0 86) 3 Recording date and time 4 Clip name (0 42) 5 Bit rate and resolution (0 46) 6 Special recording mode / Frame rate (0 88): For slow & fast motion recording mode, the shooting and playback frame rates will be displayed. 7 e mark / Z mark (0 118) 8 Embedded custom picture file (0 99) 9 Time code of the last frame in clip 10 Clip duration 11 Time code of the first frame in clip 12 Time code of the clip thumbnail 13 Thumbnail of the next clip 14 Thumbnail of the previous clip Displaying the User Memo When displaying the [Clip Info] screen of a clip that has an embedded user memo, push the joystick up to display it. Push the joystick down to return to the [Clip Info] screen. Displaying Custom Picture Settings When displaying the [Clip Info] screen of a clip that has a custom picture file recorded with it, push the joystick down to display the first of three screens with the clip's custom picture settings ([X Data 1/3] screen). Push the joystick down to switch the [X Data 2/3] screen J [X Data 3/3] screen J [User Memo] screen J [Clip Info] screen.
-
 1
1 -
2
-
3
-
4
-
5
-
6
-
7
-
8
-
9
-
10
-
11
-
12
-
13
-
14
-
15
-
16
-
17
-
18
-
19
-
20
-
21
-
22
-
23
-
24
-
25
-
26
-
27
-
28
-
29
-
30
-
31
-
32
-
33
-
34
-
35
-
36
-
37
-
38
-
39
-
40
-
41
-
42
-
43
-
44
-
45
-
46
-
47
-
48
-
49
-
50
-
51
-
52
-
53
-
54
-
55
-
56
-
57
-
58
-
59
-
60
-
61
-
62
-
63
-
64
-
65
-
66
-
67
-
68
-
69
-
70
-
71
-
72
-
73
-
74
-
75
-
76
-
77
-
78
-
79
-
80
-
81
-
82
-
83
-
84
-
85
-
86
-
87
-
88
-
89
-
90
-
91
-
92
-
93
-
94
-
95
-
96
-
97
-
98
-
99
-
100
-
101
-
102
-
103
-
104
-
105
-
106
-
107
-
108
-
109
-
110
-
111
-
 112
112 -
 113
113 -
 114
114 -
 115
115 -
 116
116 -
 117
117 -
 118
118 -
 119
119 -
 120
120 -
 121
121 -
 122
122 -
123
-
124
-
125
-
126
-
127
-
128
-
129
-
130
-
131
-
132
-
133
-
134
-
135
-
136
-
137
-
138
-
139
-
140
-
141
-
142
-
143
-
144
-
145
-
146
-
147
-
148
-
149
-
150
-
151
-
152
-
153
-
154
-
155
-
156
-
157
-
158
-
159
-
160
-
161
-
162
-
163
-
164
-
165
-
166
-
167
-
168
-
169
-
170
-
171
-
172
-
173
-
174
-
175
-
176
-
177
-
178
-
179
-
180
-
181
-
182
-
183
-
184
-
185
-
186
 |
 |