Cisco 3825 Hardware Installation Guide - Page 70
Removing or Replacing Application and Service Network Modules, Example 2-1 - commands
 |
UPC - 746320981505
View all Cisco 3825 manuals
Add to My Manuals
Save this manual to your list of manuals |
Page 70 highlights
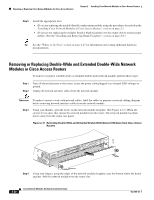
Removing or Replacing Cisco Network Modules for Cisco Access Routers Chapter 2 Installing Cisco Network Modules in Cisco Access Routers Step 1 Step 2 Initiate a console session with your Cisco access router. Enter interface configuration mode and shut down each interface on the network module you plan to remove. (See Example 2-1.) Example 2-1 Shutting Down Interfaces on Cisco Network Modules Router(config)# interface fastethernet 1/0 Router(config-if)# shutdown Tip To see information for all interfaces available on the network module, use the show interfaces command. Step 3 Repeat Step 2 for each interface on the network module. Step 4 Unplug all cables from the network module. Timesaver To make it easier to work with network cables, label the cables or prepare a network cabling diagram before removing network interface cables from the network module. Step 5 Step 6 Step 7 Step 8 Step 9 Step 10 Remove the network module as described in the "Removing or Replacing Single-Wide, Extended Single-Wide, and Extension Voice Network Modules from Cisco Access Routers" and "Removing or Replacing Double-Wide and Extended Double-Wide Network Modules in Cisco Access Routers" sections. Install a replacement network module. If you are not planning to install another network module at this time, install a blank faceplate over the network module slot. (See the "Installing Blank Faceplates on Cisco Access Routers" section on page 2-7.) Connect the cables removed from the previous network module. Confirm that the network module LEDs come on, and that the Active/Ready LEDs on the front panel of the router also come on. For further information on network module LEDs, see the chapter describing your specific network module. Initiate a console session with your Cisco access router. Enter interface configuration mode and activate each interface on the network module, as shown in Example 2-2. Example 2-2 Activating Interfaces on Cisco Network Modules Router(config)# interface fastethernet 1/0 Router(config-if)# no shutdown Step 11 Repeat Step 10 for every interface on the network module. Removing or Replacing Application and Service Network Modules Application and service network modules use hard disks and require special software procedures prior to removal or replacement. 2-22 Cisco Network Modules Hardware Installation Guide OL-2485-20
-
 1
1 -
2
-
3
-
4
-
5
-
6
-
7
-
8
-
9
-
10
-
11
-
12
-
13
-
14
-
15
-
16
-
17
-
18
-
19
-
20
-
21
-
22
-
23
-
24
-
25
-
26
-
27
-
28
-
29
-
30
-
31
-
32
-
33
-
34
-
35
-
36
-
37
-
38
-
39
-
40
-
41
-
42
-
43
-
44
-
45
-
46
-
47
-
48
-
49
-
50
-
51
-
52
-
53
-
54
-
55
-
56
-
57
-
58
-
59
-
60
-
61
-
62
-
63
-
64
-
 65
65 -
 66
66 -
 67
67 -
 68
68 -
 69
69 -
 70
70 -
 71
71 -
 72
72 -
 73
73 -
 74
74 -
 75
75 -
76
-
77
-
78
-
79
-
80
-
81
-
82
-
83
-
84
-
85
-
86
-
87
-
88
-
89
-
90
-
91
-
92
-
93
-
94
-
95
-
96
-
97
-
98
-
99
-
100
-
101
-
102
-
103
-
104
-
105
-
106
-
107
-
108
-
109
-
110
-
111
-
112
-
113
-
114
-
115
-
116
-
117
-
118
-
119
-
120
-
121
-
122
-
123
-
124
-
125
-
126
-
127
-
128
-
129
-
130
-
131
-
132
-
133
-
134
-
135
-
136
-
137
-
138
-
139
-
140
-
141
-
142
-
143
-
144
-
145
-
146
-
147
-
148
-
149
-
150
-
151
-
152
-
153
-
154
-
155
-
156
-
157
-
158
-
159
-
160
-
161
-
162
-
163
-
164
-
165
-
166
-
167
-
168
-
169
-
170
-
171
-
172
-
173
-
174
-
175
-
176
-
177
-
178
-
179
-
180
-
181
-
182
-
183
-
184
-
185
-
186
-
187
-
188
-
189
-
190
-
191
-
192
-
193
-
194
-
195
-
196
-
197
-
198
-
199
-
200
-
201
-
202
-
203
-
204
-
205
-
206
-
207
-
208
-
209
-
210
-
211
-
212
-
213
-
214
-
215
-
216
-
217
-
218
-
219
-
220
-
221
-
222
-
223
-
224
-
225
-
226
-
227
-
228
-
229
-
230
-
231
-
232
-
233
-
234
-
235
-
236
-
237
-
238
-
239
-
240
-
241
-
242
-
243
-
244
-
245
-
246
-
247
-
248
-
249
-
250
-
251
-
252
-
253
-
254
-
255
-
256
-
257
-
258
-
259
-
260
-
261
-
262
-
263
-
264
-
265
-
266
-
267
-
268
-
269
-
270
-
271
-
272
-
273
-
274
-
275
-
276
-
277
-
278
-
279
-
280
-
281
-
282
-
283
-
284
-
285
-
286
-
287
-
288
-
289
-
290
-
291
-
292
-
293
-
294
-
295
-
296
-
297
-
298
-
299
-
300
-
301
-
302
-
303
-
304
-
305
-
306
-
307
-
308
-
309
-
310
-
311
-
312
-
313
-
314
-
315
-
316
-
317
-
318
-
319
-
320
-
321
-
322
-
323
-
324
-
325
-
326
-
327
-
328
-
329
-
330
-
331
-
332
-
333
-
334
-
335
-
336
-
337
-
338
-
339
-
340
-
341
-
342
-
343
-
344
-
345
-
346
-
347
-
348
-
349
-
350
-
351
-
352
-
353
-
354
-
355
-
356
-
357
-
358
-
359
-
360
-
361
-
362
-
363
-
364
-
365
-
366
-
367
-
368
-
369
-
370
-
371
-
372
-
373
-
374
-
375
-
376
-
377
-
378
-
379
-
380
-
381
-
382
-
383
-
384
-
385
-
386
-
387
-
388
-
389
-
390
-
391
-
392
-
393
-
394
-
395
-
396
-
397
-
398
-
399
-
400
-
401
-
402
-
403
-
404
-
405
-
406
-
407
-
408
-
409
-
410
-
411
-
412
-
413
-
414
-
415
-
416
-
417
-
418
 |
 |
