Cisco 3825 Hardware Installation Guide - Page 71
Enter, SE-netmodule, Ctrl-Shift-6, Caution, Step 1, Timesaver - can t save config
 |
UPC - 746320981505
View all Cisco 3825 manuals
Add to My Manuals
Save this manual to your list of manuals |
Page 71 highlights
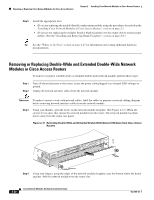
Chapter 2 Installing Cisco Network Modules in Cisco Access Routers Removing or Replacing Cisco Network Modules for Cisco Access Routers Caution Online removal of disks without proper shutdown can result in file system corruption and might render the disk unusable. The operating system on the applications or services network module must be shut down in an orderly fashion before the network module can be removed. To perform online removal of a Cisco application and service network module and insertion of a replacement, follow these steps with the router in privileged EXEC mode: Step 1 Initiate an application and service network module console session using the following command: Router# service-module service-engine slot/port session Trying 10.10.10.1, 2129 ... Open SE-netmodule> enable Password: SE-netmodule# SE-netmodule con now available Press RETURN to get started! SE-netmodule> enable Password: SE-netmodule# Timesaver Cisco application and service network modules use a blank password. Press Enter at the password prompt. Step 2 Step 3 Step 4 Step 5 Step 6 Step 7 Step 8 Save the running configuration for the network module by entering the following command from the SE-netmodule prompt: SE-netmodule# copy running-config ftp: Address or name or remote host? username/password/remote host Destination filename? filename Exit the network module console session by pressing Ctrl-Shift-6, followed by x. On the router, clear the network module console session with the following command: Router# service-module service-engine slot/port session clear Perform a graceful halt of the network module disk drive with the following command: Router# service-module service-engine slot/port shutdown Remove the network module, using the procedure described in the "Removing or Replacing Single-Wide, Extended Single-Wide, and Extension Voice Network Modules from Cisco Access Routers" section on page 2-19. Install the replacement network module, using the procedure described in the "Installing Cisco Network Modules in Cisco Access Routers" section on page 2-5. Check that the network module LEDs come on and that the Active/Ready LEDs on the router front panel also come on. This inspection ensures that connections are secure and that the new unit is operational. OL-2485-20 Cisco Network Modules Hardware Installation Guide 2-23
-
 1
1 -
2
-
3
-
4
-
5
-
6
-
7
-
8
-
9
-
10
-
11
-
12
-
13
-
14
-
15
-
16
-
17
-
18
-
19
-
20
-
21
-
22
-
23
-
24
-
25
-
26
-
27
-
28
-
29
-
30
-
31
-
32
-
33
-
34
-
35
-
36
-
37
-
38
-
39
-
40
-
41
-
42
-
43
-
44
-
45
-
46
-
47
-
48
-
49
-
50
-
51
-
52
-
53
-
54
-
55
-
56
-
57
-
58
-
59
-
60
-
61
-
62
-
63
-
64
-
65
-
 66
66 -
 67
67 -
 68
68 -
 69
69 -
 70
70 -
 71
71 -
 72
72 -
 73
73 -
 74
74 -
 75
75 -
 76
76 -
77
-
78
-
79
-
80
-
81
-
82
-
83
-
84
-
85
-
86
-
87
-
88
-
89
-
90
-
91
-
92
-
93
-
94
-
95
-
96
-
97
-
98
-
99
-
100
-
101
-
102
-
103
-
104
-
105
-
106
-
107
-
108
-
109
-
110
-
111
-
112
-
113
-
114
-
115
-
116
-
117
-
118
-
119
-
120
-
121
-
122
-
123
-
124
-
125
-
126
-
127
-
128
-
129
-
130
-
131
-
132
-
133
-
134
-
135
-
136
-
137
-
138
-
139
-
140
-
141
-
142
-
143
-
144
-
145
-
146
-
147
-
148
-
149
-
150
-
151
-
152
-
153
-
154
-
155
-
156
-
157
-
158
-
159
-
160
-
161
-
162
-
163
-
164
-
165
-
166
-
167
-
168
-
169
-
170
-
171
-
172
-
173
-
174
-
175
-
176
-
177
-
178
-
179
-
180
-
181
-
182
-
183
-
184
-
185
-
186
-
187
-
188
-
189
-
190
-
191
-
192
-
193
-
194
-
195
-
196
-
197
-
198
-
199
-
200
-
201
-
202
-
203
-
204
-
205
-
206
-
207
-
208
-
209
-
210
-
211
-
212
-
213
-
214
-
215
-
216
-
217
-
218
-
219
-
220
-
221
-
222
-
223
-
224
-
225
-
226
-
227
-
228
-
229
-
230
-
231
-
232
-
233
-
234
-
235
-
236
-
237
-
238
-
239
-
240
-
241
-
242
-
243
-
244
-
245
-
246
-
247
-
248
-
249
-
250
-
251
-
252
-
253
-
254
-
255
-
256
-
257
-
258
-
259
-
260
-
261
-
262
-
263
-
264
-
265
-
266
-
267
-
268
-
269
-
270
-
271
-
272
-
273
-
274
-
275
-
276
-
277
-
278
-
279
-
280
-
281
-
282
-
283
-
284
-
285
-
286
-
287
-
288
-
289
-
290
-
291
-
292
-
293
-
294
-
295
-
296
-
297
-
298
-
299
-
300
-
301
-
302
-
303
-
304
-
305
-
306
-
307
-
308
-
309
-
310
-
311
-
312
-
313
-
314
-
315
-
316
-
317
-
318
-
319
-
320
-
321
-
322
-
323
-
324
-
325
-
326
-
327
-
328
-
329
-
330
-
331
-
332
-
333
-
334
-
335
-
336
-
337
-
338
-
339
-
340
-
341
-
342
-
343
-
344
-
345
-
346
-
347
-
348
-
349
-
350
-
351
-
352
-
353
-
354
-
355
-
356
-
357
-
358
-
359
-
360
-
361
-
362
-
363
-
364
-
365
-
366
-
367
-
368
-
369
-
370
-
371
-
372
-
373
-
374
-
375
-
376
-
377
-
378
-
379
-
380
-
381
-
382
-
383
-
384
-
385
-
386
-
387
-
388
-
389
-
390
-
391
-
392
-
393
-
394
-
395
-
396
-
397
-
398
-
399
-
400
-
401
-
402
-
403
-
404
-
405
-
406
-
407
-
408
-
409
-
410
-
411
-
412
-
413
-
414
-
415
-
416
-
417
-
418
 |
 |
