Dell Dimension 9200 Owner's Manual - Page 106
Installing a Hard Drive, If your replacement hard drive does not have the hard drive bracket attached
 |
View all Dell Dimension 9200 manuals
Add to My Manuals
Save this manual to your list of manuals |
Page 106 highlights
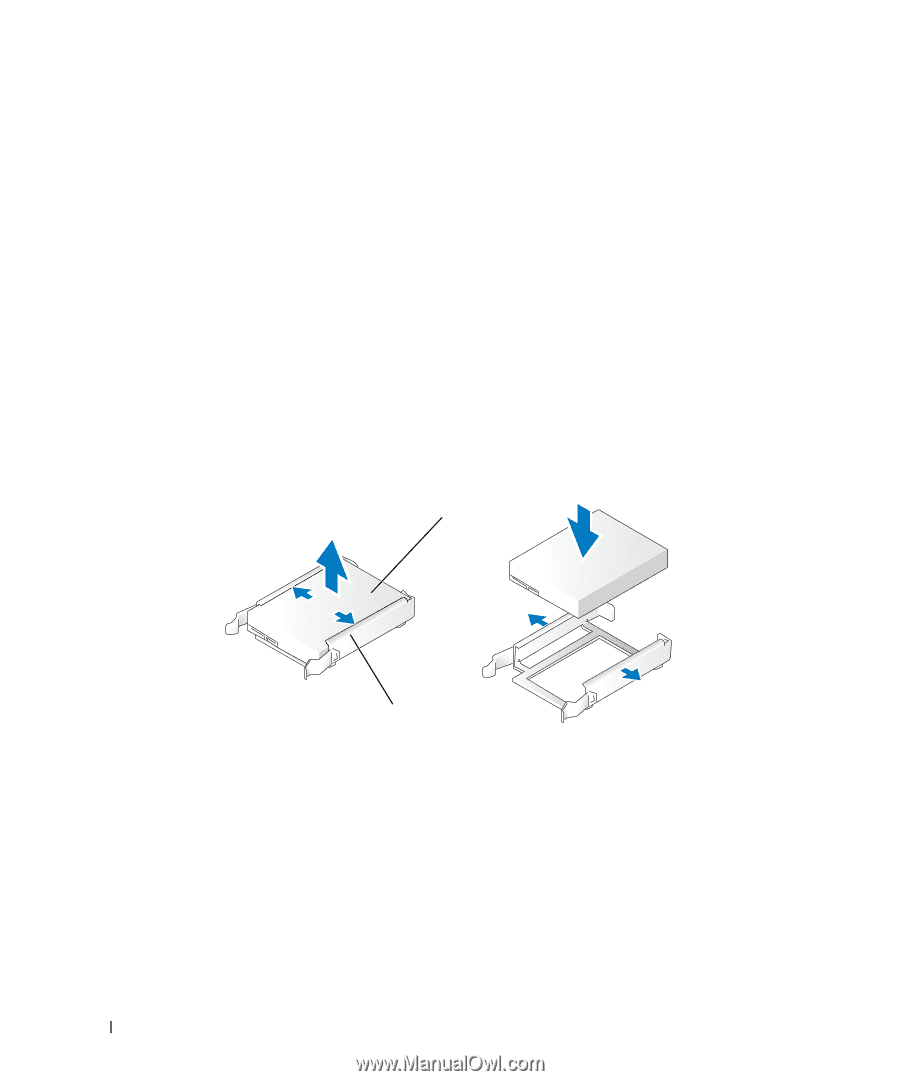
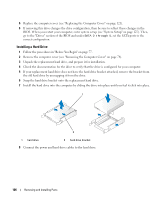
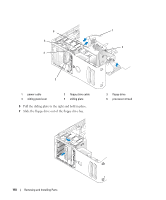
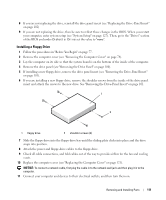
5 Replace the computer cover (see "Replacing the Computer Cover" on page 121). 6 If removing this drive changes the drive configuration, then be sure to reflect these changes in the BIOS. When you restart your computer, enter system setup (see "System Setup" on page 127). Then, go to the "Drives" section of the BIOS and under SATA 0 through 5, set the SATA ports to the correct configuration. Installing a Hard Drive 1 Follow the procedures in "Before You Begin" on page 77. 2 Remove the computer cover (see "Removing the Computer Cover" on page 78). 3 Unpack the replacement hard drive, and prepare it for installation. 4 Check the documentation for the drive to verify that the drive is configured for your computer. 5 If your replacement hard drive does not have the hard drive bracket attached, remove the bracket from the old hard drive by unsnapping it from the drive. 6 Snap the hard drive bracket onto the replacement hard drive. 7 Install the hard drive into the computer by sliding the drive into place until you feel it click into place. 1 2 1 hard drive 2 hard drive bracket 8 Connect the power and hard drive cables to the hard drive. 106 Removing and Installing Parts
-
 1
1 -
2
-
3
-
4
-
5
-
6
-
7
-
8
-
9
-
10
-
11
-
12
-
13
-
14
-
15
-
16
-
17
-
18
-
19
-
20
-
21
-
22
-
23
-
24
-
25
-
26
-
27
-
28
-
29
-
30
-
31
-
32
-
33
-
34
-
35
-
36
-
37
-
38
-
39
-
40
-
41
-
42
-
43
-
44
-
45
-
46
-
47
-
48
-
49
-
50
-
51
-
52
-
53
-
54
-
55
-
56
-
57
-
58
-
59
-
60
-
61
-
62
-
63
-
64
-
65
-
66
-
67
-
68
-
69
-
70
-
71
-
72
-
73
-
74
-
75
-
76
-
77
-
78
-
79
-
80
-
81
-
82
-
83
-
84
-
85
-
86
-
87
-
88
-
89
-
90
-
91
-
92
-
93
-
94
-
95
-
96
-
97
-
98
-
99
-
100
-
 101
101 -
 102
102 -
 103
103 -
 104
104 -
 105
105 -
 106
106 -
 107
107 -
 108
108 -
 109
109 -
 110
110 -
 111
111 -
112
-
113
-
114
-
115
-
116
-
117
-
118
-
119
-
120
-
121
-
122
-
123
-
124
-
125
-
126
-
127
-
128
-
129
-
130
-
131
-
132
-
133
-
134
-
135
-
136
-
137
-
138
-
139
-
140
-
141
-
142
-
143
-
144
-
145
-
146
-
147
-
148
-
149
-
150
-
151
-
152
-
153
-
154
-
155
-
156
-
157
-
158
-
159
-
160
-
161
-
162
-
163
-
164
-
165
-
166
-
167
-
168
-
169
-
170
-
171
-
172
 |
 |