Dell Dimension 9200 Owner's Manual - Page 120
Battery, Replacing the Battery - year
 |
View all Dell Dimension 9200 manuals
Add to My Manuals
Save this manual to your list of manuals |
Page 120 highlights
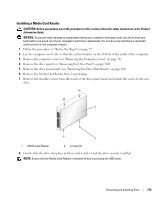
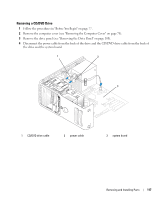
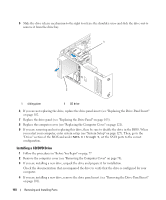
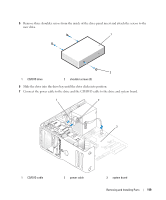
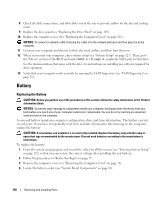
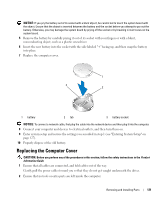
8 Check all cable connections, and fold cables out of the way to provide airflow for the fan and cooling vents. 9 Replace the drive panel(see "Replacing the Drive Panel" on page 103). 10 Replace the computer cover (See "Replacing the Computer Cover" on page 121). NOTICE: To connect a network cable, first plug the cable in to the network wall jack and then plug it in to the computer. 11 Connect your computer and devices to their electrical outlets, and then turn them on. 12 When you restart your computer, enter system setup (see "System Setup" on page 127). Then, go to the "Drives" section of the BIOS and under SATA 0 through 5, enable the SATA port for this drive. See the documentation that came with the drive for instructions on installing any software required for drive operation. 13 Verify that your computer works correctly by running the Dell Diagnostics (see "Dell Diagnostics" on page 52). Battery Replacing the Battery CAUTION: Before you perform any of the procedures in this section, follow the safety instructions in the Product Information Guide. NOTICE: To prevent static damage to components inside your computer, discharge static electricity from your body before you touch any of your computer's electronic components. You can do so by touching an unpainted metal surface on the computer. A coin-cell battery maintains computer configuration, date, and time information. The battery can last several years. If you have to repeatedly reset time and date information after turning on the computer, replace the battery. CAUTION: A new battery can explode if it is incorrectly installed. Replace the battery only with the same or equivalent type recommended by the manufacturer. Discard used batteries according to the manufacturer's instructions. To replace the battery: 1 Enter the system setup program and record the values for all the screens (see "Entering System Setup" on page 127) so that you can restore the correct settings after installing the new battery. 2 Follow the procedures in "Before You Begin" on page 77. 3 Remove the computer cover (see "Removing the Computer Cover" on page 78). 4 Locate the battery socket (see "System Board Components" on page 81). 120 Removing and Installing Parts
-
 1
1 -
2
-
3
-
4
-
5
-
6
-
7
-
8
-
9
-
10
-
11
-
12
-
13
-
14
-
15
-
16
-
17
-
18
-
19
-
20
-
21
-
22
-
23
-
24
-
25
-
26
-
27
-
28
-
29
-
30
-
31
-
32
-
33
-
34
-
35
-
36
-
37
-
38
-
39
-
40
-
41
-
42
-
43
-
44
-
45
-
46
-
47
-
48
-
49
-
50
-
51
-
52
-
53
-
54
-
55
-
56
-
57
-
58
-
59
-
60
-
61
-
62
-
63
-
64
-
65
-
66
-
67
-
68
-
69
-
70
-
71
-
72
-
73
-
74
-
75
-
76
-
77
-
78
-
79
-
80
-
81
-
82
-
83
-
84
-
85
-
86
-
87
-
88
-
89
-
90
-
91
-
92
-
93
-
94
-
95
-
96
-
97
-
98
-
99
-
100
-
101
-
102
-
103
-
104
-
105
-
106
-
107
-
108
-
109
-
110
-
111
-
112
-
113
-
114
-
 115
115 -
 116
116 -
 117
117 -
 118
118 -
 119
119 -
 120
120 -
 121
121 -
 122
122 -
 123
123 -
 124
124 -
 125
125 -
126
-
127
-
128
-
129
-
130
-
131
-
132
-
133
-
134
-
135
-
136
-
137
-
138
-
139
-
140
-
141
-
142
-
143
-
144
-
145
-
146
-
147
-
148
-
149
-
150
-
151
-
152
-
153
-
154
-
155
-
156
-
157
-
158
-
159
-
160
-
161
-
162
-
163
-
164
-
165
-
166
-
167
-
168
-
169
-
170
-
171
-
172
 |
 |
