Dell PowerConnect 5448 User's Guide - Page 43
Initial Configuration, Setup Wizard - vlan routing
 |
View all Dell PowerConnect 5448 manuals
Add to My Manuals
Save this manual to your list of manuals |
Page 43 highlights
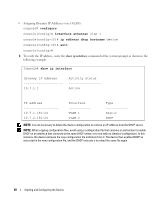
01-Jan-xxxx 01:02:01 %Box-I-SFP-PRESENT-CHNG: unit_id 1 SFP 0 status is not present. 01-Jan-xxxx 01:02:01 %Box-I-SFP-PRESENT-CHNG: unit_id 1 SFP 1 status is not present. 01-Jan-xxxx 01:02:01 %Box-I-SFP-PRESENT-CHNG: unit_id 1 SFP 2 status is not present. 01-Jan-xxxx 01:02:01 %Box-I-SFP-PRESENT-CHNG: unit_id 1 SFP 3 status is not present. After the device boots successfully, a system prompt is displayed (console>) which is used to configure the device. However, before configuring the device, ensure that the latest software version is installed on the device. If it is not the latest version, download and install the latest version. For more information on downloading the latest version, see the "Software Download" on page 54. Initial Configuration NOTE: Before proceeding, read the release notes for this product. Download the release notes from the Dell Support website at support.dell.com. NOTE: The initial configuration assumes the following: • The PowerConnect device was never configured before and is in the same state as when you received it. • The PowerConnect device booted successfully. • The console connection is established and the console prompt is displayed on the screen of a VT100 terminal device. The initial device configuration is through the Console port. After the initial configuration, the device can be managed either from the already connected Console port or remotely through an interface defined during the initial configuration. If this is the first time the device has booted up, or if the configuration file is empty because the device has not been configured, the user is prompted to use the Setup Wizard. The Setup Wizard provides guidance through the initial device configuration, and gets the device up and running as quickly as possible. NOTE: Obtain the following information from the network administrator before configuring the device: • The IP address to be assigned to the VLAN 1 interface through which the device is to be managed (by default, every port is a member of the VLAN 1) • The IP subnet mask for the network • The default gateway (next hop router) IP address for configuring the default route. • SNMP community string and SNMP management system IP address (optional) • Username and password The Setup Wizard guides you through the initial switch configuration, and gets the system up and running as quickly as possible. You can skip the Setup Wizard, and manually configure the device through the device CLI mode. Starting and Configuring the Device 43
-
 1
1 -
2
-
3
-
4
-
5
-
6
-
7
-
8
-
9
-
10
-
11
-
12
-
13
-
14
-
15
-
16
-
17
-
18
-
19
-
20
-
21
-
22
-
23
-
24
-
25
-
26
-
27
-
28
-
29
-
30
-
31
-
32
-
33
-
34
-
35
-
36
-
37
-
 38
38 -
 39
39 -
 40
40 -
 41
41 -
 42
42 -
 43
43 -
 44
44 -
 45
45 -
 46
46 -
 47
47 -
 48
48 -
49
-
50
-
51
-
52
-
53
-
54
-
55
-
56
-
57
-
58
-
59
-
60
-
61
-
62
-
63
-
64
-
65
-
66
-
67
-
68
-
69
-
70
-
71
-
72
-
73
-
74
-
75
-
76
-
77
-
78
-
79
-
80
-
81
-
82
-
83
-
84
-
85
-
86
-
87
-
88
-
89
-
90
-
91
-
92
-
93
-
94
-
95
-
96
-
97
-
98
-
99
-
100
-
101
-
102
-
103
-
104
-
105
-
106
-
107
-
108
-
109
-
110
-
111
-
112
-
113
-
114
-
115
-
116
-
117
-
118
-
119
-
120
-
121
-
122
-
123
-
124
-
125
-
126
-
127
-
128
-
129
-
130
-
131
-
132
-
133
-
134
-
135
-
136
-
137
-
138
-
139
-
140
-
141
-
142
-
143
-
144
-
145
-
146
-
147
-
148
-
149
-
150
-
151
-
152
-
153
-
154
-
155
-
156
-
157
-
158
-
159
-
160
-
161
-
162
-
163
-
164
-
165
-
166
-
167
-
168
-
169
-
170
-
171
-
172
-
173
-
174
-
175
-
176
-
177
-
178
-
179
-
180
-
181
-
182
-
183
-
184
-
185
-
186
-
187
-
188
-
189
-
190
-
191
-
192
-
193
-
194
-
195
-
196
-
197
-
198
-
199
-
200
-
201
-
202
-
203
-
204
-
205
-
206
-
207
-
208
-
209
-
210
-
211
-
212
-
213
-
214
-
215
-
216
-
217
-
218
-
219
-
220
-
221
-
222
-
223
-
224
-
225
-
226
-
227
-
228
-
229
-
230
-
231
-
232
-
233
-
234
-
235
-
236
-
237
-
238
-
239
-
240
-
241
-
242
-
243
-
244
-
245
-
246
-
247
-
248
-
249
-
250
-
251
-
252
-
253
-
254
-
255
-
256
-
257
-
258
-
259
-
260
-
261
-
262
-
263
-
264
-
265
-
266
-
267
-
268
-
269
-
270
-
271
-
272
-
273
-
274
-
275
-
276
-
277
-
278
-
279
-
280
-
281
-
282
-
283
-
284
-
285
-
286
-
287
-
288
-
289
-
290
-
291
-
292
-
293
-
294
-
295
-
296
-
297
-
298
-
299
-
300
-
301
-
302
-
303
-
304
-
305
-
306
-
307
-
308
-
309
-
310
-
311
-
312
-
313
-
314
-
315
-
316
-
317
-
318
-
319
-
320
-
321
-
322
-
323
-
324
-
325
-
326
-
327
-
328
-
329
-
330
-
331
-
332
-
333
-
334
-
335
-
336
-
337
-
338
-
339
-
340
-
341
-
342
-
343
-
344
-
345
-
346
-
347
-
348
-
349
-
350
-
351
-
352
-
353
-
354
-
355
-
356
-
357
-
358
-
359
-
360
-
361
-
362
-
363
-
364
-
365
-
366
-
367
-
368
-
369
-
370
-
371
-
372
-
373
-
374
-
375
-
376
-
377
-
378
-
379
-
380
-
381
-
382
-
383
-
384
-
385
-
386
-
387
-
388
-
389
-
390
-
391
-
392
-
393
-
394
-
395
-
396
-
397
-
398
-
399
-
400
-
401
-
402
-
403
-
404
-
405
-
406
-
407
-
408
-
409
-
410
-
411
-
412
-
413
-
414
-
415
-
416
-
417
-
418
-
419
-
420
-
421
-
422
-
423
-
424
-
425
-
426
-
427
-
428
-
429
-
430
-
431
-
432
-
433
-
434
-
435
-
436
-
437
-
438
-
439
-
440
-
441
-
442
-
443
-
444
 |
 |
