Denon AVR-5805MK2 Owners Manual - Page 35
Preliminary measurements
 |
UPC - 081757507400
View all Denon AVR-5805MK2 manuals
Add to My Manuals
Save this manual to your list of manuals |
Page 35 highlights
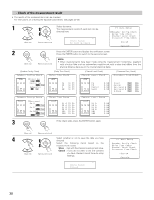
III. Preliminary measurements • This procedure is used to automatically determine the background noise, whether or not speakers are connected, and the polarities of the connected speakers. 1 (Main unit) CH SEL ENTER Select the "Start" and press the Cursor left button. Start the preliminary measurements. (Main unit) *Auto Setup Start CH SEL ENTER (Remote control unit) (Remote control unit) Cautions when making the measurements: • It is not possible to measure properly if there are any obstacles between the speakers and microphone. Check that there are no obstacles. • Please do not stand between or near the speakers and the microphone during the measurements. • To avoid affecting the measurements, turn off the air-conditioner or any other device that makes noise and take the measurements with the room as quiet as possible. • Measurement is canceled when MASTER VOLUME is operated while the Auto Setup is performed. 2 The screen shown at the right appears once the CH SEL preliminary measurements are completed. ENTER Press the ENTER button to switch the Speaker Detect Check screen. (Main unit) (Remote control unit) Sp Detect Check 3 Check the results of the speaker detection. CH SEL Press the ENTER button to switch to the second screen. ENTER If the check ends, press the ENTER button again. (Main unit) (Remote control unit) Yes No Yes No Yes No [First screen] Yes No Yes No Yes No 2spkrs 1spkr [Second screen] NOTE: • Subsequent measurements will be made based on this data, so be sure to check the results of these measurements. If the results are not as expected or if an error message is displayed, select "Retry" and perform the measurements again. (For details on the error messages, see page 39.) If the results of remeasurement are still not as expected or if an error message is displayed, turn off the power switch and check the speaker connections. Then start the measurements again from the beginning. 35
-
 1
1 -
2
-
3
-
4
-
5
-
6
-
7
-
8
-
9
-
10
-
11
-
12
-
13
-
14
-
15
-
16
-
17
-
18
-
19
-
20
-
21
-
22
-
23
-
24
-
25
-
26
-
27
-
28
-
29
-
 30
30 -
 31
31 -
 32
32 -
 33
33 -
 34
34 -
 35
35 -
 36
36 -
 37
37 -
 38
38 -
 39
39 -
 40
40 -
41
-
42
-
43
-
44
-
45
-
46
-
47
-
48
-
49
-
50
-
51
-
52
-
53
-
54
-
55
-
56
-
57
-
58
-
59
-
60
-
61
-
62
-
63
-
64
-
65
-
66
-
67
-
68
-
69
-
70
-
71
-
72
-
73
-
74
-
75
-
76
-
77
-
78
-
79
-
80
-
81
-
82
-
83
-
84
-
85
-
86
-
87
-
88
-
89
-
90
-
91
-
92
-
93
-
94
-
95
-
96
-
97
-
98
-
99
-
100
-
101
-
102
-
103
-
104
-
105
-
106
-
107
-
108
-
109
-
110
-
111
-
112
-
113
-
114
-
115
-
116
-
117
-
118
-
119
-
120
-
121
-
122
-
123
-
124
-
125
-
126
-
127
-
128
-
129
-
130
-
131
-
132
-
133
-
134
-
135
-
136
-
137
-
138
-
139
-
140
-
141
-
142
-
143
-
144
-
145
-
146
-
147
-
148
-
149
-
150
-
151
-
152
-
153
-
154
-
155
-
156
-
157
-
158
-
159
-
160
-
161
-
162
-
163
-
164
-
165
-
166
-
167
-
168
-
169
-
170
-
171
-
172
-
173
-
174
-
175
-
176
-
177
-
178
-
179
-
180
-
181
-
182
-
183
-
184
-
185
-
186
-
187
-
188
-
189
-
190
-
191
-
192
 |
 |
