Denon AVR-5805MK2 Owners Manual - Page 76
Setting the Audio Delay
 |
UPC - 081757507400
View all Denon AVR-5805MK2 manuals
Add to My Manuals
Save this manual to your list of manuals |
Page 76 highlights
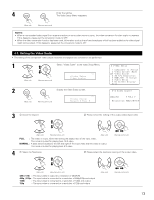
5 (Main unit) CH SEL ENTER (Remote control unit) 6 (Main unit) CH SEL ENTER (Remote control unit) 7 (Main unit) CH SEL ENTER (Remote control unit) Select the method for playing the audio signals included in the HDMI input signal. Select "TV" or "AMP". AMP : The audio signals are played according to the AVR-5805's speaker systems. TV : The audio signals are played according to the number of playable channels on the monitor TV connected to the AVR5805's HDMI monitor output terminal. NOTE: • If a monitor is connected with an HDMI cable but the monitor is not compatible with HDMI audio signal playback, only the video signals are output to the monitor from the AVR-5805 (DVI mode). Use the STATUS button to check which mode is set for outputting HDMI signals from the AVR-5805 (HDMI and DVI modes). D VD M on ito r V DP T V D BS A ud io VC R- 1 VC R- 2 VC R- 3 VC R- 4 V. Au x *HDMI/DVI In Audio : AMP (Main unit) Select the input for the playback of signals when the audio signal of HDMI can not be reproduced. When the audio signal of HDMI has become unlocked, the unit automatically changes over to the set connector (ANALOG or EXT. IN). 1~3 correspond to each HDMI 1~3 input terminal. Select input signal (ANALOG or EXT. IN). CH SEL ENTER (Remote control unit) Enter the setting. CH SEL The Video Setup Menu reappears. ENTER D VD M on ito r V DP T V D BS A ud io VC R- 1 VC R- 2 VC R- 3 VC R- 4 V. Au x *HDMI/DVI In 1: ANALOG (Main unit) (Remote control unit) 4-6. Setting the Audio Delay • When watching a DVD or other video source, the picture on the monitor may seem delayed with respect to the sound. In this case, adjust the audio delay to delay the sound and synchronize it with the picture. • The audio delay setting is stored separately for each input source. 1 Select "Audio Delay" at the Video Setup Menu. CH SEL ENTER *Video Setup Audio Delay (Main unit) (Remote control unit) 2 Display the Audio Delay screen. CH SEL ENTER (Main unit) (Remote control unit) *Audio Delay 0ms 76 Inp ut So ur ce : D VD
-
 1
1 -
2
-
3
-
4
-
5
-
6
-
7
-
8
-
9
-
10
-
11
-
12
-
13
-
14
-
15
-
16
-
17
-
18
-
19
-
20
-
21
-
22
-
23
-
24
-
25
-
26
-
27
-
28
-
29
-
30
-
31
-
32
-
33
-
34
-
35
-
36
-
37
-
38
-
39
-
40
-
41
-
42
-
43
-
44
-
45
-
46
-
47
-
48
-
49
-
50
-
51
-
52
-
53
-
54
-
55
-
56
-
57
-
58
-
59
-
60
-
61
-
62
-
63
-
64
-
65
-
66
-
67
-
68
-
69
-
70
-
 71
71 -
 72
72 -
 73
73 -
 74
74 -
 75
75 -
 76
76 -
 77
77 -
 78
78 -
 79
79 -
 80
80 -
 81
81 -
82
-
83
-
84
-
85
-
86
-
87
-
88
-
89
-
90
-
91
-
92
-
93
-
94
-
95
-
96
-
97
-
98
-
99
-
100
-
101
-
102
-
103
-
104
-
105
-
106
-
107
-
108
-
109
-
110
-
111
-
112
-
113
-
114
-
115
-
116
-
117
-
118
-
119
-
120
-
121
-
122
-
123
-
124
-
125
-
126
-
127
-
128
-
129
-
130
-
131
-
132
-
133
-
134
-
135
-
136
-
137
-
138
-
139
-
140
-
141
-
142
-
143
-
144
-
145
-
146
-
147
-
148
-
149
-
150
-
151
-
152
-
153
-
154
-
155
-
156
-
157
-
158
-
159
-
160
-
161
-
162
-
163
-
164
-
165
-
166
-
167
-
168
-
169
-
170
-
171
-
172
-
173
-
174
-
175
-
176
-
177
-
178
-
179
-
180
-
181
-
182
-
183
-
184
-
185
-
186
-
187
-
188
-
189
-
190
-
191
-
192
 |
 |
