Denon AVR-5805MK2 Owners Manual - Page 93
Setting the Video Setup for Zone2
 |
UPC - 081757507400
View all Denon AVR-5805MK2 manuals
Add to My Manuals
Save this manual to your list of manuals |
Page 93 highlights
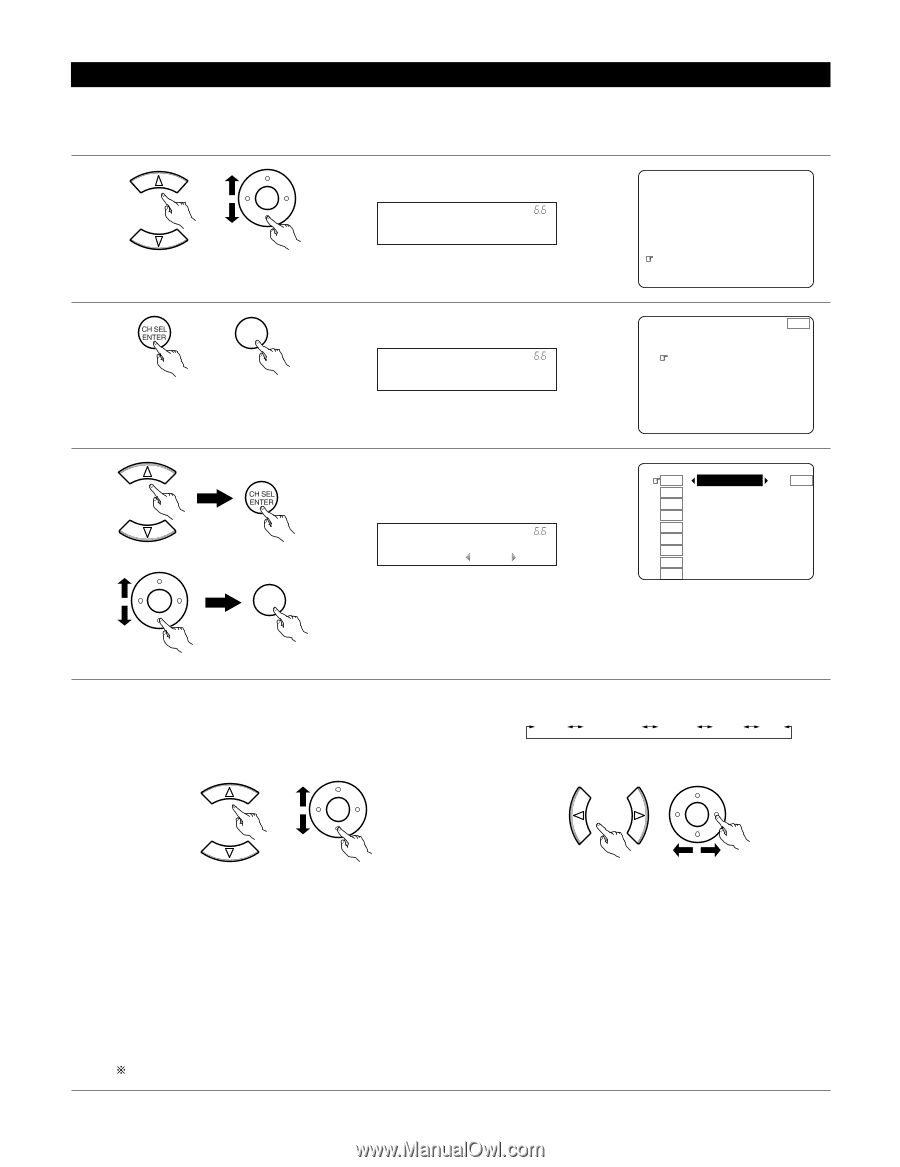
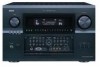
6-6. Setting the Video Setup for Zone2 [1] Video Convert Mode (Zone2) • Select the video input signal to be output to the Zone2 composit, S-Video and component monitor output terminals using the video conversion function. 1 Select "Video Setup" at the Zone Setup Menu. CH SEL ENTER *Zone Setup Z2 Video Setup (Main unit) (Remote control unit) 2 Display the Video Setup screen. CH SEL ENTER (Main unit) (Remote control unit) *Z2 Video Setup Z2 Video Mode Zone-2 3 (Main unit) CH SEL ENTER (Main unit) CH SEL ENTER Select "Video Convert Mode", then press the ENTER button. Display the Video Convert Mode. *Z2 Video Mode DVD : Auto D VD Zone-2 V DP T V D BS VC R- 1 VC R- 2 VC R- 3 VC R- 4 V. Au x (Remote control unit) (Remote control unit) 4 q Select the Zone2 input source. CH SEL ENTER w Select the mode as below. AUTO Component S-video Video OFF The details in each mode are as follows. CH SEL ENTER (Main unit) (Remote control unit) (Main unit) (Remote control unit) AUTO : When there are multiple input signals for the input sources selected at Zone2, the input signal is detected and the input signal output to the Zone2's monitor output terminal is selected automatically, in the following order of priority: Component, S-Video, Composite. Component : The component video input signal is always selected. If there is no component input signal among the input sources selected at Zone2, no video signals are output to the Zone2 component monitor output terminal. S-Video : The S-Video input signal is always selected. Video : The composite input signal is always selected. OFF : The convert function does not operate. The video signal of the input source selected at Zone2 is only output to the Zone2 video monitor output terminal. The S-Video signal selected at Zone2 is only output to the Zone2 S-Video monitor output terminal. If "Yes" is selected for "Default", the settings are automatically reset to the default values. 93
-
 1
1 -
2
-
3
-
4
-
5
-
6
-
7
-
8
-
9
-
10
-
11
-
12
-
13
-
14
-
15
-
16
-
17
-
18
-
19
-
20
-
21
-
22
-
23
-
24
-
25
-
26
-
27
-
28
-
29
-
30
-
31
-
32
-
33
-
34
-
35
-
36
-
37
-
38
-
39
-
40
-
41
-
42
-
43
-
44
-
45
-
46
-
47
-
48
-
49
-
50
-
51
-
52
-
53
-
54
-
55
-
56
-
57
-
58
-
59
-
60
-
61
-
62
-
63
-
64
-
65
-
66
-
67
-
68
-
69
-
70
-
71
-
72
-
73
-
74
-
75
-
76
-
77
-
78
-
79
-
80
-
81
-
82
-
83
-
84
-
85
-
86
-
87
-
 88
88 -
 89
89 -
 90
90 -
 91
91 -
 92
92 -
 93
93 -
 94
94 -
 95
95 -
 96
96 -
 97
97 -
 98
98 -
99
-
100
-
101
-
102
-
103
-
104
-
105
-
106
-
107
-
108
-
109
-
110
-
111
-
112
-
113
-
114
-
115
-
116
-
117
-
118
-
119
-
120
-
121
-
122
-
123
-
124
-
125
-
126
-
127
-
128
-
129
-
130
-
131
-
132
-
133
-
134
-
135
-
136
-
137
-
138
-
139
-
140
-
141
-
142
-
143
-
144
-
145
-
146
-
147
-
148
-
149
-
150
-
151
-
152
-
153
-
154
-
155
-
156
-
157
-
158
-
159
-
160
-
161
-
162
-
163
-
164
-
165
-
166
-
167
-
168
-
169
-
170
-
171
-
172
-
173
-
174
-
175
-
176
-
177
-
178
-
179
-
180
-
181
-
182
-
183
-
184
-
185
-
186
-
187
-
188
-
189
-
190
-
191
-
192
 |
 |