Denon AVR-5805MK2 Owners Manual - Page 77
Setting the On Screen Display OSD
 |
UPC - 081757507400
View all Denon AVR-5805MK2 manuals
Add to My Manuals
Save this manual to your list of manuals |
Page 77 highlights
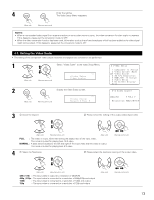
3 Set the delay time. (0 ms ~ 100 ms) CH SEL ENTER With a movie source, for example, adjust so that the movement of the actors' lips is synchronized with the sound. (Main unit) (Remote control unit) When "OFF" mode is selected at "4-2. Video Convert Mode", the delay time can be set within the range of 0 to 200 ms. 4 Enter the setting. CH SEL The Video Setup Menu reappears. ENTER (Main unit) (Remote control unit) NOTES: • The audio delay setting does not apply when playing in the EXT. IN mode or in the analog input direct mode or stereo mode (only when the crossover frequency is set to "FIXED-THX-" or front speaker is set to "Large"). • By default, this menu is not displayed when no digital signals are being input. 4-7. Setting the On Screen Display (OSD) • Use this to turn the on-screen display (messages other than the menu screens) on or off. • Sets the on-screen display's display mode. 1 Select "On Screen Display" at the Video Setup Menu. CH SEL ENTER (Main unit) (Remote control unit) *Video Setup On Screen 2 Display the On Screen Display setup screen. CH SEL ENTER (Main unit) (Remote control unit) *On Screen Func/Mode: ON O N : OFF O N : OFF 3 q Select the item to be set. w Select the parameter. CH SEL ENTER CH SEL ENTER (Main unit) (Remote control unit) (Main unit) (Remote control unit) Function/Mode Status : Set whether or not to turn on the on-screen display of the input source name and input mode when an input source is selected. Master Volume Status : Set whether or not to turn on the on-screen display of the main volume level when the main volume is operated. Display Mode : Mode 1 : Prevents flickering of the on-screen display when there is no video signal. Mode 2 : Flickering is not prevented. Use this mode if the on-screen display does not appear in the Mode 1, as may happen according to the TV being used. 77
-
 1
1 -
2
-
3
-
4
-
5
-
6
-
7
-
8
-
9
-
10
-
11
-
12
-
13
-
14
-
15
-
16
-
17
-
18
-
19
-
20
-
21
-
22
-
23
-
24
-
25
-
26
-
27
-
28
-
29
-
30
-
31
-
32
-
33
-
34
-
35
-
36
-
37
-
38
-
39
-
40
-
41
-
42
-
43
-
44
-
45
-
46
-
47
-
48
-
49
-
50
-
51
-
52
-
53
-
54
-
55
-
56
-
57
-
58
-
59
-
60
-
61
-
62
-
63
-
64
-
65
-
66
-
67
-
68
-
69
-
70
-
71
-
 72
72 -
 73
73 -
 74
74 -
 75
75 -
 76
76 -
 77
77 -
 78
78 -
 79
79 -
 80
80 -
 81
81 -
 82
82 -
83
-
84
-
85
-
86
-
87
-
88
-
89
-
90
-
91
-
92
-
93
-
94
-
95
-
96
-
97
-
98
-
99
-
100
-
101
-
102
-
103
-
104
-
105
-
106
-
107
-
108
-
109
-
110
-
111
-
112
-
113
-
114
-
115
-
116
-
117
-
118
-
119
-
120
-
121
-
122
-
123
-
124
-
125
-
126
-
127
-
128
-
129
-
130
-
131
-
132
-
133
-
134
-
135
-
136
-
137
-
138
-
139
-
140
-
141
-
142
-
143
-
144
-
145
-
146
-
147
-
148
-
149
-
150
-
151
-
152
-
153
-
154
-
155
-
156
-
157
-
158
-
159
-
160
-
161
-
162
-
163
-
164
-
165
-
166
-
167
-
168
-
169
-
170
-
171
-
172
-
173
-
174
-
175
-
176
-
177
-
178
-
179
-
180
-
181
-
182
-
183
-
184
-
185
-
186
-
187
-
188
-
189
-
190
-
191
-
192
 |
 |
