Epson Stylus Pro WT7900 User's Guide - Page 115
Solving Miscellaneous Printing Problems, If your printouts are not what you expected
 |
View all Epson Stylus Pro WT7900 manuals
Add to My Manuals
Save this manual to your list of manuals |
Page 115 highlights
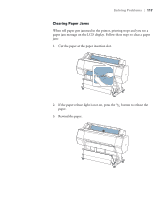
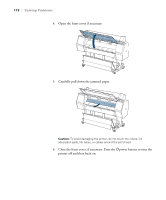
Solving Problems | 115 Solving Miscellaneous Printing Problems If your printouts are not what you expected, try the suggestions below: Problem Solution Your print has incorrect or garbled characters. ◗ Make sure your software is installed correctly and the printer is selected. ◗ Clear any stalled print jobs. ◗ Turn off the printer and computer. Make sure the interface cable is securely plugged in at both ends. Your print has incorrect margins. ◗ Check the page size or paper size settings in your application. Make sure they are within the printer's printable area. ◗ Paper is loaded incorrectly. Follow the instructions beginning on page 45 to reload the paper. ◗ Make sure PAPER SIZE CHECK and PAPER SKEW CHECK are turned on in the Printer Setup menu. ◗ The ROLL PAPER MARGIN setting in the Printer Setup menu is incorrect. See page 128 for more information. Blank paper is printed. ◗ Make sure your software is installed correctly and the printer is selected. ◗ Make sure the paper size setting in your printer software is correct for the paper you're using. The printer continues to feed ◗ Press the Pause/reset button button on the printer to clear any print paper after you have job data in the printer's buffer and reset the printer. cancelled a job. ◗ Make sure the paper source is set correctly. Roll paper cannot be cut. ◗ The paper cutter may be dull. Follow the instructions on page 94 to replace the cutter. ◗ Make sure appears on the LCD display. If not, press the l paper source button to select this setting. Also check the auto cut settings in your printer software. 115
-
 1
1 -
2
-
3
-
4
-
5
-
6
-
7
-
8
-
9
-
10
-
11
-
12
-
13
-
14
-
15
-
16
-
17
-
18
-
19
-
20
-
21
-
22
-
23
-
24
-
25
-
26
-
27
-
28
-
29
-
30
-
31
-
32
-
33
-
34
-
35
-
36
-
37
-
38
-
39
-
40
-
41
-
42
-
43
-
44
-
45
-
46
-
47
-
48
-
49
-
50
-
51
-
52
-
53
-
54
-
55
-
56
-
57
-
58
-
59
-
60
-
61
-
62
-
63
-
64
-
65
-
66
-
67
-
68
-
69
-
70
-
71
-
72
-
73
-
74
-
75
-
76
-
77
-
78
-
79
-
80
-
81
-
82
-
83
-
84
-
85
-
86
-
87
-
88
-
89
-
90
-
91
-
92
-
93
-
94
-
95
-
96
-
97
-
98
-
99
-
100
-
101
-
102
-
103
-
104
-
105
-
106
-
107
-
108
-
109
-
 110
110 -
 111
111 -
 112
112 -
 113
113 -
 114
114 -
 115
115 -
 116
116 -
 117
117 -
 118
118 -
 119
119 -
 120
120 -
121
-
122
-
123
-
124
-
125
-
126
-
127
-
128
-
129
-
130
-
131
-
132
-
133
-
134
-
135
-
136
 |
 |
