Epson Stylus Pro WT7900 User's Guide - Page 83
Checking and Cleaning the Print Head, Checking the Print Head
 |
View all Epson Stylus Pro WT7900 manuals
Add to My Manuals
Save this manual to your list of manuals |
Page 83 highlights
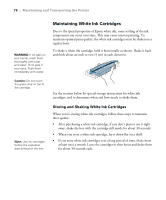
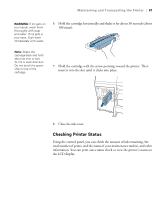
Maintaining and Transporting the Printer | 83 4. Press to exit the menu. For more information about the Printer Status menu, see page 128. Note: The printer automatically checks the print head and cleans it if necessary, but you can adjust the settings (see page 86). Note: You can have a nozzle check pattern automatically printed on a regular basis. See page 86. Note: The printer normally replaces white ink with cleaning liquid when it's shutting down. Checking and Cleaning the Print Head If your printed image shows a color shift or horizontal lines, you should check the print head to see if any nozzles are clogged or deflected. If one or more nozzles is clogged, you can run a cleaning cycle to clear the nozzles. Checking the Print Head Check the print head by printing a nozzle check pattern, as described below, and then examine it to determine whether the print head needs cleaning. 1. Make sure roll paper or letter- or A4-size cut sheet paper is loaded in the printer. If you need to check the white ink nozzles, use film to ensure that the ink is visible. 2. Press r Menu. 3. Press d until TEST PRINT is selected, then press r. 4. Make sure NOZZLE CHECK is selected, then press r. 5. Select PRINT WITH WHITE INK or PRINT NOW, then press r. • Select PRINT WITH WHITE INK if you think there may be a problem with the white ink nozzles. This option ensures that white ink is included as part of the test pattern. If necessary, the printer will replace cleaning liquid with white ink in the print head before printing the pattern. • Select PRINT NOW if you know the white ink nozzles are working properly and you don't need to check them. The printer may include white ink as part of the test pattern, but only if it's already loaded in the print head. 6. Press OK to start printing the nozzle check pattern. 83
-
 1
1 -
2
-
3
-
4
-
5
-
6
-
7
-
8
-
9
-
10
-
11
-
12
-
13
-
14
-
15
-
16
-
17
-
18
-
19
-
20
-
21
-
22
-
23
-
24
-
25
-
26
-
27
-
28
-
29
-
30
-
31
-
32
-
33
-
34
-
35
-
36
-
37
-
38
-
39
-
40
-
41
-
42
-
43
-
44
-
45
-
46
-
47
-
48
-
49
-
50
-
51
-
52
-
53
-
54
-
55
-
56
-
57
-
58
-
59
-
60
-
61
-
62
-
63
-
64
-
65
-
66
-
67
-
68
-
69
-
70
-
71
-
72
-
73
-
74
-
75
-
76
-
77
-
 78
78 -
 79
79 -
 80
80 -
 81
81 -
 82
82 -
 83
83 -
 84
84 -
 85
85 -
 86
86 -
 87
87 -
 88
88 -
89
-
90
-
91
-
92
-
93
-
94
-
95
-
96
-
97
-
98
-
99
-
100
-
101
-
102
-
103
-
104
-
105
-
106
-
107
-
108
-
109
-
110
-
111
-
112
-
113
-
114
-
115
-
116
-
117
-
118
-
119
-
120
-
121
-
122
-
123
-
124
-
125
-
126
-
127
-
128
-
129
-
130
-
131
-
132
-
133
-
134
-
135
-
136
 |
 |
