Epson Stylus Pro WT7900 User's Guide - Page 97
Replacing the Maintenance Tank
 |
View all Epson Stylus Pro WT7900 manuals
Add to My Manuals
Save this manual to your list of manuals |
Page 97 highlights
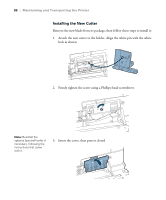
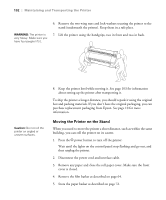
Maintaining and Transporting the Printer | 97 4. Turn the printer back on. 5. Run the Cutter Adjustment from the Maintenance Menu on the control panel. After you print the pattern, put the two cut pieces together and select the pattern with the most precise cut between the two colors. Select the pattern number on the control panel and press OK. Replacing the Maintenance Tank The maintenance tank stores ink that gets flushed from the system during the initial ink charge and manual and automatic print head cleaning. When the tank is almost full, the message MAINTENANCE TANK NEARLY FULL appears on the LCD display. When the tank is completely full, the printer stops working and MAINTENANCE TANK FULL appears on the LCD. You cannot print until the tank is replaced. You can check how much space remains in the maintenance tank by viewing its icon on the control panel, shown below. You can also check its status using the menus (see page 82) or by printing a nozzle check sheet (see page 86). Maintenance tank status The icon shows the approximate amount of space remaining in the tank. Replacement tanks are available (part number C12C890191). See page 10 for details. 97
-
 1
1 -
2
-
3
-
4
-
5
-
6
-
7
-
8
-
9
-
10
-
11
-
12
-
13
-
14
-
15
-
16
-
17
-
18
-
19
-
20
-
21
-
22
-
23
-
24
-
25
-
26
-
27
-
28
-
29
-
30
-
31
-
32
-
33
-
34
-
35
-
36
-
37
-
38
-
39
-
40
-
41
-
42
-
43
-
44
-
45
-
46
-
47
-
48
-
49
-
50
-
51
-
52
-
53
-
54
-
55
-
56
-
57
-
58
-
59
-
60
-
61
-
62
-
63
-
64
-
65
-
66
-
67
-
68
-
69
-
70
-
71
-
72
-
73
-
74
-
75
-
76
-
77
-
78
-
79
-
80
-
81
-
82
-
83
-
84
-
85
-
86
-
87
-
88
-
89
-
90
-
91
-
 92
92 -
 93
93 -
 94
94 -
 95
95 -
 96
96 -
 97
97 -
 98
98 -
 99
99 -
 100
100 -
 101
101 -
 102
102 -
103
-
104
-
105
-
106
-
107
-
108
-
109
-
110
-
111
-
112
-
113
-
114
-
115
-
116
-
117
-
118
-
119
-
120
-
121
-
122
-
123
-
124
-
125
-
126
-
127
-
128
-
129
-
130
-
131
-
132
-
133
-
134
-
135
-
136
 |
 |
