Epson Stylus Pro WT7900 User's Guide - Page 33
Now go to Completing Setup and Connecting the Power Cord
 |
View all Epson Stylus Pro WT7900 manuals
Add to My Manuals
Save this manual to your list of manuals |
Page 33 highlights
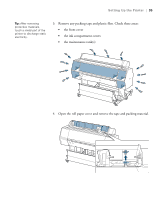
Setting Up the Printer | 33 Note: Once inserted, the pins cannot be removed. 7. Insert six pins into the plastic connectors to secure the rods. 8. Set the basket upright, then press the straps onto the film basket in the indicated positions. Note: Do not place heavy objects such as paper rolls in this basket, or it may get damaged. The basket can support up to 6.6 lbs (3 kg). Now go to "Completing Setup and Connecting the Power Cord" on page 34. 33
-
 1
1 -
2
-
3
-
4
-
5
-
6
-
7
-
8
-
9
-
10
-
11
-
12
-
13
-
14
-
15
-
16
-
17
-
18
-
19
-
20
-
21
-
22
-
23
-
24
-
25
-
26
-
27
-
 28
28 -
 29
29 -
 30
30 -
 31
31 -
 32
32 -
 33
33 -
 34
34 -
 35
35 -
 36
36 -
 37
37 -
 38
38 -
39
-
40
-
41
-
42
-
43
-
44
-
45
-
46
-
47
-
48
-
49
-
50
-
51
-
52
-
53
-
54
-
55
-
56
-
57
-
58
-
59
-
60
-
61
-
62
-
63
-
64
-
65
-
66
-
67
-
68
-
69
-
70
-
71
-
72
-
73
-
74
-
75
-
76
-
77
-
78
-
79
-
80
-
81
-
82
-
83
-
84
-
85
-
86
-
87
-
88
-
89
-
90
-
91
-
92
-
93
-
94
-
95
-
96
-
97
-
98
-
99
-
100
-
101
-
102
-
103
-
104
-
105
-
106
-
107
-
108
-
109
-
110
-
111
-
112
-
113
-
114
-
115
-
116
-
117
-
118
-
119
-
120
-
121
-
122
-
123
-
124
-
125
-
126
-
127
-
128
-
129
-
130
-
131
-
132
-
133
-
134
-
135
-
136
 |
 |

33
Setting Up the Printer
|
33
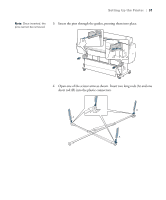
7.
Insert six pins into the plastic connectors to secure the rods.
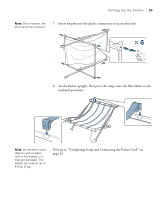
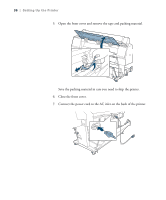
8.
Set the basket upright, then press the straps onto the film basket in the
indicated positions.
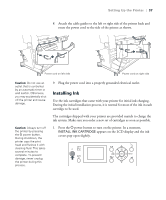
Now go to “Completing Setup and Connecting the Power Cord” on
page 34.
Note:
Once inserted, the
pins cannot be removed.
Note:
Do not place heavy
objects such as paper
rolls in this basket, or it
may get damaged. The
basket can support up to
6.6 lbs (3 kg).