Epson Stylus Pro WT7900 User's Guide - Page 87
Aligning the Print Head, Follow these steps to align the print head
 |
View all Epson Stylus Pro WT7900 manuals
Add to My Manuals
Save this manual to your list of manuals |
Page 87 highlights
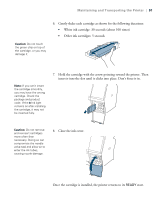
Maintaining and Transporting the Printer | 87 • OFF-The printer will not perform automatic nozzle checks and cleaning cycles. 4. Press l, then select PRINT NOZZLE PATTERN and press r. 5. Select ON: EVERY PAGE to have the nozzle check pattern printed before each print job, or select ON: EVERY 10 PAGES. The setting is turned OFF by default. These settings take effect only when you print on roll paper. 6. Press OK to save the setting. Tip: For best results, use the same width of paper that you plan to print with. Note: When you select the paper type, it automatically sets the paper thickness for Epson media. Aligning the Print Head Aligning the print head is one of the most important things you can do to ensure the best print quality. If vertical banding appears on your prints, if they look grainy or blurry, or if you see misregistration or "ghosting," you need to align the print head. If you haven't already done so, it's a good idea to run a nozzle check before aligning the print head (page 83). This ensures that the print head alignment patterns print correctly. Follow these steps to align the print head: 1. Load the bundled roll paper included with the printer. You can also use Epson film or other compatible Epson media. 2. Press r Menu. 3. Press u or d until HEAD ALIGNMENT is selected, then press r. 4. Make sure PAPER THICKNESS is highlighted, then press r. 5. Make sure SELECT PAPER TYPE is highlighted, then press r. Select the paper type loaded in the printer and press OK. Select Bundle Roll Paper if you've loaded the bundled paper included with the printer. 6. Press l twice to return to the Head Alignment menu. 7. Press d to select ALIGNMENT, then press r. 87
-
 1
1 -
2
-
3
-
4
-
5
-
6
-
7
-
8
-
9
-
10
-
11
-
12
-
13
-
14
-
15
-
16
-
17
-
18
-
19
-
20
-
21
-
22
-
23
-
24
-
25
-
26
-
27
-
28
-
29
-
30
-
31
-
32
-
33
-
34
-
35
-
36
-
37
-
38
-
39
-
40
-
41
-
42
-
43
-
44
-
45
-
46
-
47
-
48
-
49
-
50
-
51
-
52
-
53
-
54
-
55
-
56
-
57
-
58
-
59
-
60
-
61
-
62
-
63
-
64
-
65
-
66
-
67
-
68
-
69
-
70
-
71
-
72
-
73
-
74
-
75
-
76
-
77
-
78
-
79
-
80
-
81
-
 82
82 -
 83
83 -
 84
84 -
 85
85 -
 86
86 -
 87
87 -
 88
88 -
 89
89 -
 90
90 -
 91
91 -
 92
92 -
93
-
94
-
95
-
96
-
97
-
98
-
99
-
100
-
101
-
102
-
103
-
104
-
105
-
106
-
107
-
108
-
109
-
110
-
111
-
112
-
113
-
114
-
115
-
116
-
117
-
118
-
119
-
120
-
121
-
122
-
123
-
124
-
125
-
126
-
127
-
128
-
129
-
130
-
131
-
132
-
133
-
134
-
135
-
136
 |
 |
