Epson Stylus Pro WT7900 User's Guide - Page 56
Cutting Film with the Built-in Cutter, Printing Trim Lines, button. When the selection menu appears
 |
View all Epson Stylus Pro WT7900 manuals
Add to My Manuals
Save this manual to your list of manuals |
Page 56 highlights
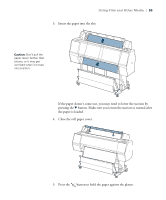
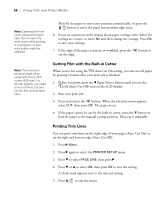
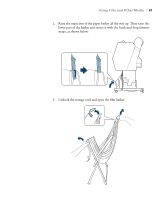
56 | Using Film and Other Media Note: Opening the front cover causes printing to stop. Do not open the front cover while printing is in progress, or your print quality might be affected. Wait for the paper to move into position automatically, or press the button to move the paper into position right away. 6. If you see a question on the display about paper settings, select Yes if the settings are correct, or select No and then change the settings. Press OK to save your settings. 7. If the edge of the paper is uneven or wrinkled, press the cut the edge. button to Note: The minimum printout length when using Auto Cut is 16.5 inches (420 mm). For shorter lengths, you need to turn off Auto Cut and cut the film as described here. Cutting Film with the Built-in Cutter When you're not using the Auto Cut On setting, you can cut roll paper by pressing a button after your print job is finished. 1. Before you print, press the l Paper Source button until you see the roll (Auto Cut Off) icon on the LCD display. 2. Run your print job. 3. Press and release the button. When the selection menu appears, select CUT, then press OK. The paper is cut. 4. If the paper cannot be cut by the built-in cutter, press the d button to feed the paper to the manual cutting position. Then cut it manually. Printing Trim Lines You can print trim lines on the right edge of your pages (Auto Cut On) or on the right and bottom edge (Auto Cut Off). 1. Press r Menu. 2. Press r again to select the PRINTER SETUP menu. 3. Press d to select PAGE LINE, then press r. 4. Press d or u to select ON, then press OK to save the setting. A check mark appears next to the selected setting. 5. Press to exit the menu. 56
-
 1
1 -
2
-
3
-
4
-
5
-
6
-
7
-
8
-
9
-
10
-
11
-
12
-
13
-
14
-
15
-
16
-
17
-
18
-
19
-
20
-
21
-
22
-
23
-
24
-
25
-
26
-
27
-
28
-
29
-
30
-
31
-
32
-
33
-
34
-
35
-
36
-
37
-
38
-
39
-
40
-
41
-
42
-
43
-
44
-
45
-
46
-
47
-
48
-
49
-
50
-
 51
51 -
 52
52 -
 53
53 -
 54
54 -
 55
55 -
 56
56 -
 57
57 -
 58
58 -
 59
59 -
 60
60 -
 61
61 -
62
-
63
-
64
-
65
-
66
-
67
-
68
-
69
-
70
-
71
-
72
-
73
-
74
-
75
-
76
-
77
-
78
-
79
-
80
-
81
-
82
-
83
-
84
-
85
-
86
-
87
-
88
-
89
-
90
-
91
-
92
-
93
-
94
-
95
-
96
-
97
-
98
-
99
-
100
-
101
-
102
-
103
-
104
-
105
-
106
-
107
-
108
-
109
-
110
-
111
-
112
-
113
-
114
-
115
-
116
-
117
-
118
-
119
-
120
-
121
-
122
-
123
-
124
-
125
-
126
-
127
-
128
-
129
-
130
-
131
-
132
-
133
-
134
-
135
-
136
 |
 |