Epson Stylus Pro WT7900 User's Guide - Page 37
Installing Ink, The cartridges shipped with your printer are provided mainly to charge
 |
View all Epson Stylus Pro WT7900 manuals
Add to My Manuals
Save this manual to your list of manuals |
Page 37 highlights
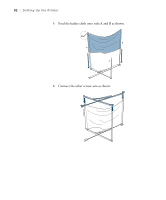
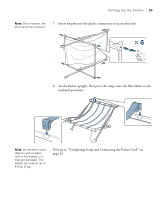
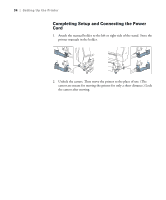
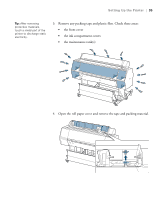
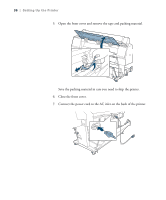
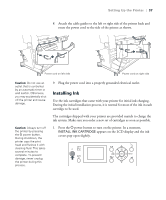
Setting Up the Printer | 37 8. Attach the cable guides to the left or right side of the printer back and route the power cord to the side of the printer as shown. Power cord on left side Power cord on right side Caution: Do not use an outlet that is controlled by an automatic timer or wall switch. Otherwise, you may accidentally shut off the printer and cause damage. Caution: Always turn off the printer by pressing the P power button. During shutdown, the printer caps the print head and flushes it with cleaning fluid. This takes several minutes to complete. To prevent damage, never unplug the printer during this process. 9. Plug the power cord into a properly grounded electrical outlet. Installing Ink Use the ink cartridges that came with your printer for initial ink charging. During the initial installation process, it is normal for most of the ink in each cartridge to be used. The cartridges shipped with your printer are provided mainly to charge the ink system. Make sure you order a new set of cartridges as soon as possible. 1. Press the P power button to turn on the printer. In a moment, INSTALL INK CARTRIDGE appears on the LCD display and the ink covers pop open slightly. 37
-
 1
1 -
2
-
3
-
4
-
5
-
6
-
7
-
8
-
9
-
10
-
11
-
12
-
13
-
14
-
15
-
16
-
17
-
18
-
19
-
20
-
21
-
22
-
23
-
24
-
25
-
26
-
27
-
28
-
29
-
30
-
31
-
 32
32 -
 33
33 -
 34
34 -
 35
35 -
 36
36 -
 37
37 -
 38
38 -
 39
39 -
 40
40 -
 41
41 -
 42
42 -
43
-
44
-
45
-
46
-
47
-
48
-
49
-
50
-
51
-
52
-
53
-
54
-
55
-
56
-
57
-
58
-
59
-
60
-
61
-
62
-
63
-
64
-
65
-
66
-
67
-
68
-
69
-
70
-
71
-
72
-
73
-
74
-
75
-
76
-
77
-
78
-
79
-
80
-
81
-
82
-
83
-
84
-
85
-
86
-
87
-
88
-
89
-
90
-
91
-
92
-
93
-
94
-
95
-
96
-
97
-
98
-
99
-
100
-
101
-
102
-
103
-
104
-
105
-
106
-
107
-
108
-
109
-
110
-
111
-
112
-
113
-
114
-
115
-
116
-
117
-
118
-
119
-
120
-
121
-
122
-
123
-
124
-
125
-
126
-
127
-
128
-
129
-
130
-
131
-
132
-
133
-
134
-
135
-
136
 |
 |
