Epson Stylus Pro WT7900 User's Guide - Page 86
Refreshing the White Ink Supply, Automatically Checking and Cleaning the Print Head
 |
View all Epson Stylus Pro WT7900 manuals
Add to My Manuals
Save this manual to your list of manuals |
Page 86 highlights
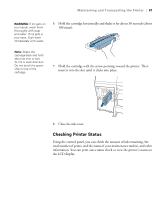
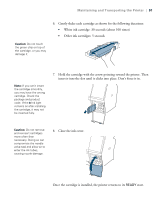
86 | Maintaining and Transporting the Printer Refreshing the White Ink Supply If the white ink density in your printouts is inconsistent even after cleaning the print head, you may need to refresh the white ink supply-especially if the printer hasn't been used for more than a year. This helps clear any white ink components that have settled in the supply line. Before starting, make sure you have already shaken the installed white ink cartridge as described on page 79. 1. Press r Menu. 2. Press d until MAINTENANCE is selected, then press r. 3. Press d until CLEANING is selected, then press r. 4. Press d until WT INK REFRESH is selected, then press r. 5. Press OK to start the refresh process. 6. Wait several minutes for the process to complete, then print a nozzle check pattern (page 83) to verify that the white ink nozzles are working. Note: If the printer detects clogged nozzles, it performs a single cleaning cycle by default. You can increase the number of cleaning cycles up to three with the AUTO CLEANING TIMES setting in maintenance mode (see page 92). Automatically Checking and Cleaning the Print Head By default, the printer checks the print head on a regular basis and cleans it if necessary. This is done without printing a nozzle check pattern or using any paper. You can specify how often you want this to happen. You can also have a nozzle check pattern automatically printed at selected intervals, so you can check it yourself. 1. Press r Menu. PRINTER SETUP is selected. Press r again. 2. Press d until AUTO NOZZLE CHECK is selected, then press r. 3. Select one of the following, then press OK: • ON: PERIODICALLY-The printer periodically checks its nozzles and runs a cleaning cycle if necessary (default). • ON: EVERY JOB-The printer automatically checks its nozzles and cleans them if necessary before each print job. This uses a very small amount of ink; recommended for large unattended print jobs. 86
-
 1
1 -
2
-
3
-
4
-
5
-
6
-
7
-
8
-
9
-
10
-
11
-
12
-
13
-
14
-
15
-
16
-
17
-
18
-
19
-
20
-
21
-
22
-
23
-
24
-
25
-
26
-
27
-
28
-
29
-
30
-
31
-
32
-
33
-
34
-
35
-
36
-
37
-
38
-
39
-
40
-
41
-
42
-
43
-
44
-
45
-
46
-
47
-
48
-
49
-
50
-
51
-
52
-
53
-
54
-
55
-
56
-
57
-
58
-
59
-
60
-
61
-
62
-
63
-
64
-
65
-
66
-
67
-
68
-
69
-
70
-
71
-
72
-
73
-
74
-
75
-
76
-
77
-
78
-
79
-
80
-
 81
81 -
 82
82 -
 83
83 -
 84
84 -
 85
85 -
 86
86 -
 87
87 -
 88
88 -
 89
89 -
 90
90 -
 91
91 -
92
-
93
-
94
-
95
-
96
-
97
-
98
-
99
-
100
-
101
-
102
-
103
-
104
-
105
-
106
-
107
-
108
-
109
-
110
-
111
-
112
-
113
-
114
-
115
-
116
-
117
-
118
-
119
-
120
-
121
-
122
-
123
-
124
-
125
-
126
-
127
-
128
-
129
-
130
-
131
-
132
-
133
-
134
-
135
-
136
 |
 |
