Epson Stylus Pro WT7900 User's Guide - Page 39
insert it into its slot until it clicks into place. Make sure you insert each
 |
View all Epson Stylus Pro WT7900 manuals
Add to My Manuals
Save this manual to your list of manuals |
Page 39 highlights
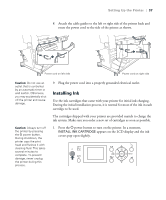
Setting Up the Printer | 39 4. Note the location of the slot corresponding to each cartridge. Left ink bay Slot no. Cartridge 1 Cyan (C) 2 Orange (O) 3 Yellow (Y) 4 Light Cyan (LC) 5 White (WT) 6 Cleaning Liquid (CL) Right ink bay Slot no. Cartridge 7 Vivid Magenta (VM) 8 Cleaning Liquid (CL) 9 Green (G) 10 Photo Black (PK) 11 Vivid Light Magenta (VLM) 5. Install the ink cartridges in the printer. Hold each cartridge with the arrow pointing toward the printer, then insert it into its slot until it clicks into place. Make sure you insert each cartridge all the way into the correct slot. 39
-
 1
1 -
2
-
3
-
4
-
5
-
6
-
7
-
8
-
9
-
10
-
11
-
12
-
13
-
14
-
15
-
16
-
17
-
18
-
19
-
20
-
21
-
22
-
23
-
24
-
25
-
26
-
27
-
28
-
29
-
30
-
31
-
32
-
33
-
 34
34 -
 35
35 -
 36
36 -
 37
37 -
 38
38 -
 39
39 -
 40
40 -
 41
41 -
 42
42 -
 43
43 -
 44
44 -
45
-
46
-
47
-
48
-
49
-
50
-
51
-
52
-
53
-
54
-
55
-
56
-
57
-
58
-
59
-
60
-
61
-
62
-
63
-
64
-
65
-
66
-
67
-
68
-
69
-
70
-
71
-
72
-
73
-
74
-
75
-
76
-
77
-
78
-
79
-
80
-
81
-
82
-
83
-
84
-
85
-
86
-
87
-
88
-
89
-
90
-
91
-
92
-
93
-
94
-
95
-
96
-
97
-
98
-
99
-
100
-
101
-
102
-
103
-
104
-
105
-
106
-
107
-
108
-
109
-
110
-
111
-
112
-
113
-
114
-
115
-
116
-
117
-
118
-
119
-
120
-
121
-
122
-
123
-
124
-
125
-
126
-
127
-
128
-
129
-
130
-
131
-
132
-
133
-
134
-
135
-
136
 |
 |

39
Setting Up the Printer
|
39
4.
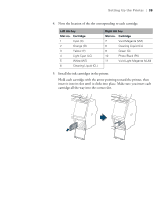
Note the location of the slot corresponding to each cartridge.
5.
Install the ink cartridges in the printer.
Hold each cartridge with the arrow pointing toward the printer, then
insert it into its slot until it clicks into place. Make sure you insert each
cartridge all the way into the correct slot.
Left ink bay
Right ink bay
Slot no.
Cartridge
Slot no.
Cartridge
1
Cyan (C)
7
Vivid Magenta (VM)
2
Orange (O)
8
Cleaning Liquid (CL)
3
Yellow (Y)
9
Green (G)
4
Light Cyan (LC)
10
Photo Black (PK)
5
White (WT)
11
Vivid Light Magenta (VLM)
6
Cleaning Liquid (CL)