Fluke 744 Fluke 744 Users Manual - Page 44
Measuring Temperature, Using Thermocouples - leads
 |
View all Fluke 744 manuals
Add to My Manuals
Save this manual to your list of manuals |
Page 44 highlights
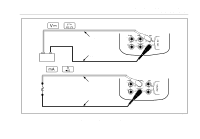
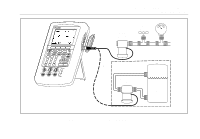
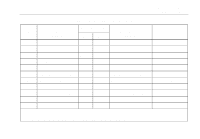
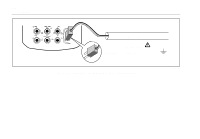
744 Users Manual Measuring Temperature Using Thermocouples The calibrator supports eleven standard thermocouples, each identified with an alpha character: E, N, J, K, T, B, R, S, C, L, or U. Table 5 summarizes the ranges and characteristics of the supported thermocouples. To measure temperature using a thermocouple, proceed as follows: 1. Attach the thermocouple leads to the appropriate TC miniplug, then to the TC input/output as shown in Figure 13. One pin is wider than the other. Do not try to force a miniplug in the wrong polarization. Note If the calibrator and the thermocouple plug are at different temperatures, wait one minute or more for the connector temperature to stabilize after you plug the miniplug into the TC input/output. 2. If necessary, press M for MEASURE mode. 3. Press t. The display prompts you to select the thermocouple type. 4. Select the desired thermocouple type using the u or d followed by e. 5. If necessary, you can change between °C or °F Temperature Units as follows: a. Press s. b. Press the Next Page softkey twice. c. Use the u and d keys to move the cursor to the desired parameter. Then press either eor the Choices softkey to choose a setting for that parameter. d. Press u or d to move the cursor to the desired setting. e. Press eto go back to the sdisplay. f. Press the Done softkey or sto exit Setup mode. 6. If necessary, you can change between ITS-90 or IPTS-68 Temperature Scale in Setup mode. The procedure is the same as steps a-f above. 34
-
 1
1 -
2
-
3
-
4
-
5
-
6
-
7
-
8
-
9
-
10
-
11
-
12
-
13
-
14
-
15
-
16
-
17
-
18
-
19
-
20
-
21
-
22
-
23
-
24
-
25
-
26
-
27
-
28
-
29
-
30
-
31
-
32
-
33
-
34
-
35
-
36
-
37
-
38
-
 39
39 -
 40
40 -
 41
41 -
 42
42 -
 43
43 -
 44
44 -
 45
45 -
 46
46 -
 47
47 -
 48
48 -
 49
49 -
50
-
51
-
52
-
53
-
54
-
55
-
56
-
57
-
58
-
59
-
60
-
61
-
62
-
63
-
64
-
65
-
66
-
67
-
68
-
69
-
70
-
71
-
72
-
73
-
74
-
75
-
76
-
77
-
78
-
79
-
80
-
81
-
82
-
83
-
84
-
85
-
86
-
87
-
88
-
89
-
90
-
91
-
92
-
93
-
94
-
95
-
96
-
97
-
98
-
99
-
100
-
101
-
102
-
103
-
104
-
105
-
106
-
107
-
108
-
109
-
110
-
111
-
112
-
113
-
114
-
115
-
116
-
117
-
118
-
119
-
120
-
121
-
122
-
123
-
124
-
125
-
126
-
127
-
128
-
129
-
130
-
131
-
132
-
133
-
134
-
135
-
136
-
137
-
138
 |
 |