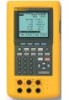
Fluke 744 Fluke 744 Users Manual - Page 53
Measuring or Sourcing with Custom Units, alphanumeric entry window, then press
 |
View all Fluke 744 manuals
Add to My Manuals
Save this manual to your list of manuals |
Page 53 highlights
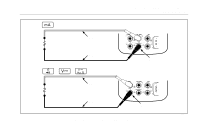
Measuring or Sourcing with Custom Units wWarning To avoid possible electric shock, when using Custom Units for measurement, always refer to the secondary value displayed below and to the right of the main display for the actual value of the measurement in native engineering units. You can set up the measurement or source display to show your own custom units. To do this, you select a function, for example mV dc, scale it as you choose, then enter an alphanumeric name for your custom units, for example, "PH." Proceed as follows to set up a custom unit: 1. When measuring or sourcing the function of your choice, press the Scale softkey, then select Custom Units from the list. 2. Enter the 0% and 100% scale points for the input of your transfer function. 3. Press the Custom Units softkey. Documenting Process Calibrator Using Measure Mode 4. Enter the 0% and 100% scale points for the output of your transfer function. 5. Enter the name of the custom units (up to four characters), for example PH (for pH), using the alphanumeric entry window, then press e. While Custom Units are active, the wsymbol shows on the display to the right of the custom unit. Once you have programmed the custom measurement unit, the custom unit is available for calibration procedures in split-screen MEASURE/SOURCE mode. To cancel Custom Units, press the Custom Units softkey again. 43
-
 1
1 -
2
-
3
-
4
-
5
-
6
-
7
-
8
-
9
-
10
-
11
-
12
-
13
-
14
-
15
-
16
-
17
-
18
-
19
-
20
-
21
-
22
-
23
-
24
-
25
-
26
-
27
-
28
-
29
-
30
-
31
-
32
-
33
-
34
-
35
-
36
-
37
-
38
-
39
-
40
-
41
-
42
-
43
-
44
-
45
-
46
-
47
-
 48
48 -
 49
49 -
 50
50 -
 51
51 -
 52
52 -
 53
53 -
 54
54 -
 55
55 -
 56
56 -
 57
57 -
 58
58 -
59
-
60
-
61
-
62
-
63
-
64
-
65
-
66
-
67
-
68
-
69
-
70
-
71
-
72
-
73
-
74
-
75
-
76
-
77
-
78
-
79
-
80
-
81
-
82
-
83
-
84
-
85
-
86
-
87
-
88
-
89
-
90
-
91
-
92
-
93
-
94
-
95
-
96
-
97
-
98
-
99
-
100
-
101
-
102
-
103
-
104
-
105
-
106
-
107
-
108
-
109
-
110
-
111
-
112
-
113
-
114
-
115
-
116
-
117
-
118
-
119
-
120
-
121
-
122
-
123
-
124
-
125
-
126
-
127
-
128
-
129
-
130
-
131
-
132
-
133
-
134
-
135
-
136
-
137
-
138
 |
 |