HTC Advantage X7501 User Manual - Page 83
Organize and search, Start > Contacts, Menu >, Categories, Start, Contacts
 |
View all HTC Advantage X7501 manuals
Add to My Manuals
Save this manual to your list of manuals |
Page 83 highlights
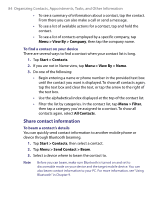
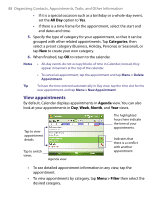
Organizing Contacts, Appointments, Tasks, and Other Information 83 Tips • If someone who is not in your list of contacts calls you, you can create a contact from Call History by tapping and holding a phone number and then tapping Save to Contacts from the shortcut menu. • To save a phone number that is contained in a message, tap the phone number, then tap Menu > Save to Contacts. • In the list of contact information, you'll see where you can add a picture or assign a ring tone to a contact. To change contact information 1. Tap Start > Contacts. 2. Tap the contact. 3. Tap Menu > Edit and enter the changes. 4. When finished, tap OK. Organize and search To group similar contacts You can group similar contacts for easier management by assigning them to categories. 1. Create a new contact, or select an existing contact to edit. 2. Tap Categories. 3. Select a preset category such as Business or Personal, or tap New to create your own category. 4. When finished, tap OK. Note If your contact list has been filtered by a category, that category is automatically assigned when you create a new contact. To work with the contact list There are several ways to use and customize the contact list. Here are a few tips: 1. Tap Start > Contacts. 2. In the contact list, do any of the following: • In Name view, you can search for a contact by entering a name or number, or by using the alphabetical index. To switch to Name view, tap Menu > View By > Name.
-
 1
1 -
2
-
3
-
4
-
5
-
6
-
7
-
8
-
9
-
10
-
11
-
12
-
13
-
14
-
15
-
16
-
17
-
18
-
19
-
20
-
21
-
22
-
23
-
24
-
25
-
26
-
27
-
28
-
29
-
30
-
31
-
32
-
33
-
34
-
35
-
36
-
37
-
38
-
39
-
40
-
41
-
42
-
43
-
44
-
45
-
46
-
47
-
48
-
49
-
50
-
51
-
52
-
53
-
54
-
55
-
56
-
57
-
58
-
59
-
60
-
61
-
62
-
63
-
64
-
65
-
66
-
67
-
68
-
69
-
70
-
71
-
72
-
73
-
74
-
75
-
76
-
77
-
 78
78 -
 79
79 -
 80
80 -
 81
81 -
 82
82 -
 83
83 -
 84
84 -
 85
85 -
 86
86 -
 87
87 -
 88
88 -
89
-
90
-
91
-
92
-
93
-
94
-
95
-
96
-
97
-
98
-
99
-
100
-
101
-
102
-
103
-
104
-
105
-
106
-
107
-
108
-
109
-
110
-
111
-
112
-
113
-
114
-
115
-
116
-
117
-
118
-
119
-
120
-
121
-
122
-
123
-
124
-
125
-
126
-
127
-
128
-
129
-
130
-
131
-
132
-
133
-
134
-
135
-
136
-
137
-
138
-
139
-
140
-
141
-
142
-
143
-
144
-
145
-
146
-
147
-
148
-
149
-
150
-
151
-
152
-
153
-
154
-
155
-
156
-
157
-
158
-
159
-
160
-
161
-
162
-
163
-
164
-
165
-
166
-
167
-
168
-
169
-
170
-
171
-
172
-
173
-
174
-
175
-
176
-
177
-
178
-
179
-
180
-
181
-
182
-
183
-
184
-
185
-
186
-
187
-
188
-
189
-
190
-
191
-
192
-
193
-
194
-
195
-
196
-
197
-
198
-
199
-
200
-
201
-
202
-
203
-
204
-
205
-
206
-
207
-
208
-
209
-
210
-
211
-
212
-
213
-
214
-
215
-
216
-
217
-
218
-
219
-
220
-
221
-
222
-
223
-
224
-
225
-
226
-
227
-
228
-
229
-
230
-
231
-
232
-
233
-
234
-
235
-
236
-
237
-
238
-
239
-
240
-
241
-
242
-
243
-
244
-
245
-
246
-
247
-
248
-
249
-
250
 |
 |
