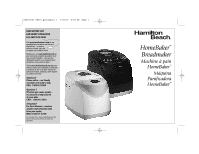
Hamilton Beach 29881 Use & Care - Page 5
Quick-Start Guide - paddle
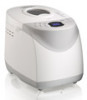 |
UPC - 040094298815
View all Hamilton Beach 29881 manuals
Add to My Manuals
Save this manual to your list of manuals |
Page 5 highlights
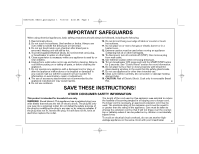
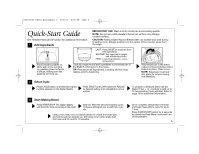
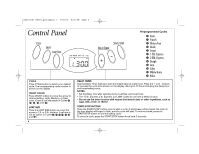
840194101 ENv01.qxd:Layout 1 7/30/10 8:38 AM Page 5 Quick-Start Guide See "Detailed Instructions" section for additional information. 1 Add Ingredients BEFORE FIRST USE: Wash and dry bread pan and kneading paddle. NOTE: Do not use metal utensils in bread pan as they may damage nonstick surface. CAUTION! Falling Object Hazard. Breadmaker can wobble and walk during kneading cycle. Always position it in the center of the counter away from the edge. Place kneading paddle on shaft, with arrow pointing up, pushing down as far as it will go, making sure flat surfaces are lined up. LAST: Yeast. MUST be separate from wet ingredients SECOND: Dry ingredients (sugar, salt, shortening, flour) FIRST: Liquid ingredients - room temperature Carefully measure and add ingredients to the bread pan in the EXACT order given in the recipe. TIP: Premeasure all ingredients, including add-ins (nuts, raisins), prior to beginning. Place bread pan in the breadmaker, turning clockwise until it locks into place. Close cover. NOTE: Bread pan must lock into place for proper mixing and kneading. 2 Select Cycle Press CYCLE button until desired program number appears on the digital display. Press CRUST and LOAF buttons to ADJUST to desired setting (not adjustable in some cycles). To program a Delayed Start, use the Delay Timer + or - buttons to add up to 12 hours before Cycle will start. Refer to page 10 for additional information. 3 Start Making Bread Press START/STOP. The digital display will show the time remaining in the cycle. Add-ins: After the second kneading cycle, 10 beeps will signal you to add fruit, nuts, etc. Using oven mitts, turn counterclockwise to unlock the bread pan, and pull bread pan straight up. Still using oven mitts, shake loaf from pan and let cool for 10 minutes. Once complete, breadmaker will beep and begin Keep Warm cycle for up to 1 hour. Press START/STOP button for 2 seconds to cancel the Keep Warm cycle and turn off breadmaker. 5
-
 1
1 -
 2
2 -
 3
3 -
 4
4 -
 5
5 -
 6
6 -
 7
7 -
 8
8 -
 9
9 -
 10
10 -
 11
11 -
12
-
13
-
14
-
15
-
16
-
17
-
18
-
19
-
20
-
21
-
22
-
23
-
24
-
25
-
26
-
27
-
28
-
29
-
30
-
31
-
32
-
33
-
34
-
35
-
36
-
37
-
38
-
39
-
40
-
41
-
42
-
43
-
44
-
45
-
46
-
47
-
48
-
49
-
50
-
51
-
52
-
53
-
54
-
55
-
56
-
57
-
58
-
59
-
60
-
61
-
62
-
63
-
64
-
65
-
66
-
67
-
68
-
69
-
70
-
71
-
72
-
73
-
74
-
75
-
76
-
77
-
78
-
79
-
80
-
81
-
82
-
83
-
84
-
85
-
86
-
87
-
88
-
89
-
90
-
91
-
92
 |
 |
