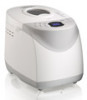
Hamilton Beach 29881 Use & Care - Page 9
Detailed, Instructions - parts
 |
UPC - 040094298815
View all Hamilton Beach 29881 manuals
Add to My Manuals
Save this manual to your list of manuals |
Page 9 highlights
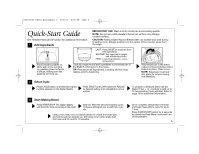
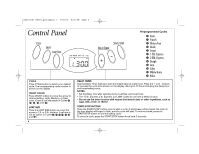
840194101 ENv01.qxd:Layout 1 7/30/10 8:38 AM Page 9 Detailed Instructions BEFORE FIRST USE: • Check for any missing or damaged parts. • Clean all the parts according to the Cleaning section. • Set the breadmaker on Bake mode and bake empty for about 10 minutes. Let unit cool down and clean all the detached parts again. The appliance may emit a little smoke and/or odor when you turn it on for the first time. This is normal and will subside after the first or second use. Make sure the appliance has sufficient ventilation. • Dry all parts thoroughly. The appliance is ready for use. 1 Using the bread pan handle, turn the bread pan counterclockwise and then pull it out of the appliance. LAST: Yeast. MUST be separate from wet ingredients SECOND: Dry ingredients (sugar, salt, shortening, flour) 2 Push the kneading paddle onto the drive shaft inside the bread pan. CAUTION! Falling Object Hazard. Breadmaker can wobble and walk during kneading cycle. Always position it in the center of the counter away from the edge. FIRST: Liquid ingredients - room 3 temperature Add the ingredients to the bread pan in the order listed in the recipe. First, add the liquids, sugar, and salt; then the flour; and last the yeast. NOTE: Make sure that yeast does not come into contact with salt or liquids. 5 Plug in the appliance. A beep will be heard and the display will default to Cycle . 4 Place the bread pan into the appliance and make sure it is firmly locked in place by turning it clockwise. Close the lid. 6 Press the CYCLE button until your desired cycle is displayed. 7 Press the LOAF SIZE button to move the arrow to 1.5- or 2-lb. loaf size. (Loaf size is not an option in Cycles and .) 8 Press the CRUST button to move the arrow to desired setting: Light, Medium, or Dark crust. (Crust is not adjustable in Cycles , , , , and .) 9
-
 1
1 -
2
-
3
-
 4
4 -
 5
5 -
 6
6 -
 7
7 -
 8
8 -
 9
9 -
 10
10 -
 11
11 -
 12
12 -
 13
13 -
 14
14 -
15
-
16
-
17
-
18
-
19
-
20
-
21
-
22
-
23
-
24
-
25
-
26
-
27
-
28
-
29
-
30
-
31
-
32
-
33
-
34
-
35
-
36
-
37
-
38
-
39
-
40
-
41
-
42
-
43
-
44
-
45
-
46
-
47
-
48
-
49
-
50
-
51
-
52
-
53
-
54
-
55
-
56
-
57
-
58
-
59
-
60
-
61
-
62
-
63
-
64
-
65
-
66
-
67
-
68
-
69
-
70
-
71
-
72
-
73
-
74
-
75
-
76
-
77
-
78
-
79
-
80
-
81
-
82
-
83
-
84
-
85
-
86
-
87
-
88
-
89
-
90
-
91
-
92
 |
 |
