HP 2605dn HP Color LaserJet 2605/2605dn/2605dtn - Software Technical Reference - Page 258
Layout, Orientation, Paper source, Copies, Custom button, Unprintable Area button, More Options - not printing red
 |
View all HP 2605dn manuals
Add to My Manuals
Save this manual to your list of manuals |
Page 258 highlights
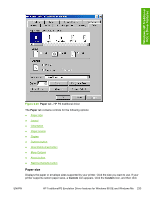
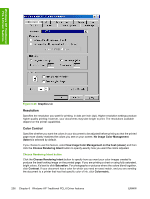
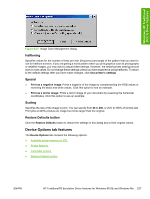
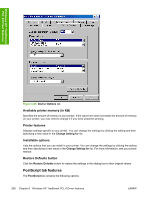
Windows HP Traditional PCL 6 Driver features Custom to specify a paper size. A red circle with a line through one of the paper icons means that you can choose that paper size, but there is a setting you must change before your printer can print on that size of paper. The setting may be in this dialog box, such as the Paper source setting, or it may be a setting on the printer. Layout Specifies how many pages of your document to print on one piece of paper. For example, 1 up prints one page of your document per piece of paper; 2 up prints two pages on one piece of paper, dividing the paper in half. This option is ignored if you print an EPS file. Orientation Determines how the document is positioned on the page. Click Portrait or Landscape to see an example. In Landscape mode, you also have the option of rotating the image. Select the Rotated check box to see an example. To see the current dimensions of the page (the paper size and the unprintable margins), point to the page icon, and then press and hold down the mouse button. Paper source Specifies where the paper you want to use is located in the printer. Different printer models support different paper sources, such as upper tray, envelope feed, mixed bins, and manual feed. If you click AutoSelect Tray, the printer uses the paper tray that supports the paper size you have chosen. Copies Sets the number of copies you want printed. You can print from 1 to 999 copies. If you print an EPS file, this option is ignored. Some software programs override this setting. Custom button Click the Custom button to specify a custom paper size. You can define up to three custom sizes at a time, if your printer supports it. If this button is unavailable, click a custom paper icon in the Paper size section. Unprintable Area button Click the Unprintable Area button to view the page margins (the area of the page that is unavailable for printing). If you change these settings, be sure to check your printer manual. Some printers have built-in margins. If the built-in margins are greater than the margins you specify here, the text in your document could be cut off. More Options Click the More Options button to display a duplex printing (printing on both sides of the media) options dialog box. The available options are: ● None (default setting) ● Flip on long edge (select this option for a left edge binding) ● Flip on short edge (select this option for a top edge binding) 234 Chapter 6 Windows HP Traditional PCL 6 Driver features ENWW
-
 1
1 -
2
-
3
-
4
-
5
-
6
-
7
-
8
-
9
-
10
-
11
-
12
-
13
-
14
-
15
-
16
-
17
-
18
-
19
-
20
-
21
-
22
-
23
-
24
-
25
-
26
-
27
-
28
-
29
-
30
-
31
-
32
-
33
-
34
-
35
-
36
-
37
-
38
-
39
-
40
-
41
-
42
-
43
-
44
-
45
-
46
-
47
-
48
-
49
-
50
-
51
-
52
-
53
-
54
-
55
-
56
-
57
-
58
-
59
-
60
-
61
-
62
-
63
-
64
-
65
-
66
-
67
-
68
-
69
-
70
-
71
-
72
-
73
-
74
-
75
-
76
-
77
-
78
-
79
-
80
-
81
-
82
-
83
-
84
-
85
-
86
-
87
-
88
-
89
-
90
-
91
-
92
-
93
-
94
-
95
-
96
-
97
-
98
-
99
-
100
-
101
-
102
-
103
-
104
-
105
-
106
-
107
-
108
-
109
-
110
-
111
-
112
-
113
-
114
-
115
-
116
-
117
-
118
-
119
-
120
-
121
-
122
-
123
-
124
-
125
-
126
-
127
-
128
-
129
-
130
-
131
-
132
-
133
-
134
-
135
-
136
-
137
-
138
-
139
-
140
-
141
-
142
-
143
-
144
-
145
-
146
-
147
-
148
-
149
-
150
-
151
-
152
-
153
-
154
-
155
-
156
-
157
-
158
-
159
-
160
-
161
-
162
-
163
-
164
-
165
-
166
-
167
-
168
-
169
-
170
-
171
-
172
-
173
-
174
-
175
-
176
-
177
-
178
-
179
-
180
-
181
-
182
-
183
-
184
-
185
-
186
-
187
-
188
-
189
-
190
-
191
-
192
-
193
-
194
-
195
-
196
-
197
-
198
-
199
-
200
-
201
-
202
-
203
-
204
-
205
-
206
-
207
-
208
-
209
-
210
-
211
-
212
-
213
-
214
-
215
-
216
-
217
-
218
-
219
-
220
-
221
-
222
-
223
-
224
-
225
-
226
-
227
-
228
-
229
-
230
-
231
-
232
-
233
-
234
-
235
-
236
-
237
-
238
-
239
-
240
-
241
-
242
-
243
-
244
-
245
-
246
-
247
-
248
-
249
-
250
-
251
-
252
-
 253
253 -
 254
254 -
 255
255 -
 256
256 -
 257
257 -
 258
258 -
 259
259 -
 260
260 -
 261
261 -
 262
262 -
 263
263 -
264
-
265
-
266
-
267
-
268
-
269
-
270
-
271
-
272
-
273
-
274
-
275
-
276
-
277
-
278
-
279
-
280
-
281
-
282
-
283
-
284
-
285
-
286
-
287
-
288
-
289
-
290
-
291
-
292
-
293
-
294
-
295
-
296
-
297
-
298
-
299
-
300
-
301
-
302
-
303
-
304
-
305
-
306
-
307
-
308
-
309
-
310
-
311
-
312
-
313
-
314
-
315
-
316
-
317
-
318
-
319
-
320
-
321
-
322
-
323
-
324
-
325
-
326
-
327
-
328
-
329
-
330
-
331
-
332
-
333
-
334
-
335
-
336
-
337
-
338
-
339
-
340
-
341
-
342
-
343
-
344
-
345
-
346
-
347
-
348
-
349
-
350
-
351
-
352
-
353
-
354
-
355
-
356
-
357
-
358
-
359
-
360
-
361
-
362
-
363
-
364
-
365
-
366
-
367
-
368
-
369
-
370
-
371
-
372
 |
 |