HP LaserJet Enterprise 600 HP LaserJet Enterprise 600 M601, M602, and M603 Ser - Page 109
Use job-storage features when printing, Release a job-storage print job
 |
View all HP LaserJet Enterprise 600 manuals
Add to My Manuals
Save this manual to your list of manuals |
Page 109 highlights
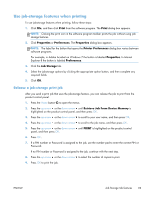
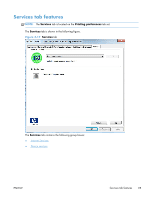
Use job-storage features when printing To use job-storage features when printing, follow these steps: 1. Click File, and then click Print from the software program. The Print dialog box appears. NOTE: Clicking the print icon in the software program toolbar prints the job without using jobstorage features. 2. Click Properties or Preferences. The Properties dialog box appears. NOTE: The label for the button that opens the Printer Preferences dialog box varies between software programs. For example, in Adobe Acrobat on Windows 7 the button is labeled Properties. In Internet Explorer 8 the button is labeled Preferences. 3. Click the Job Storage tab. 4. Select the job-storage options by clicking the appropriate option button, and then complete any required fields. 5. Click OK. Release a job-storage print job After you send a print job that uses the job-storage feature, you can release the job to print from the product control panel. 1. Press the Home button to open the menus. 2. Press the up arrow or the down arrow until Retrieve Job From Device Memory is highlighted on the product control panel, and then press OK. 3. Press the up arrow or the down arrow to scroll to your user name, and then press OK. 4. Press the up arrow or the down arrow to scroll to the job name, and then press OK. 5. Press the up arrow or the down arrow until PRINT is highlighted on the product control panel, and then press OK. 6. Press OK. 7. If a PIN number or Password is assigned to the job, use the number pad to enter the correct PIN or Password. If no PIN number or Password is assigned to the job, continue with the next step. 8. Press the up arrow or the down arrow to select the number of copies to print. 9. Press OK to print the job. ENWW Job Storage tab features 93
-
 1
1 -
2
-
3
-
4
-
5
-
6
-
7
-
8
-
9
-
10
-
11
-
12
-
13
-
14
-
15
-
16
-
17
-
18
-
19
-
20
-
21
-
22
-
23
-
24
-
25
-
26
-
27
-
28
-
29
-
30
-
31
-
32
-
33
-
34
-
35
-
36
-
37
-
38
-
39
-
40
-
41
-
42
-
43
-
44
-
45
-
46
-
47
-
48
-
49
-
50
-
51
-
52
-
53
-
54
-
55
-
56
-
57
-
58
-
59
-
60
-
61
-
62
-
63
-
64
-
65
-
66
-
67
-
68
-
69
-
70
-
71
-
72
-
73
-
74
-
75
-
76
-
77
-
78
-
79
-
80
-
81
-
82
-
83
-
84
-
85
-
86
-
87
-
88
-
89
-
90
-
91
-
92
-
93
-
94
-
95
-
96
-
97
-
98
-
99
-
100
-
101
-
102
-
103
-
 104
104 -
 105
105 -
 106
106 -
 107
107 -
 108
108 -
 109
109 -
 110
110 -
 111
111 -
 112
112 -
 113
113 -
 114
114 -
115
-
116
-
117
-
118
-
119
-
120
-
121
-
122
-
123
-
124
-
125
-
126
-
127
-
128
-
129
-
130
-
131
-
132
-
133
-
134
-
135
-
136
-
137
-
138
-
139
-
140
-
141
-
142
-
143
-
144
-
145
-
146
-
147
-
148
-
149
-
150
-
151
-
152
-
153
-
154
-
155
-
156
-
157
-
158
-
159
-
160
-
161
-
162
-
163
-
164
-
165
-
166
-
167
-
168
 |
 |