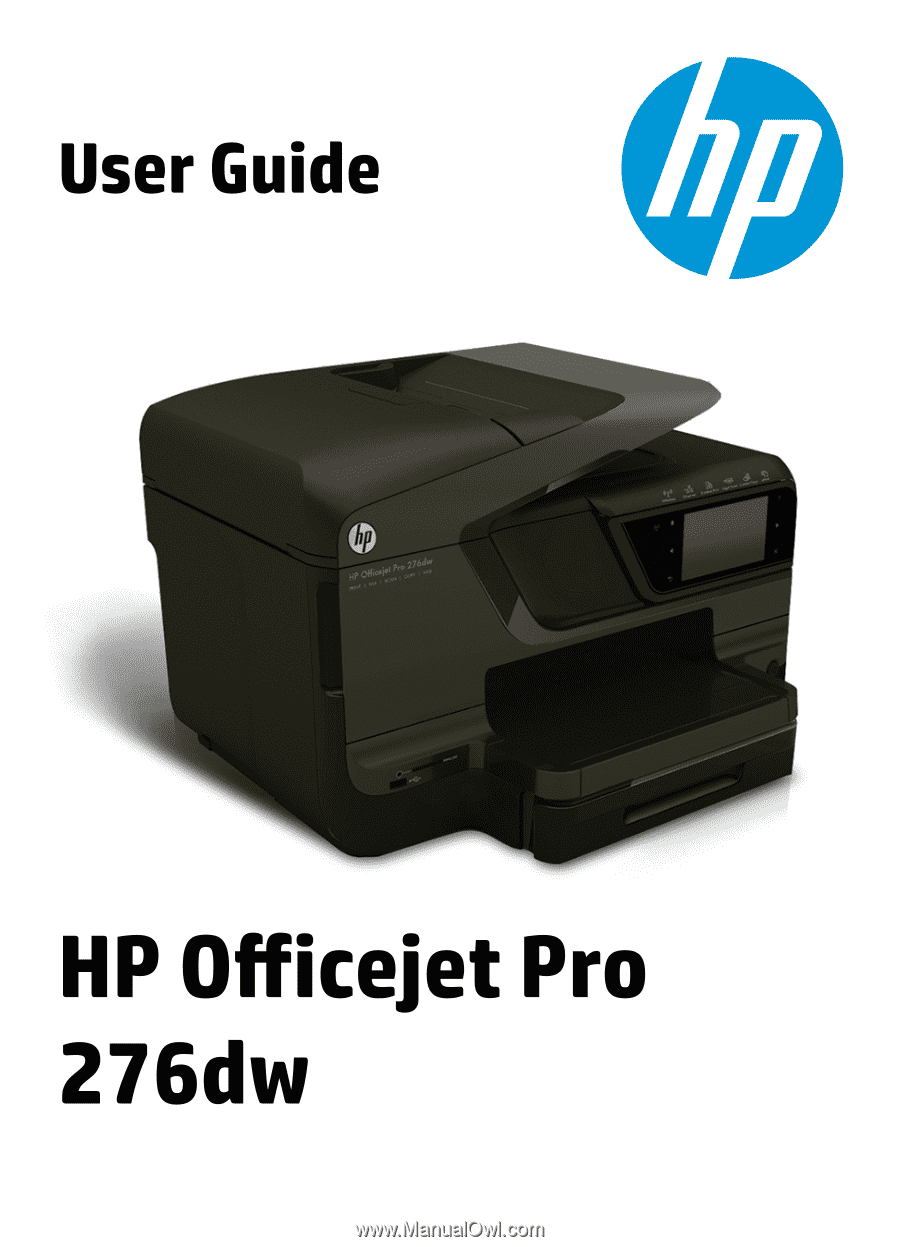
HP Officejet Pro 276dw HP Officejet Pro 276dw - User Guide
HP Officejet Pro 276dw Manual
 |
View all HP Officejet Pro 276dw manuals
Add to My Manuals
Save this manual to your list of manuals |
HP Officejet Pro 276dw manual content summary:
- HP Officejet Pro 276dw | HP Officejet Pro 276dw - User Guide - Page 1
- HP Officejet Pro 276dw | HP Officejet Pro 276dw - User Guide - Page 2
- HP Officejet Pro 276dw | HP Officejet Pro 276dw - User Guide - Page 3
HP Officejet Pro 276dw Multifunction Printer User Guide - HP Officejet Pro 276dw | HP Officejet Pro 276dw - User Guide - Page 4
. 6. Install the product in a protected location where no one can step on or trip over the line cord, and the line cord cannot be damaged. 7. If the product does not operate normally, see Solve a problem. 8. There are no user-serviceable parts inside. Refer servicing to qualified service personnel. - HP Officejet Pro 276dw | HP Officejet Pro 276dw - User Guide - Page 5
and photo paper 24 Load custom-size paper...25 Insert a memory device...26 Install the accessories...27 Install the automatic two-sided printing accessory (duplexer 27 Install Tray 2...28 Configure trays...30 Turn on accessories in the printer driver 31 To turn on accessories (Windows 31 To - HP Officejet Pro 276dw | HP Officejet Pro 276dw - User Guide - Page 6
device 41 Print on special and custom-size paper 42 Print on special or custom-size paper (Windows 42 Print on special or custom-size paper (Mac OS X 43 Set up custom sizes (Mac OS X 43 HP ePrint...44 HP Wireless Direct...44 Turn on HP wireless direct printing 45 Print from a wireless-capable - HP Officejet Pro 276dw | HP Officejet Pro 276dw - User Guide - Page 7
HP Digital Fax...61 5 Copy Copy documents...62 Change copy settings...62 Save copy settings...63 Collate Copies...63 ID Copy ...63 HP Copy Fix...64 6 Fax Send a fax...65 Send a standard fax...65 Send a standard fax from the computer 66 Send a fax manually 73 Set the paper size for received faxes - HP Officejet Pro 276dw | HP Officejet Pro 276dw - User Guide - Page 8
81 Change Printer Apps...91 Manage Printer Apps...92 Turn off Printer Apps...92 Remove Web Services...92 8 Work with ink cartridges Information on ink cartridges and the printhead 93 Check the estimated ink levels 94 Print when one or more ink cartridges are depleted 94 Replace the ink cartridges - HP Officejet Pro 276dw | HP Officejet Pro 276dw - User Guide - Page 9
Contents 9 Solve a problem HP support...98 Obtain electronic support...99 HP support by phone...99 Before you call...100 Phone support period 100 After the phone support period 100 General troubleshooting tips and resources 100 Solve printer problems...101 The printer shuts down unexpectedly 101 - HP Officejet Pro 276dw | HP Officejet Pro 276dw - User Guide - Page 10
problems...148 Understand the Printer Status Report 149 Printhead maintenance...151 Clean the printhead...151 Calibrate the linefeed...152 Align the printhead...152 Reinstall the printhead...153 Understand the network configuration page 155 Clear jams...157 Clear paper jams...157 Avoid paper jams - HP Officejet Pro 276dw | HP Officejet Pro 276dw - User Guide - Page 11
supported paper 167 Set minimum margins 170 Guidelines for printing on both sides of a page 171 Print specifications...171 Copy specifications...171 Fax specifications...171 Scan specifications...172 Web Services specifications 172 HP ePrint...172 Printer Apps...172 HP users in Canada 183 Notice - HP Officejet Pro 276dw | HP Officejet Pro 276dw - User Guide - Page 12
online 198 Supplies...198 Ink cartridges and printheads 198 HP paper...199 C Additional fax setup Set up faxing (parallel phone systems 200 Select the correct fax setup for your home or office 201 Case A: Separate fax line (no voice calls received 203 Case B: Set up the printer with DSL 204 - HP Officejet Pro 276dw | HP Officejet Pro 276dw - User Guide - Page 13
Change IP settings...225 Configure the printer's firewall settings 225 Creating and using firewall rules 225 Reset network settings...227 Set up the printer HP software 232 Windows...233 Mac OS X...233 E Printer management tools Toolbox (Windows)...234 HP protocols and services 238 Administrator - HP Officejet Pro 276dw | HP Officejet Pro 276dw - User Guide - Page 14
with mobility impairments, the HP software functions can be executed through keyboard commands. The HP software also supports Windows accessibility options such as StickyKeys, ToggleKeys, FilterKeys, and MouseKeys. The printer doors, buttons, paper trays, and paper guides can be operated by users - HP Officejet Pro 276dw | HP Officejet Pro 276dw - User Guide - Page 15
option. NOTE: The printer's Sleep Mode and Schedule On and Off features are temporarily not available if one or more of the ink cartridges are missing. After the cartridge is reinstalled, these features resume. CAUTION: HP recommends that you replace any missing cartridges as soon as possible - HP Officejet Pro 276dw | HP Officejet Pro 276dw - User Guide - Page 16
Chapter 1 Understand the printer parts This section contains the following topics: • Front view • Printing supplies area • Back view Front view ) 5 Front universal serial bus (USB) port 6 Memory card slots 7 Tray 1 8 Output tray extension 9 (Power button) 10 Control panel 12 Get started - HP Officejet Pro 276dw | HP Officejet Pro 276dw - User Guide - Page 17
Printing supplies area 1 Ink cartridge access door 2 Ink cartridges 3 Printhead 4 Printhead latch Back view 1 Fax port (2-EXT) 2 Fax port (1-LINE ) 3 Ethernet network port 4 Rear universal serial bus (USB) port 5 Power input Understand the printer parts 13 - HP Officejet Pro 276dw | HP Officejet Pro 276dw - User Guide - Page 18
Chapter 1 (continued) 6 Automatic two-sided printing accessory (duplexer) Use the printer control panel This section contains the following topics: • Overview of buttons and lights • Control panel display icons • Change printer settings Overview of buttons and lights The following diagrams and - HP Officejet Pro 276dw | HP Officejet Pro 276dw - User Guide - Page 19
that HP ePrint is turned on. For more information, see HP ePrint. Displays a screen where you can make copies or select other options. Displays a screen where you can make a fax, or choose fax settings. Displays a screen where you can make a scan, or change scan settings. Use the printer control - HP Officejet Pro 276dw | HP Officejet Pro 276dw - User Guide - Page 20
for generating reports, changing fax and other maintenance settings, and accessing the Help screen. Displays the Network screen for selecting options. Provides more information about the printer's features. Displays a screen where you can see information about the ink cartridges, including fill - HP Officejet Pro 276dw | HP Officejet Pro 276dw - User Guide - Page 21
mode and settings, print reports, or get help for the printer. TIP: If the printer is connected to a computer, you can also change the printer settings using HP software tools available on your computer, such as the HP printer software, HP Utility (Mac OS X), or the EWS. For more information about - HP Officejet Pro 276dw | HP Officejet Pro 276dw - User Guide - Page 22
paper The printer is designed to work well with most types of office media. It is best to test a variety of print media types before buying large quantities. Use HP media for optimum print quality. For more information about HP media, visit the HP website at www.hp.com. HP recommends plain papers - HP Officejet Pro 276dw | HP Officejet Pro 276dw - User Guide - Page 23
use this paper with any inkjet printer. Available in semi-gloss finish in 8.5 x 11 inch, A4, 4 x 6 inch, and 10 x 15 cm. It is acid-free for longer lasting documents. To order HP papers and other supplies, go to www.hp.com. Go to Shop for Products and Services and select Ink, toner and paper. NOTE - HP Officejet Pro 276dw | HP Officejet Pro 276dw - User Guide - Page 24
paper or Load an original in the automatic document feeder (ADF). • To prevent jams, poor print quality, and other printing problems not clean. For more information, see Maintain the printer. To load an original on the scanner glass Use guides along the edge of the scanner glass. 3. Close the lid. - HP Officejet Pro 276dw | HP Officejet Pro 276dw - User Guide - Page 25
ADF; this might cause damage to your photos. Use only media that is supported by the printer. For more information, see Tips for selecting and using paper. NOTE: Double-sided documents on A4-, Letter, or legal-size paper can be scanned using the ADF and the product's scanning software. NOTE: Some - HP Officejet Pro 276dw | HP Officejet Pro 276dw - User Guide - Page 26
these instructions to load standard paper. 1. Pull out Tray 1. 2. Insert the media print-side down in the center of the tray. Make sure the stack of media aligns with the line on the width guide, and is not higher than the paper stack line on the guide. NOTE: Do not load paper while the printer is - HP Officejet Pro 276dw | HP Officejet Pro 276dw - User Guide - Page 27
you have loaded, and then reinsert the tray. NOTE: To load legal-size paper, press the blue latch at the bottom left of the input tray and fully extend the tray. 4. Pull out the extension on the output tray. Load envelopes Use these instructions to load an envelope. 1. Pull out Tray 1. Load - HP Officejet Pro 276dw | HP Officejet Pro 276dw - User Guide - Page 28
while the printer is printing. 3. Slide the paper guides in the tray to adjust them for the media size that you have loaded, and then reinsert the tray. 4. Pull out the extension on the output tray. Load cards and photo paper Use these instructions to load cards or photo paper. 1. Pull out Tray - HP Officejet Pro 276dw | HP Officejet Pro 276dw - User Guide - Page 29
paper guides in the tray to adjust them for the media size that you have loaded, and then reinsert the tray. 4. Pull out the extension on the output tray. Load custom-size paper Use these instructions to load custom-size paper. CAUTION: Use only custom-size paper that is supported by the printer - HP Officejet Pro 276dw | HP Officejet Pro 276dw - User Guide - Page 30
photo light is not blinking. Also, never insert more than one memory card at a time as this can also damage files on the memory cards. NOTE: The printer does not support encrypted memory cards. For more information on the supported memory cards, see Memory device specifications. To insert a memory - HP Officejet Pro 276dw | HP Officejet Pro 276dw - User Guide - Page 31
the automatic two-sided printing accessory (duplexer) • Install Tray 2 • Configure trays • Turn on accessories in the printer driver Install the automatic two-sided printing accessory (duplexer) You can print on both sides of a sheet of paper automatically. For information on using the duplexer, see - HP Officejet Pro 276dw | HP Officejet Pro 276dw - User Guide - Page 32
the unit; use them only for removing the unit from the printer. Install Tray 2 Tray 2 can hold up to 250 sheets of plain paper. For ordering information, see HP supplies and accessories. To install Tray 2 1. Unpack the tray, remove the packing tapes and materials, and move the tray to the - HP Officejet Pro 276dw | HP Officejet Pro 276dw - User Guide - Page 33
the tray out of the printer by grasping under the front of the tray. 2. Insert the paper print-side down in the center of the tray. Make sure the stack of paper aligns with the line on the width guide, and does not exceed the line marking on the guide. NOTE: Tray 2 can be loaded - HP Officejet Pro 276dw | HP Officejet Pro 276dw - User Guide - Page 34
to... Follow these steps Load both trays with the same media, and have • the printer pick media from one tray if the other one is empty. • Load media in Tray 1 and Tray 2. For more information, see Load paper. Make sure tray lock is disabled. Have both special media (such as transparencies or - HP Officejet Pro 276dw | HP Officejet Pro 276dw - User Guide - Page 35
or Print & Scan. 2. Select the printer from list of printers, and then click Options & Supplies. 3. Click the Driver tab. 4. Select the options you want to install, and then click OK. Maintain the printer This section provides instructions for keeping the printer in top working condition. Perform - HP Officejet Pro 276dw | HP Officejet Pro 276dw - User Guide - Page 36
scanner glass 1. Turn the printer off. For more information, see Turn the printer off. 2. Lift the scanner on the printer. Clean the exterior WARNING! Before cleaning the printer, turn the printer off by from the interior of the printer, as well as from the printer control panel. Clean the automatic - HP Officejet Pro 276dw | HP Officejet Pro 276dw - User Guide - Page 37
feeder. Update the printer HP is always working to improve the performance of its printers and bring you the latest features. If the printer is connected to a network and Web Services has been enabled, you can check for and install printer updates. To update the printer, use one of the following - HP Officejet Pro 276dw | HP Officejet Pro 276dw - User Guide - Page 38
position causing problems with the ink cartridges and print quality issues. CAUTION: HP recommends that you replace any missing cartridges as soon as possible to avoid print quality issues and possible extra ink usage or damage to the ink system. Never turn off the printer when ink cartridges are - HP Officejet Pro 276dw | HP Officejet Pro 276dw - User Guide - Page 39
Restore factory defaults To restore the the printer to factory defaults, complete the following steps: 1. Touch (right arrow), and then touch Setup. 2. Touch Tools. 3. Touch Restore Factory Defaults. Restore factory defaults 35 - HP Officejet Pro 276dw | HP Officejet Pro 276dw - User Guide - Page 40
Print on envelopes Print photos Print on special and custom-size paper Print documents Follow the instructions for your operating system. • Print documents (Windows) • Print documents (Mac OS X) NOTE: This printer includes HP ePrint, a free service from HP that allows you to print documents on your - HP Officejet Pro 276dw | HP Officejet Pro 276dw - User Guide - Page 41
to begin printing. Print brochures Follow the instructions for your operating system to print brochures, including edge-toedge brochures. • Print brochures (Windows) • Print brochures (Mac OS X) NOTE: This printer includes HP ePrint, a free service from HP that allows you to print documents on your - HP Officejet Pro 276dw | HP Officejet Pro 276dw - User Guide - Page 42
Chapter 2 Print brochures (Windows) NOTE: To set print settings for all print jobs, make the changes in the HP software provided with the printer. For more information on the HP software, see Printer management tools. 1. Load paper in the tray. For more information, see Load paper. 2. On the File - HP Officejet Pro 276dw | HP Officejet Pro 276dw - User Guide - Page 43
(Mac OS X) Print on envelopes (Windows) 1. Load envelopes print-side down in the tray. For more information, see Load paper. 2. On the File menu in your software application, click Print. 3. Make sure the printer you want to use is selected. 4. To change settings, click the button that opens the - HP Officejet Pro 276dw | HP Officejet Pro 276dw - User Guide - Page 44
should be flat before printing. Follow the instructions for your operating system. • Print photos on photo paper (Windows) • Print photos on photo paper (Mac OS X) • Print photos from a memory device NOTE: This printer includes HP ePrint, a free service from HP that allows you to print documents on - HP Officejet Pro 276dw | HP Officejet Pro 276dw - User Guide - Page 45
pop-up menu, and then select the following settings: • Media Type: The appropriate photo paper type • Print Quality: Draft, Normal, or Best NOTE: If you do not see these options, click the disclosure triangle next to the Printer pop-up menu or click Show Details. 4. To print the photo in black and - HP Officejet Pro 276dw | HP Officejet Pro 276dw - User Guide - Page 46
-size paper that is supported by the printer. For more information, see Paper specifications. NOTE: Defining custom-size paper sizes is only available in the HP printing software in Mac OS X. Follow the instructions for your operating system. • Print on special or custom-size paper (Windows) • Print - HP Officejet Pro 276dw | HP Officejet Pro 276dw - User Guide - Page 47
the custom size in the HP software provided with the printer. For instructions, see Set up custom sizes (Mac OS X). 1. Load the appropriate paper in the tray. For more information, see Load paper. 2. Depending on your application use one of the following procedures to select a paper size: From Page - HP Officejet Pro 276dw | HP Officejet Pro 276dw - User Guide - Page 48
instructions on the printer's control panel to enable and set up the printer's Web Services. For more information, see www.hpconnected.com. HP Wireless Direct With HP have installed the HP printer software provided with the printer. • If you are using a mobile device, make sure you have installed a - HP Officejet Pro 276dw | HP Officejet Pro 276dw - User Guide - Page 49
mobile device. 3. From the mobile device, search for and connect to the HP wireless direct printing name, such as HP-Setup-XX-Officejet Pro 276dw (where ** are the unique characters to identify your printer). If HP wireless direct is turned on with security, enter the password when prompted. 4. From - HP Officejet Pro 276dw | HP Officejet Pro 276dw - User Guide - Page 50
tray, select the HP wireless direct printing name, such as HP-Setup-XX-Officejet Pro 276dw (where ** are the unique characters to identify your printer). If HP wireless direct is turned on with security, enter the password when prompted. 4. If the printer has been installed and connected to your - HP Officejet Pro 276dw | HP Officejet Pro 276dw - User Guide - Page 51
-sided printing accessory (duplexer) to be installed on the printer. To print on both sides (Windows) 1. Load the appropriate media. For more information, see Guidelines for printing on both sides of a page and Load paper. 2. Make sure the duplexer is installed correctly. For more information, see - HP Officejet Pro 276dw | HP Officejet Pro 276dw - User Guide - Page 52
not see any options, click the disclosure triangle next to the Printer pop-up menu or click Show Details. 6. Select any other print settings that you want, and then click Print. View Print Resolutions 1. In printer driver, click the Paper/Quality tab, and then click the Advanced button. 2. Click the - HP Officejet Pro 276dw | HP Officejet Pro 276dw - User Guide - Page 53
: If you are scanning an original from the printer control panel or from your computer using the HP printer software, the HP software provided with the printer must be installed on your computer prior to scanning. In addition, on Windows computers, the HP software must be running prior to scanning - HP Officejet Pro 276dw | HP Officejet Pro 276dw - User Guide - Page 54
change the scan resolution setting. 4. Touch Start Scan. Scan an original from HP scanning software Follow the instructions for your operating system. NOTE: Use the HP ). 2. Open the printer software. For more information, see Open the printer software (Windows). In the window that appears, select - HP Officejet Pro 276dw | HP Officejet Pro 276dw - User Guide - Page 55
web server. 3. Click the Scan tab, click Webscan in the left pane, change any settings, and then click Start Scan. TIP: To scan documents as editable text, you must install the HP software included with the printer. For more information, see Scanning documents as editable text. To enable Webscan - HP Officejet Pro 276dw | HP Officejet Pro 276dw - User Guide - Page 56
Open the printer software. For more information, see Open the printer software (Windows). In the window that appears scan, click Scan, and then follow the on-screen instructions. Mac OS X 1. Load your original print-side (ADF). 2. Double-click the HP Scan icon located in the Applications/Hewlett - HP Officejet Pro 276dw | HP Officejet Pro 276dw - User Guide - Page 57
can convert your documents successfully, do the following: • Make sure the scanner glass or ADF window is clean. When the printer scans the document, smudges or dust on the scanner glass or ADF window can be scanned, as well, and can prevent the software from converting the document to editable - HP Officejet Pro 276dw | HP Officejet Pro 276dw - User Guide - Page 58
HP Direct Digital Filing, you can simply walk up to the printer, touch a button on the printer or group access or to one or more email addresses for best settings are being used for each specific task. HP Digital Fax Never lose important faxes misplaced within a stack of paper pages again! With HP - HP Officejet Pro 276dw | HP Officejet Pro 276dw - User Guide - Page 59
like to set up HP Digital Solutions without installing the HP software, you can use the printer's embedded web server. For Scan to Network Folder, Fax to Network Folder • An active network connection. You must be connected to the network. • An existing Windows (SMB) shared folder For information - HP Officejet Pro 276dw | HP Officejet Pro 276dw - User Guide - Page 60
the appropriate instructions. NOTE: You can also use these steps to change settings in the future. This section contains the following topics: • Set up Scan to Network Folder • Set up Scan to Email Set up Scan to Network Folder You can configure up to 10 destination folders for each printer. NOTE - HP Officejet Pro 276dw | HP Officejet Pro 276dw - User Guide - Page 61
Configure the email address which will appear in the FROM portion of the email message sent by the printer. You can add up to 10 Outgoing Email Profiles. You can use the HP software installed on your computer to create these profiles. Add email addresses to the Email Address Book Manage the list - HP Officejet Pro 276dw | HP Officejet Pro 276dw - User Guide - Page 62
steps for your operating system. Windows 1. Open the HP printer software. For more information, see Toolbox (Windows). 2. Go to the Scan section under the Print, Scan & Fax, and then double-click Scan to E-mail Wizard. 3. Click New, and then follow the on-screen instructions. NOTE: After you set the - HP Officejet Pro 276dw | HP Officejet Pro 276dw - User Guide - Page 63
3. Change any settings, and then click Apply. Set up HP Digital Fax With HP Digital Fax, the printer automatically Windows 1. Open the HP printer software. 2. Go to the Fax section under the Print, Scan & Fax, and then double-click Digital Fax Setup. 3. Follow the on-screen instructions. Set up HP - HP Officejet Pro 276dw | HP Officejet Pro 276dw - User Guide - Page 64
. Use the HP Digital Solutions To use the HP Digital Solutions available with the printer, follow the appropriate instructions. Use HP Scan to Network the folder you want to use. 4. If prompted, enter the PIN. 5. Change any scan settings, and then touch Start Scan. NOTE: The connection might - HP Officejet Pro 276dw | HP Officejet Pro 276dw - User Guide - Page 65
the SUBJECT for the email message. 7. Change any scan settings, and then touch Start Scan. NOTE: The connection might take some time, depending on network traffic and connection speed. Use HP Digital Fax After you set up HP Digital Fax, any black-and-white faxes that you receive print, by default - HP Officejet Pro 276dw | HP Officejet Pro 276dw - User Guide - Page 66
This section contains the following topics: • Copy documents • Change copy settings • Save copy settings • Collate Copies • ID Copy • HP Copy Fix Copy documents You can make quality copies from the printer control panel. To copy documents 1. Make sure you have paper loaded in the main tray. For more - HP Officejet Pro 276dw | HP Officejet Pro 276dw - User Guide - Page 67
Resizing originals to fit on different paper sizes To change copy settings for a single job 1. Touch Copy. 2. Select the copy function settings you want to change. 3. Touch Start Black or Start card, and print the images on one side of a single page for reporting and filing. ID Copy 63 - HP Officejet Pro 276dw | HP Officejet Pro 276dw - User Guide - Page 68
sure you have paper loaded in the main tray. For more information, see Load paper. 2. Place your HP Copy Fix HP Copy Fix automatically enhances printouts by removing dark edges and fixing page skew problems for black and white copies. To set HP Copy Fix 1. Touch Copy. 2. Touch Settings. 3. Touch HP - HP Officejet Pro 276dw | HP Officejet Pro 276dw - User Guide - Page 69
the HP software provided with the printer. Change fax settings • Fax and digital phone services • Fax over Internet Protocol • Use reports Send a fax You can send a fax in a variety of ways. Using the printer control panel, you can send a black-and-white or color fax. You can also send a fax manually - HP Officejet Pro 276dw | HP Officejet Pro 276dw - User Guide - Page 70
the installation program provided on the HP software CD provided with the printer. Windows 1. Open the document on your computer that you want to fax. 2. On the File menu in your software application, click Print. 3. From the Name list, select the printer that has "fax" in the name. 4. To change - HP Officejet Pro 276dw | HP Officejet Pro 276dw - User Guide - Page 71
document feeder (ADF). 2. Touch Fax. 3. Dial the number by using the keypad on the phone that is connected to the printer. NOTE: Do not use the control panel display of the printer when manually sending a fax. You must use the keypad on your phone to dial the recipient's number. Send a fax 67 - HP Officejet Pro 276dw | HP Officejet Pro 276dw - User Guide - Page 72
: If you are using a calling card and do not enter your PIN fast enough, the printer might start sending fax tones too soon and cause your PIN not to be recognized by the calling card service. If this is the case, you can create a speed dial entry to store the PIN for - HP Officejet Pro 276dw | HP Officejet Pro 276dw - User Guide - Page 73
late in the evening, when phone lines are not as busy or phone rates are lower, for example. The printer automatically sends your fax at the specified time. You can only schedule one fax to be sent at a time. You can continue to send faxes normally, however, while a fax is scheduled. NOTE - HP Officejet Pro 276dw | HP Officejet Pro 276dw - User Guide - Page 74
entries to send faxes in black and white, because of memory limitations. The printer scans the fax into memory then dials the first number. When a connection Medium. • You can no longer send or receive faxes in color. To change the ECM setting from the control panel 1. From the Home screen, touch - HP Officejet Pro 276dw | HP Officejet Pro 276dw - User Guide - Page 75
(on the 2-EXT port) • On the same phone line, but not directly connected to the printer To receive a fax manually 1. Make sure the printer is turned on and you have paper loaded in the main tray. 2. Remove any originals from the document feeder tray. 3. Set the Rings to Answer setting to a high - HP Officejet Pro 276dw | HP Officejet Pro 276dw - User Guide - Page 76
instruct the sender to press Start on their fax machine. 5. When you hear fax tones from a sending fax machine, do the following: a. Touch Fax, and then select Start Black or Start Color. b. After the printer the printer from printing (for example, the printer runs out of paper), the printer stops - HP Officejet Pro 276dw | HP Officejet Pro 276dw - User Guide - Page 77
does not support polling pass codes. Polling pass codes are a security feature that require the receiving fax machine to provide a pass code to the printer it is polling in order to receive the fax. Make sure the printer you are polling does not have a pass code set up (or has not changed the - HP Officejet Pro 276dw | HP Officejet Pro 276dw - User Guide - Page 78
on one page, if possible. If this feature is turned off, information that does not fit on the first page is printed on a second page. Automatic Reduction is useful when you receive a legal-size fax and Letter-size paper is loaded in the main tray. To set automatic reduction from the printer control - HP Officejet Pro 276dw | HP Officejet Pro 276dw - User Guide - Page 79
supported in your country/region, Junk Fax Blocker does not appear in the Fax Options or Fax Settings menu. NOTE: If no phone numbers are added in the Caller ID list, it is assumed that you are not subscribed to a Caller ID service Caller ID History. - or To manually enter a fax number to block, - HP Officejet Pro 276dw | HP Officejet Pro 276dw - User Guide - Page 80
paper files. NOTE: If the printer is connected to a network using an Ethernet cable or a wireless connection, you can use HP Digital Fax instead. For more information, see HP or Fax to Mac feature) must be on at all times. Only one computer can act as the Fax to PC or Fax to Mac administrator - HP Officejet Pro 276dw | HP Officejet Pro 276dw - User Guide - Page 81
a Mac, you can use HP Utility. To set up Fax to PC (Windows) 1. Open the printer software. For more information, see Open the printer software (Windows). 2. Go to the Fax section under the Print, Scan & Fax, and then double-click Digital Fax Setup. 3. Follow the on-screen instructions. To set up Fax - HP Officejet Pro 276dw | HP Officejet Pro 276dw - User Guide - Page 82
your computer, such as the HP software included with the printer and the printer's embedded web server (EWS). For more information, see Printer management tools. This section contains the following topics: • Set up and change speed-dial entries • Set up and change group speed-dial entries • Delete - HP Officejet Pro 276dw | HP Officejet Pro 276dw - User Guide - Page 83
. Set up and change group speed-dial entries You can store groups of fax numbers as group speed-dial entries. To set up group speed-dial entries NOTE: Before you can create a group speed-dial entry, you must have already created at least one speed-dial entry. 1. On the printer's control panel, touch - HP Officejet Pro 276dw | HP Officejet Pro 276dw - User Guide - Page 84
, see Load paper. 2. On the printer's control panel, touch (right arrow), and then touch Setup. 3. Touch Fax Setup, and then touch Speed Dial Setup. 4. Touch Print Speed Dial List. Change fax settings After completing the steps in the getting started guide that came with the printer, use the - HP Officejet Pro 276dw | HP Officejet Pro 276dw - User Guide - Page 85
the setting. Change the answer ring pattern for distinctive ring Many phone companies offer a distinctive ring feature that allows you to have several phone numbers on one phone line. When you subscribe to this service, each number is assigned a different ring pattern. You can set up the printer to - HP Officejet Pro 276dw | HP Officejet Pro 276dw - User Guide - Page 86
not be changed unless you have multiple numbers on the same telephone line. Touch Yes to continue. 6. Do one of the following: • Touch the ring pattern assigned by your telephone company to fax calls. - Or - • Touch Ring Pattern Detection, and then follow the instructions on the printer's control - HP Officejet Pro 276dw | HP Officejet Pro 276dw - User Guide - Page 87
You can set the fax speed used to communicate between your printer and other fax machines when sending and receiving faxes. If you use one of the following, setting the fax speed to a slower speed might be required: • An Internet phone service • A PBX system • Fax over Internet Protocol (FoIP) • An - HP Officejet Pro 276dw | HP Officejet Pro 276dw - User Guide - Page 88
. (For more information about changing the fax speed, see Set the fax speed. For more information about using ECM, see Send a fax in Error Correction Mode. If you have questions about Internet faxing, contact your Internet faxing services support department or your local service provider for further - HP Officejet Pro 276dw | HP Officejet Pro 276dw - User Guide - Page 89
possible printing delays. You do not need to replace the ink cartridges until prompted to do so. NOTE: Ensure that the printhead and ink cartridges are in good condition and installed properly. For more information, see Work with ink cartridges. This section contains the following topics: • Print - HP Officejet Pro 276dw | HP Officejet Pro 276dw - User Guide - Page 90
touch Advanced Fax Setup. 3. Touch Fax Error Report. 4. Touch to select one of the following. On (Send and Receive) Prints whenever a fax error of faxes that have been received and sent by the printer. To print the fax log from the printer control panel 1. Touch (right arrow), and then touch Setup - HP Officejet Pro 276dw | HP Officejet Pro 276dw - User Guide - Page 91
. View the Call History Use the following procedure to view a list of all the calls placed from the printer. NOTE: The call history cannot be printed. You can only view it from the printer's control panel display. To view the Call History 1. Touch (right arrow), and then touch Fax. 2. Touch (Call - HP Officejet Pro 276dw | HP Officejet Pro 276dw - User Guide - Page 92
• Printer Apps HP ePrint HP ePrint is a free service from HP that allows you to print to your HP ePrint-enabled printer anytime, from any location. It's as simple as sending an email to the email address assigned to your printer when you enable Web Services on the printer. No special drivers or - HP Officejet Pro 276dw | HP Officejet Pro 276dw - User Guide - Page 93
you didn't set up Web Services when you installed the HP software on your computer, you can still use the software to set up Web Services. To set up Web Services, complete the following steps for your operating system: Set up Web Services (Windows) 1. Open the printer software. For more information - HP Officejet Pro 276dw | HP Officejet Pro 276dw - User Guide - Page 94
connecting to the Internet, enter these settings. 6. Follow the instructions on the Web Services information sheet to finish the setup. Use Web Services The following section describes how to use and configure Web Services. • HP ePrint • Printer Apps HP ePrint HP ePrint allows you to print to your - HP Officejet Pro 276dw | HP Officejet Pro 276dw - User Guide - Page 95
, complete the following steps: 1. From the Home screen, touch (HP ePrint), and then touch Settings. 2. Touch ePrint, and then touch Off. NOTE: To remove all Web Services, see Remove Web Services. Printer Apps Printer Apps allow you to easily locate and print pre-formatted web content, directly - HP Officejet Pro 276dw | HP Officejet Pro 276dw - User Guide - Page 96
, touch 2. Touch Apps, and then touch Off. (HP ePrint), and then touch Settings. NOTE: To remove all Web Services, see Remove Web Services. Remove Web Services To remove Web Services, complete the following steps: 1. On the printer's control panel display, touch Settings. 2. Touch Remove Web - HP Officejet Pro 276dw | HP Officejet Pro 276dw - User Guide - Page 97
printer, you need to perform some simple maintenance procedures. This section provides guidelines for handling the ink cartridges, instructions for replacing the ink cartridges, and aligning and cleaning the printhead. TIP: If you have problems copying documents, see Print quality troubleshooting - HP Officejet Pro 276dw | HP Officejet Pro 276dw - User Guide - Page 98
up and in use. Leaving one or more cartridge slots empty for an extended period may lead to print quality problems and possibly damage the printhead. If you have recently left a cartridge out of the printer for an extended period, or if you have had a recent paper jam, and have noticed poor print - HP Officejet Pro 276dw | HP Officejet Pro 276dw - User Guide - Page 99
handle on the print carriage to install the ink cartridges. Doing so could cause the printhead or ink cartridges to be incorrectly seated, which can cause errors or print quality problems. The latch must remain down in order to correctly install the ink cartridges. Replace the ink cartridges 95 - HP Officejet Pro 276dw | HP Officejet Pro 276dw - User Guide - Page 100
letter as the color you are installing. 6. Repeat steps 3 through 5 for each ink cartridge you are replacing. 7. Close the ink cartridge access door. Related topics Ink cartridges and printheads Store printing supplies Ink cartridges can be left in the printer for extended periods of time. However - HP Officejet Pro 276dw | HP Officejet Pro 276dw - User Guide - Page 101
usage information collection. NOTE: To re-enable the usage information function, restore the factory defaults. NOTE: You can continue to use the cartridge in the HP printer if you turn off the memory chip's ability to collect the printer's usage information. Anonymous Usage Information Storage 97 - HP Officejet Pro 276dw | HP Officejet Pro 276dw - User Guide - Page 102
your problem, try using one of the following support services to obtain assistance. This section contains the following topics: • HP support • General troubleshooting tips and resources • Solve printer problems • Print quality troubleshooting • Solve paper-feed problems • Solve copy problems • Solve - HP Officejet Pro 276dw | HP Officejet Pro 276dw - User Guide - Page 103
can also obtain support from the HP software for Windows or Mac OS X, which provide easy, step-by-step solutions to common printing problems. For more information, see Printer management tools. Support options and availability vary by printer, country/region, and language. HP support by phone The - HP Officejet Pro 276dw | HP Officejet Pro 276dw - User Guide - Page 104
Clear jams. • For paper-feed problems, such as the paper skew and paper pick, see Solve paperfeed problems. • (Power button) light is on and not blinking. When the printer is turned on for the first time, it takes approximately 12 minutes to initialize it after the ink cartridges are installed - HP Officejet Pro 276dw | HP Officejet Pro 276dw - User Guide - Page 105
running Windows. • You are not running too many programs when you are performing a task. Close programs that you are not using or restart the computer before attempting the task again. Solve printer problems TIP: You can visit the HP online support website at www.hp.com/support for information - HP Officejet Pro 276dw | HP Officejet Pro 276dw - User Guide - Page 106
source of the communication problem. Re-enable the firewall. The printer prints slowly Try the following solutions if the printer is printing very slowly. • Solution 1: Use a lower print quality setting • Solution 2: Check the ink levels • Solution 3: Contact HP support Solution 1: Use a lower print - HP Officejet Pro 276dw | HP Officejet Pro 276dw - User Guide - Page 107
up and in use. Leaving one or more cartridge slots empty for an extended period may lead to print quality problems and possibly damage the printhead. If you have recently left a cartridge out of the printer for an extended period, or if you have had a recent paper jam, and have noticed poor print - HP Officejet Pro 276dw | HP Officejet Pro 276dw - User Guide - Page 108
more information, see Turn the printer off. Make sure all ink cartridges are installed. If any of the ink cartridge is missing, the printer will perform extra servicing to protect the printhead. Blank or partial page printed Clean the printhead Complete the printhead cleaning procedure. For more - HP Officejet Pro 276dw | HP Officejet Pro 276dw - User Guide - Page 109
printout. TIP: You can visit the HP online support website at www.hp.com/support for information and utilities that can help you correct many common printer problems. • Solution 1: Make sure you are using genuine HP ink cartridges • Solution 2: Check the ink levels Print quality troubleshooting 105 - HP Officejet Pro 276dw | HP Officejet Pro 276dw - User Guide - Page 110
up and in use. Leaving one or more cartridge slots empty for an extended period may lead to print quality problems and possibly damage the printhead. If you have recently left a cartridge out of the printer for an extended period, or if you have had a recent paper jam, and have noticed poor print - HP Officejet Pro 276dw | HP Officejet Pro 276dw - User Guide - Page 111
, there is not a problem with your ink supplies. Therefore, replacing the ink cartridges is not necessary. For more information, see: Select paper Cause: The wrong kind of paper was loaded in the input tray. If this did not solve the issue, try the next solution. Print quality troubleshooting 107 - HP Officejet Pro 276dw | HP Officejet Pro 276dw - User Guide - Page 112
sure photo paper such as HP Advanced Photo Paper is loaded in the input tray. NOTE: On some computer screens, colors might appear differently than they do when printed on paper. In this case, there is nothing wrong with the printer, print settings, or ink cartridges. No further troubleshooting is - HP Officejet Pro 276dw | HP Officejet Pro 276dw - User Guide - Page 113
Do not remove the depleted cartridge until you have a new ink cartridge available to replace. For information about how to install new cartridges, see Replace the ink cartridges. 2. Calibrate the linefeed. For more information, see Calibrate the linefeed. 3. Align the printhead. For more information - HP Officejet Pro 276dw | HP Officejet Pro 276dw - User Guide - Page 114
for technical support. Cause: There was a problem with the printhead. Solve paper-feed problems TIP: You can visit the HP online support website at www.hp.com/support for information and utilities that can help you correct many common printer problems. Media is not supported for the printer or tray - HP Officejet Pro 276dw | HP Officejet Pro 276dw - User Guide - Page 115
paper of the same size so that the stack height is within this range. • Use HP media for optimum performance and efficiency. Solve copy problems TIP: You can visit the HP online support website at www.hp.com/support for information and utilities that can help you correct many common printer problems - HP Officejet Pro 276dw | HP Officejet Pro 276dw - User Guide - Page 116
the status of jobs. Wait for any job that is processing to finish. ◦ The printer might be jammed. Check for jams. See Clear jams. • Check the trays Make sure that media is loaded. For more information, see Load paper Copies are blank • Check the media The media might not meet Hewlett-Packard media - HP Officejet Pro 276dw | HP Officejet Pro 276dw - User Guide - Page 117
) might need cleaning. For more information, see Maintain the printer. • Print a Print Quality Diagnostic Page and follow the instructions on the page to resolve poor quality copy problems. For more information, see Print quality troubleshooting. Copy defects are apparent • Vertical white or faded - HP Officejet Pro 276dw | HP Officejet Pro 276dw - User Guide - Page 118
Change copy settings. The printer prints half a page, then ejects the paper Check the ink cartridges Make sure the correct ink cartridges are installed and the ink cartridges are not low on ink. For more information, see Printer management tools and Understand the Printer Status Report. HP cannot - HP Officejet Pro 276dw | HP Officejet Pro 276dw - User Guide - Page 119
HP software Make sure that the HP printer software is installed and working properly, and the scan feature is turned on. NOTE: If you do not scan frequently, you can choose to turn off the feature. ◦ Windows: Open the HP printer through TWAIN on Windows computers, you can change the settings so that - HP Officejet Pro 276dw | HP Officejet Pro 276dw - User Guide - Page 120
perform a specific task other than the one that you are attempting. See the onscreen Help for the HP printer software for instructions about changing the properties. Text cannot be edited • Check the settings ◦ Make sure that the OCR has been installed. Windows: On the computer desktop, click Start - HP Officejet Pro 276dw | HP Officejet Pro 276dw - User Guide - Page 121
HP software provided with the printer ink dots form unwanted patterns that can be detected when the image is scanned or printed or when the image appears on a screen. If the following suggestions do not solve the problem best results, use the scanner glass for scanning rather than the ADF. Solve scan - HP Officejet Pro 276dw | HP Officejet Pro 276dw - User Guide - Page 122
the Windows control panel. ◦ Try adjusting the resolution and color settings. The scanned image shows blots, lines, vertical white stripes, or other defects ◦ If the scanner glass is dirty, the image produced does not have optimum clarity. For cleaning instructions, see Maintain the printer. ◦ The - HP Officejet Pro 276dw | HP Officejet Pro 276dw - User Guide - Page 123
might be set to reduce the scanned image. See the HP printer software Help for more information about changing the settings. Solve fax problems This section contains fax setup troubleshooting information for the printer. If the printer is not set up correctly for faxing, you might experience - HP Officejet Pro 276dw | HP Officejet Pro 276dw - User Guide - Page 124
reviewing the troubleshooting information in this section. • Try to send or receive a test fax. If you can send or receive a fax successfully, there might not be a problem. If you are running the test from the Fax Setup Wizard (Windows) or HP Setup Assistant (Mac OS X), make sure the printer - HP Officejet Pro 276dw | HP Officejet Pro 276dw - User Guide - Page 125
any problems found, run the fax test again to make sure it passes and the printer is ready for faxing. The "Phone Cord Connected to Correct Port on Fax" test failed Solution: Plug the phone cord into the correct port. 1. Using the phone cord supplied in the box with the printer, connect one end - HP Officejet Pro 276dw | HP Officejet Pro 276dw - User Guide - Page 126
printer directly to the telephone wall jack. The "Using Correct Type of Phone Cord with Fax" test failed Solution: • Make sure you used the phone cord supplied in the box with the printer to connect to the telephone wall jack. One end of the phone cord should be connected to the 122 Solve a problem - HP Officejet Pro 276dw | HP Officejet Pro 276dw - User Guide - Page 127
not be able to send or receive faxes. After you plug in the phone cord that came with the printer, run the fax test again. • If you are using a phone splitter, this can cause faxing problems. (A splitter is a two-cord connector that plugs into a telephone wall jack.) Try removing the splitter and - HP Officejet Pro 276dw | HP Officejet Pro 276dw - User Guide - Page 128
the phone cord supplied in the box with the printer, connect one end to your telephone wall jack, then connect the other end to the port labeled 1-LINE on the back of the printer. • If you are using a phone splitter, this can cause faxing problems. (A splitter is a two-cord connector that plugs into - HP Officejet Pro 276dw | HP Officejet Pro 276dw - User Guide - Page 129
them back one at a time and rerunning the test each time, until you identify which piece of equipment is causing the problem. ◦ If the Fax Line Condition Test fails without the other equipment, connect the printer to a working phone line and continue reviewing the troubleshooting information in - HP Officejet Pro 276dw | HP Officejet Pro 276dw - User Guide - Page 130
Internet. The printer is having problems sending and receiving faxes Solution: Make sure the printer is turned on. Look at the display on the printer. If the on the printer. After turning on the printer, HP recommends you wait five minutes before sending or receiving a fax. The printer cannot send - HP Officejet Pro 276dw | HP Officejet Pro 276dw - User Guide - Page 131
Correction Mode (ECM) off and try faxing again. For information about changing ECM, see Send a fax in Error Correction Mode. If the problem persists, contact your telephone company. • If you are using a digital subscriber line (DSL) service, make sure that you have a DSL filter connected or you - HP Officejet Pro 276dw | HP Officejet Pro 276dw - User Guide - Page 132
Chapter 9 The printer is having problems sending a manual fax Solution: NOTE: This possible solution applies only in the countries/regions that receive a 2-wire phone cord in the box with the printer, including: Argentina, Australia, Brazil, Canada, Chile, China, Colombia, Greece, India, Indonesia, - HP Officejet Pro 276dw | HP Officejet Pro 276dw - User Guide - Page 133
information, see Change the answer ring pattern for distinctive ring. • If Auto Answer is set to Off, you need to receive faxes manually; otherwise, the printer cannot receive the fax. For information on receiving faxes manually, see Receive a fax manually. • If you have a voice mail service at the - HP Officejet Pro 276dw | HP Officejet Pro 276dw - User Guide - Page 134
equipment is causing the problem. • If you have a special ring pattern for your fax phone number (using a distinctive ring service through your telephone company), make sure that the Distinctive Ring feature on the printer is set to match. For more information, see Change the answer ring pattern - HP Officejet Pro 276dw | HP Officejet Pro 276dw - User Guide - Page 135
to a low number of rings and the printer to answer in the maximum number of rings supported. (The maximum number of rings varies by supplied in the box with the printer, connect one end to the coupler, then connect the other end to the printer control panel is turned on. Solve fax problems 131 - HP Officejet Pro 276dw | HP Officejet Pro 276dw - User Guide - Page 136
section provides solutions to common problems using Web Services and HP websites. • Solve problems using Web Services • Solve problems using HP websites Solve problems using Web Services If you are having problems using Web Services, such as HP ePrint and Printer Apps, check the following: • Make - HP Officejet Pro 276dw | HP Officejet Pro 276dw - User Guide - Page 137
can visit the HP online support website at www.hp.com/support for information and utilities that can help you correct many common printer problems. This section covers the following topics: • Solving HP Direct Digital Filing problems • Solving HP Digital Fax problems Solving HP Direct Digital Filing - HP Officejet Pro 276dw | HP Officejet Pro 276dw - User Guide - Page 138
. TIP: If you have recently changed the DNS settings, turn off and then turn on the printer. For more information, contact your network administrator or the person who set up your network. Unable to scan to network folder NOTE: HP Direct Digital Filing does not support Active Directory. The computer - HP Officejet Pro 276dw | HP Officejet Pro 276dw - User Guide - Page 139
printer can create up to 9,999 files using the same prefix and suffix. If you have scanned many files to a folder, change the prefix. • Make sure the filename prefix uses only the letters or characters supported the HP software. Check your email Inbox for any delivery notification failure messages - HP Officejet Pro 276dw | HP Officejet Pro 276dw - User Guide - Page 140
sent from the printer is secure, the Scan to Network Folder Wizard does not support SFS, and the computer displays the standard sharing dialog box instead of the SFS dialog box. For more information, see the documentation available for your operating system. Solving HP Digital Fax problems NOTE: Fax - HP Officejet Pro 276dw | HP Officejet Pro 276dw - User Guide - Page 141
can visit the HP online support website at www.hp.com/support for information and utilities that can help you correct many common printer problems. NOTE: If you are starting a memory device operation from a computer, see the software Help for troubleshooting information. • The printer cannot read - HP Officejet Pro 276dw | HP Officejet Pro 276dw - User Guide - Page 142
at www.hp.com/support for information and utilities that can help you correct many common printer problems. If you are unable to connect the printer to your Ethernet network, perform one or more of the following tasks. NOTE: After correcting any of the following, run the installation program again - HP Officejet Pro 276dw | HP Officejet Pro 276dw - User Guide - Page 143
.com/go/wirelessprinting. NOTE: After you resolve the problem, follow the instructions in After resolving the problems. Basic wireless troubleshooting NOTE: If you have not configured the printer for wireless connection, use the HP software to complete the setup. For more information, see . Perform - HP Officejet Pro 276dw | HP Officejet Pro 276dw - User Guide - Page 144
troubleshooting If you have tried the suggestions provided in Basic wireless troubleshooting and are still unable to connect to your printer printer is online and ready • Step 5 - Make sure the wireless version of the printer is set as the default printer driver (Windows be a problem with the router - HP Officejet Pro 276dw | HP Officejet Pro 276dw - User Guide - Page 145
or computer. TIP: If you are able to access the Internet and are using a computer running Windows, you can also use the HP Network Assistant for help in setting up a network. To use this tool, visit www.hp.com/sbso/wireless/tools-setup.html? jumpid=reg_R1002_USEN. (This Web site is only available in - HP Officejet Pro 276dw | HP Officejet Pro 276dw - User Guide - Page 146
instructions at the beginning of this section) and follow any recommendations. URL The URL shown here is the network address assigned to the printer EWS or are still having problems using the printer over the network, continue to services do not allow you to access local devices (like your printer) - HP Officejet Pro 276dw | HP Officejet Pro 276dw - User Guide - Page 147
section for additional troubleshooting help. Step 5 - Make sure the wireless version of the printer is set as the default printer driver (Windows only) If you install the HP software again, the installer might create a second version of the printer driver in your Printers or Printers and Faxes or - HP Officejet Pro 276dw | HP Officejet Pro 276dw - User Guide - Page 148
any problems and have successfully connected the printer to your wireless network, complete the following steps for your operating system: Windows 1. On the computer desktop, click Start, select Programs or All Programs, click HP, click the folder for your printer, and then click Printer Setup - HP Officejet Pro 276dw | HP Officejet Pro 276dw - User Guide - Page 149
where it can be found. If you are using the HP software on a computer running Windows and cannot find the printer during installation (and you know the printer is on the network)-or if you have already successfully installed HP software and experience problems-check the following: • If you have just - HP Officejet Pro 276dw | HP Officejet Pro 276dw - User Guide - Page 150
not available in all languages. Solve printer management problems TIP: You can visit the HP online support website at www.hp.com/support for information and utilities that can help you correct many common printer problems. This section provides solutions to common problems that involve managing the - HP Officejet Pro 276dw | HP Officejet Pro 276dw - User Guide - Page 151
. Troubleshoot installation issues TIP: You can visit the HP online support website at www.hp.com/support for information and utilities that can help you correct many common printer problems. • Hardware installation suggestions • HP software installation suggestions Hardware installation suggestions - HP Officejet Pro 276dw | HP Officejet Pro 276dw - User Guide - Page 152
CD for damage. You can download the printer driver from the HP website (www.hp.com/support). NOTE: After correcting any problems, run the installation program again. Solve network problems General network troubleshooting • If you are unable to install the HP software, verify that: ◦ All cable - HP Officejet Pro 276dw | HP Officejet Pro 276dw - User Guide - Page 153
the network settings have been reset. Understand the Printer Status Report Use the printer status report to view current printer information and ink cartridge status. Also use the printer status report to help you troubleshoot problems with the printer. The printer status report also contains a log - HP Officejet Pro 276dw | HP Officejet Pro 276dw - User Guide - Page 154
and the part numbers and warranty expiration dates for the ink cartridges. NOTE: Ink level warnings and indicators provide estimates for planning purposes only. When you receive a low-ink warning message, consider having a replacement cartridge available to avoid possible printing delays. You do not - HP Officejet Pro 276dw | HP Officejet Pro 276dw - User Guide - Page 155
after you complete both stages of cleaning, try aligning the printer. If print quality problems persist after cleaning and aligning, contact HP support. For more information, see HP support. NOTE: Cleaning uses ink, so clean the printhead only when necessary. The cleaning process takes a few minutes - HP Officejet Pro 276dw | HP Officejet Pro 276dw - User Guide - Page 156
in the Utilities section. 3. Click Calibrate Linefeed and follow the on-screen instructions. Align the printhead The printer automatically aligns the printhead during the initial setup. You might want to use this feature when the printer status page shows streaking or white lines through any of the - HP Officejet Pro 276dw | HP Officejet Pro 276dw - User Guide - Page 157
. 2. From the Device Services tab, click the icon to the left of Align Printheads. 3. Follow the on-screen instructions. To align the printhead from HP Utility (Mac OS X) 1. Open HP Utility. For more information, see HP Utility (Mac OS X). 2. In the Information And Support section, click Align - HP Officejet Pro 276dw | HP Officejet Pro 276dw - User Guide - Page 158
printhead. 6. Carefully lower the latch handle. NOTE: Make sure you lower the latch handle before reinserting the ink cartridges. Leaving the latch handle raised can result in incorrectly seated ink cartridges and problems printing. The latch must remain down in order to correctly install the ink - HP Officejet Pro 276dw | HP Officejet Pro 276dw - User Guide - Page 159
, you can print a network configuration page to view the network settings for the printer. You can use the network configuration page to help troubleshoot network connectivity problems. If you need to call HP, it is often useful to print this page before calling. Understand the network configuration - HP Officejet Pro 276dw | HP Officejet Pro 276dw - User Guide - Page 160
is the default port for printing. It is accessed by HP software (for example, the HP Standard Port). • LPD: Line Printer Daemon (LPD) refers to the protocol and programs associated with line-printer spooling services that may be installed on various TCP/IP systems. NOTE: The LPD functionality can - HP Officejet Pro 276dw | HP Officejet Pro 276dw - User Guide - Page 161
a job. This section contains the following topics: • Clear paper jams • Avoid paper jams Clear paper jams Paper jams can occur either inside the printer or in the automatic document feeder. CAUTION: To prevent possible damage to the printhead, clear paper jams as soon as possible. TIP: If you notice - HP Officejet Pro 276dw | HP Officejet Pro 276dw - User Guide - Page 162
1. Remove all media from the output tray. CAUTION: Trying to clear a paper jam from the front of the printer can damage the print mechanism. Always access and clear paper jams through the automatic two-sided printing accessory (duplexer). 2. Check the duplexer. a. Push the button on either side - HP Officejet Pro 276dw | HP Officejet Pro 276dw - User Guide - Page 163
is stuck. When you open the ink cartridge access door, the carriage should return to its position on the right side of the printer. If it does not move to the right, turn off the printer before you remove any jam. 6. After clearing the jam, close all covers, turn on the printer (if you turned it off - HP Officejet Pro 276dw | HP Officejet Pro 276dw - User Guide - Page 164
when you are removing it from the rollers, check the rollers and wheels for torn pieces of paper that might remain inside the printer. If you do not remove all the pieces of paper from the printer, more paper jams are likely to occur. 4. If you have pushed the green tab in step 2, pull it back - HP Officejet Pro 276dw | HP Officejet Pro 276dw - User Guide - Page 165
and then add paper. Do not try to add paper while the printer is trying to pick up a sheet. • If you are printing on both sides of a page, do not print highly saturated images on light weight paper. • Make sure that the printer is clean. For more information, see Maintain the printer. Clear jams 161 - HP Officejet Pro 276dw | HP Officejet Pro 276dw - User Guide - Page 166
topics: • Warranty information • Printer specifications • Regulatory information • Environmental product stewardship program • Third-party licenses Warranty information This section contains the following topics: • Hewlett-Packard limited warranty statement • Ink cartridge warranty information 162 - HP Officejet Pro 276dw | HP Officejet Pro 276dw - User Guide - Page 167
Hewlett-Packard limited warranty statement Warranty information 163 - HP Officejet Pro 276dw | HP Officejet Pro 276dw - User Guide - Page 168
Appendix A Ink cartridge warranty information The HP cartridge warranty is applicable when the product is used in its designated HP printer. This warranty does not cover HP ink products that have been refilled, remanufactured, refurbished, misused, or tampered with. During the warranty period the - HP Officejet Pro 276dw | HP Officejet Pro 276dw - User Guide - Page 169
• USB 2.0 high-speed host port • Wireless 802.11b/g/n* • 802.3 network (Ethernet) Drop-on-demand thermal inkjet printing Four ink cartridges (one each for black, cyan, magenta, and yellow) NOTE: Not all ink cartridges are supported in all countries/regions. One printhead Printer specifications 165 - HP Officejet Pro 276dw | HP Officejet Pro 276dw - User Guide - Page 170
Appendix A (continued) Feature Capacity Supply yields For more information on estimated ink cartridge yields, visit www.hp.com/go/ learnaboutsupplies/. Printer languages HP PCL 5, HP PCL 6, PS3, and PDF 5. Font support US fonts: CG Times, CG Times Italic, Universe, Universe Italic, Courier, - HP Officejet Pro 276dw | HP Officejet Pro 276dw - User Guide - Page 171
printer, and to determine what features work with your media. • Understand supported sizes • Understand supported paper types and weights Understand supported 184 x 267 mm; 7.25 x 10.5 inches) U.S. Statement (140 x 216 mm; 5.5 x 8.5 inches)+ B5 (JIS) (182 x 257 mm; 7.17 x 10.12 inches)+ A5 (148 x 210 - HP Officejet Pro 276dw | HP Officejet Pro 276dw - User Guide - Page 172
Appendix A (continued) Media size 6 x 8 inches+ Tray 1 Edge-to-Edge A4* Edge-to-Edge Letter* Envelopes U.S. #10 Envelope (105 x 241 mm; 4.12 x 9.5 inches) Monarch Envelope (98 x 191 mm; 3.88 x 7.5 inches) Card Envelope (111 x 152 mm; 4.4 x 6 inches) A2 Envelope (111 x 146 mm; 4.37 x 5. - HP Officejet Pro 276dw | HP Officejet Pro 276dw - User Guide - Page 173
media (5 x 7 inches) Photo media (8 x 10 inches) Photo media (8.5 x 11 inches) Photo printer is compatible with plain and inkjet hagaki from Japan Post only. It is not compatible with photo hagaki from Japan Post. + Only single-sided copy jobs are supported by the ADF. Understand supported paper - HP Officejet Pro 276dw | HP Officejet Pro 276dw - User Guide - Page 174
Duplexer Plain and brochure Output tray All supported media 60 to 105 g/m2 (16 to 28 lb bond) Automatic Document Feeder All supported media except photo paper 60 to 90 g/m2 (16 to ) (3) Top margin 4 mm (0.16 inch) (4) Bottom margin 4 mm (0.16 inch) Windows and 12mm (0.47 inch) Mac and Linux - HP Officejet Pro 276dw | HP Officejet Pro 276dw - User Guide - Page 175
• Specify two-sided printing options in your application or in the printer driver. • Do not print on both sides of envelopes, photo paper, glossy media, or paper lighter than 16 lb bond (60 g/m2) or heavier than 28 lb bond (105 g/m2). Jams might occur with these media types. • Several kinds of media - HP Officejet Pro 276dw | HP Officejet Pro 276dw - User Guide - Page 176
ADF: 216 x 356 mm (8.5 x 14 inches) Web Services specifications An Internet connection using either a wired (Ethernet) or wireless connection. HP ePrint • Maximum size of email and attachments: 5 MB • Maximum number of attachments: 10 NOTE: The printer's email address must be the only address listed - HP Officejet Pro 276dw | HP Officejet Pro 276dw - User Guide - Page 177
HP website specifications • A web browser (either Microsoft Internet Explorer 6.0 or higher, Mozilla Firefox 2.0 or higher, Safari 3.2.3 or higher, or Google Chrome 3.0) with the Adobe Flash plug-in (version 10 ISO 7779 HP Officejet Pro 276dw • Sound pressure 12 megapixel maximum, 10 MB maximum (TIFF - HP Officejet Pro 276dw | HP Officejet Pro 276dw - User Guide - Page 178
Appendix A Supported memory card types • Secure Digital (SD), Mini SD, Micro SD, SDXC • High Capacity Secure Digital • MultiMediaCard (MMC), MMC Plus, MMC (RS-MMC) USB flash drives HP has fully tested the following USB flash drives with the printer: • Kingston: Data Traveler 100 USB 2.0 flash drive - HP Officejet Pro 276dw | HP Officejet Pro 276dw - User Guide - Page 179
Regulatory information The printer meets product requirements from regulatory agencies in your country/region. This section contains the following topics: • FCC statement • Notice to users in Korea • VCCI (Class B) - HP Officejet Pro 276dw | HP Officejet Pro 276dw - User Guide - Page 180
Appendix A FCC statement Notice to users in Korea 176 Technical information - HP Officejet Pro 276dw | HP Officejet Pro 276dw - User Guide - Page 181
is valid if powered with the correct CE-marked AC adapter provided by HP. If this product has wired and/or wireless telecommunications functionality, it also Norms) that are listed in the EU Declaration of Conformity issued by HP for this product or product family and available (in English only) - HP Officejet Pro 276dw | HP Officejet Pro 276dw - User Guide - Page 182
Appendix A The compliance is indicated by one of the following conformity markings placed on the product: For non-telecommunications products and for EU harmonized telecommunications products, such as Bluetooth® within power class - HP Officejet Pro 276dw | HP Officejet Pro 276dw - User Guide - Page 183
Notice to users of the U.S. telephone network: FCC requirements Regulatory information 179 - HP Officejet Pro 276dw | HP Officejet Pro 276dw - User Guide - Page 184
Appendix A Notice to users of the Canadian telephone network Notice to users of the German telephone network 180 Technical information - HP Officejet Pro 276dw | HP Officejet Pro 276dw - User Guide - Page 185
This section contains the following regulatory information pertaining to wireless products: • Exposure to radio frequency radiation • Notice to users in Brazil • Notice to users in Canada • Notice to users in Taiwan • Notice to users in Mexico • Notice to users in Japan Regulatory information 181 - HP Officejet Pro 276dw | HP Officejet Pro 276dw - User Guide - Page 186
Appendix A Exposure to radio frequency radiation Notice to users in Brazil 182 Technical information - HP Officejet Pro 276dw | HP Officejet Pro 276dw - User Guide - Page 187
Notice to users in Canada Notice to users in Taiwan Regulatory information 183 - HP Officejet Pro 276dw | HP Officejet Pro 276dw - User Guide - Page 188
a Regulatory Model Number. The Regulatory Model Number for your product is SNPRC-1202-01. This regulatory number should not be confused with the marketing name (HP Officejet Pro 276dw Multifunction Printer) or product number. 184 Technical information - HP Officejet Pro 276dw | HP Officejet Pro 276dw - User Guide - Page 189
visit: www.hp.com/hpinfo/globalcitizenship/environment/recycle/ HP inkjet supplies recycling program HP is committed to protecting the environment. The HP Inkjet Supplies Recycling Program is available in many countries/regions, and lets you recycle used print cartridges and ink cartridges free of - HP Officejet Pro 276dw | HP Officejet Pro 276dw - User Guide - Page 190
Appendix A Disposal of waste equipment by users in private households in the European Union 186 Technical information - HP Officejet Pro 276dw | HP Officejet Pro 276dw - User Guide - Page 191
Regulation EC No 1907/2006 of the European Parliament and the Council). A chemical information report for this product can be found at: www.hp.com/go/reach. Battery information This section contains the following topics: • Battery disposal in the Netherlands • Battery disposal in Taiwan • California - HP Officejet Pro 276dw | HP Officejet Pro 276dw - User Guide - Page 192
Appendix A California Perchlorate Material Notice RoHS notices (China only) Toxic and hazardous substance table Restriction of hazardous substance (Ukraine) 188 Technical information - HP Officejet Pro 276dw | HP Officejet Pro 276dw - User Guide - Page 193
FOR ANY DIRECT, INDIRECT, INCIDENTAL, SPECIAL, EXEMPLARY, OR * CONSEQUENTIAL DAMAGES (INCLUDING, BUT NOT LIMITED TO, PROCUREMENT OF * SUBSTITUTE GOODS OR SERVICES; LOSS OF USE, DATA, OR PROFITS; OR * BUSINESS INTERRUPTION) HOWEVER CAUSED AND ON ANY THEORY OF LIABILITY, * WHETHER IN CONTRACT, STRICT - HP Officejet Pro 276dw | HP Officejet Pro 276dw - User Guide - Page 194
* FOR ANY DIRECT, INDIRECT, INCIDENTAL, SPECIAL, EXEMPLARY, OR CONSEQUENTIAL * DAMAGES (INCLUDING, BUT NOT LIMITED TO, PROCUREMENT OF SUBSTITUTE GOODS * OR SERVICES; LOSS OF USE, DATA, OR PROFITS; OR BUSINESS INTERRUPTION) * HOWEVER CAUSED AND ON ANY THEORY OF LIABILITY, WHETHER IN CONTRACT, STRICT - HP Officejet Pro 276dw | HP Officejet Pro 276dw - User Guide - Page 195
All of the software was either written by or donated to Tom St Denis for the purposes of this project. The only exception is the SAFER.C source which has no known license status (assumed copyrighted) which is why SAFER,C is shipped as disabled. Tom St Denis LICENSE.md5-pubdom--jm_share_folder - HP Officejet Pro 276dw | HP Officejet Pro 276dw - User Guide - Page 196
not cryptographic related :-). 4. If you include any Windows specific code (or a derivative thereof) from the BUT NOT LIMITED TO, PROCUREMENT OF SUBSTITUTE GOODS OR SERVICES; LOSS OF USE, DATA, OR PROFITS; OR version or derivative of this code cannot be changed. i.e. this code cannot simply be copied - HP Officejet Pro 276dw | HP Officejet Pro 276dw - User Guide - Page 197
LIABLE FOR ANY DIRECT, INDIRECT, INCIDENTAL, SPECIAL, EXEMPLARY, OR CONSEQUENTIAL DAMAGES (INCLUDING, BUT NOT LIMITED TO, PROCUREMENT OF SUBSTITUTE GOODS OR SERVICES; LOSS OF USE, DATA, OR PROFITS; OR BUSINESS INTERRUPTION) HOWEVER CAUSED AND ON ANY THEORY OF LIABILITY, WHETHER IN CONTRACT, STRICT - HP Officejet Pro 276dw | HP Officejet Pro 276dw - User Guide - Page 198
OR CONSEQUENTIAL DAMAGES (INCLUDING, BUT NOT LIMITED TO, PROCUREMENT OF SUBSTITUTE GOODS OR SERVICES; LOSS OF USE, DATA, OR PROFITS; OR BUSINESS INTERRUPTION) HOWEVER CAUSED AND ON , Inc. ALL RIGHTS RESERVED. ECC cipher suite support in OpenSSL originally developed by 194 Technical information - HP Officejet Pro 276dw | HP Officejet Pro 276dw - User Guide - Page 199
* FOR ANY DIRECT, INDIRECT, INCIDENTAL, SPECIAL, EXEMPLARY, OR CONSEQUENTIAL * DAMAGES (INCLUDING, BUT NOT LIMITED TO, PROCUREMENT OF SUBSTITUTE GOODS * OR SERVICES; LOSS OF USE, DATA, OR PROFITS; OR BUSINESS INTERRUPTION) * HOWEVER CAUSED AND ON ANY THEORY OF LIABILITY, WHETHER IN CONTRACT, STRICT - HP Officejet Pro 276dw | HP Officejet Pro 276dw - User Guide - Page 200
Redistribute This Code * * Unicode, Inc. hereby grants the right to freely use the information * supplied in this file in the creation of products supporting the * Unicode Standard, and to make copies of this file in any form * for internal or external distribution as long as this notice * remains - HP Officejet Pro 276dw | HP Officejet Pro 276dw - User Guide - Page 201
Third-party licenses 197 - HP Officejet Pro 276dw | HP Officejet Pro 276dw - User Guide - Page 202
' option at the top of the www.hp.com/ buy/supplies page to obtain information about purchasing HP products in your country. Supplies • Ink cartridges and printheads • HP paper Ink cartridges and printheads Ordering cartridges online is not supported in all countries/regions. However, many countries - HP Officejet Pro 276dw | HP Officejet Pro 276dw - User Guide - Page 203
you receive a low-ink warning message, consider having a replacement cartridge available to avoid possible printing delays. You do not need to replace cartridges until prompted to do so. HP paper To order paper such as HP Premium Paper, go to www.hp.com. HP recommends plain papers with the ColorLok - HP Officejet Pro 276dw | HP Officejet Pro 276dw - User Guide - Page 204
setup. Keep your getting started guide for later use. In this section, you learn how to set up the printer so that faxing works successfully with equipment and services you might already have on the same phone line. TIP: You can also use the Fax Setup Wizard (Windows) or HP Setup Assistant (Mac OS - HP Officejet Pro 276dw | HP Officejet Pro 276dw - User Guide - Page 205
need to know what types of equipment and services (if any) share the same phone line with the printer. This is important because you might need to some of your existing office equipment directly to the printer, and you might also need to change some fax settings before you can fax successfully. 1. - HP Officejet Pro 276dw | HP Officejet Pro 276dw - User Guide - Page 206
at the same number you use for fax calls on the printer. 3. From the following table, select the combination of equipment and services applicable to your home or office setting. Then look up the recommended fax setup. Step-by-step instructions are included for each case in the sections that follow - HP Officejet Pro 276dw | HP Officejet Pro 276dw - User Guide - Page 207
PBX Distinct Voice ive ring calls service Computer Answering Voice dial-up machine mail modem service Recommended fax setup Case J: up the printer as described in this section. Back view of the printer 1 Telephone wall jack 2 Use the phone cord supplied in the box with the printer to - HP Officejet Pro 276dw | HP Officejet Pro 276dw - User Guide - Page 208
Optional) Change the Rings to Answer setting to the lowest setting (two rings). 4. Run a fax test. When the phone rings, the printer answers automatically printer with DSL If you have a DSL service through your telephone company, and do not connect any equipment to the printer, use the instructions - HP Officejet Pro 276dw | HP Officejet Pro 276dw - User Guide - Page 209
only one phone cord is supplied, you might need to obtain additional phone cords for this setup. 3. Connect an additional phone cord from the DSL filter to the telephone wall jack. 4. Run a fax test. If you encounter problems setting up the printer with optional equipment, contact your local service - HP Officejet Pro 276dw | HP Officejet Pro 276dw - User Guide - Page 210
set up the printer with a distinctive ring service 1. Using the phone cord supplied in the box with the printer, connect one end to your . 3. Change the Distinctive Ring setting to match the pattern that the telephone company assigned to your fax number. NOTE: By default, the printer is set - HP Officejet Pro 276dw | HP Officejet Pro 276dw - User Guide - Page 211
the fax. If you encounter problems setting up the printer with optional equipment, contact your local service provider or vendor for further assistance phone cords you might already have in your home or office. 2. Do one of the following: • If you have a parallel-type phone system, remove the - HP Officejet Pro 276dw | HP Officejet Pro 276dw - User Guide - Page 212
the call and hear fax tones from a sending fax machine, you need to answer the fax call manually. If you encounter problems setting up the printer with optional equipment, contact your local service provider or vendor for further assistance. Case F: Shared voice/fax line with voice mail If you - HP Officejet Pro 276dw | HP Officejet Pro 276dw - User Guide - Page 213
in person to incoming fax calls, or the printer cannot receive faxes. You must initiate the manual fax before voicemail picks up the line. If you encounter problems setting up the printer with optional equipment, contact your local service provider or vendor for further assistance. Case G: Fax - HP Officejet Pro 276dw | HP Officejet Pro 276dw - User Guide - Page 214
, the printer cannot receive faxes. 5. Turn on the Auto Answer setting. 6. (Optional) Change the Rings printer begins emitting fax reception tones to the sending fax machine and receives the fax. If you encounter problems setting up the printer with optional equipment, contact your local service - HP Officejet Pro 276dw | HP Officejet Pro 276dw - User Guide - Page 215
If you have a DSL line and use that phone line to send faxes, follow these instructions to set up your fax. 1 Telephone wall jack 2 Parallel splitter 3 DSL/ADSL filter Connect one end of the phone jack that was supplied with the printer to connect to the 1-LINE port on the back of the - HP Officejet Pro 276dw | HP Officejet Pro 276dw - User Guide - Page 216
encounter problems setting up the printer with optional equipment, contact your local service provider as shown in the illustration. (A parallel splitter has one RJ-11 port on the front and two RJ- use these instructions to set up your fax. There are two different ways to set up the printer with your - HP Officejet Pro 276dw | HP Officejet Pro 276dw - User Guide - Page 217
wall jack and plug it into the port labeled 2-EXT on the back of the printer. 3. Connect a phone to the "OUT" port on the back of your computer with the printer, connect one end to your telephone wall jack, then connect the other end to the port labeled 1-LINE on the back of the printer. NOTE: You - HP Officejet Pro 276dw | HP Officejet Pro 276dw - User Guide - Page 218
directions to set up your fax. If you encounter problems setting up the printer with optional equipment, contact your local service provider or vendor for further assistance. Shared voice/fax with computer DSL/ADSL modem Use these instructions if your computer has a DSL/ADSL modem 1 Telephone wall - HP Officejet Pro 276dw | HP Officejet Pro 276dw - User Guide - Page 219
you set in the Rings to Answer setting. The printer begins emitting fax reception tones to the sending fax machine and receives the fax. If you encounter problems setting up the printer with optional equipment, contact your local service provider or vendor for further assistance. Set up faxing - HP Officejet Pro 276dw | HP Officejet Pro 276dw - User Guide - Page 220
from a sending fax machine might be recorded on your answering machine, and you might not receive faxes with the printer. 3. Using the phone cord supplied in the box with the printer, connect one end to your telephone wall jack, then connect the other end to the port labeled 1-LINE on the back of - HP Officejet Pro 276dw | HP Officejet Pro 276dw - User Guide - Page 221
. 7. Change the Rings to Answer setting on the printer to the maximum number of rings supported by your printer. (The problems setting up the printer with optional equipment, contact your local service to see if it has one or two phone ports. NOTE: If your computer has only one phone port, you need to - HP Officejet Pro 276dw | HP Officejet Pro 276dw - User Guide - Page 222
the port labeled "OUT" on the back of the computer (the computer dial-up modem). 4. Using the phone cord supplied in the box with the printer, connect one end to your telephone wall jack, then connect the other end to the port labeled 1-LINE on the back of the - HP Officejet Pro 276dw | HP Officejet Pro 276dw - User Guide - Page 223
Change the Rings to Answer setting on the printer to the maximum number of rings supported by the product. (The maximum number of rings varies by country/region.) 10 message. If you encounter problems setting up the printer with optional equipment, contact your local service provider or vendor for - HP Officejet Pro 276dw | HP Officejet Pro 276dw - User Guide - Page 224
service need to be connected to additional DSL/ADSL filters, to avoid noise when making voice calls. 2. Using the phone cord supplied in the box with the printer, connect one rings. 8. Change your Rings to Answer setting on the printer to the maximum number of rings supported by the printer. NOTE: - HP Officejet Pro 276dw | HP Officejet Pro 276dw - User Guide - Page 225
these instructions to set up your fax. If you encounter problems setting up the printer with optional equipment, contact your local service provider begin, check your computer to see if it has one or two phone ports. • If your computer has only one phone port, you need to purchase a parallel - HP Officejet Pro 276dw | HP Officejet Pro 276dw - User Guide - Page 226
or the printer cannot receive faxes. If you encounter problems setting up the printer with optional equipment, contact your local service provider or hp.com/at/faxconfig www.hp.com/de/faxconfig www.hp.com/ch/fr/faxconfig www.hp.com/ch/de/faxconfig www.hp.com/uk/faxconfig www.hp.fi/faxconfig www.hp - HP Officejet Pro 276dw | HP Officejet Pro 276dw - User Guide - Page 227
, review the report for information on how to fix the problem and rerun the test. To test fax setup via the printer control panel 1. Set up the printer for faxing according to your particular home or office setup instructions. 2. Make sure the ink cartridges are installed, and that full-size paper - HP Officejet Pro 276dw | HP Officejet Pro 276dw - User Guide - Page 228
Change basic network settings • Change advanced network settings • Set up the printer for wireless communication • Uninstall and reinstall the HP software Change and off, and changing the network settings. printer control panel or the HP software that came with the printer should not change some of - HP Officejet Pro 276dw | HP Officejet Pro 276dw - User Guide - Page 229
might want to manually change settings such as the IP address, subnet mask, or the default gateway. CAUTION: Be careful when manually assigning an IP address. If you enter an invalid IP address during the installation, your network components cannot connect with the printer. 1. Touch (right arrow - HP Officejet Pro 276dw | HP Officejet Pro 276dw - User Guide - Page 230
address was changed, use the new IP address to open the EWS. Reset firewall settings To reset the firewall settings to the factory defaults, restore the printer's network settings. For more information, see Reset network settings. Limitations to rules, templates, and services When creating firewall - HP Officejet Pro 276dw | HP Officejet Pro 276dw - User Guide - Page 231
supported by the print server. Maximum number of services you can add to 40 the policy. For a given rule, only one address template and one service template can be added. Maximum number of service templates in the 9 policy. Maximum number of user-defined custom 5 service templates. Reset - HP Officejet Pro 276dw | HP Officejet Pro 276dw - User Guide - Page 232
have not changed the Windows, HP provides a tool called HP instructions to complete the setup. 5. After the setup has completed, the network printer drivers can be installed by opening the printer's HP folder in All Programs, clicking Printer Setup and Software , and selecting Connect a new printer - HP Officejet Pro 276dw | HP Officejet Pro 276dw - User Guide - Page 233
stops blinking but remains lit. 5. After the setup has completed, the network printer drivers can be installed by opening the printer's HP folder in All Programs, clicking Printer Setup and Software , and selecting Connect a new printer. Set up the printer using the embedded web server (EWS) If the - HP Officejet Pro 276dw | HP Officejet Pro 276dw - User Guide - Page 234
-screen instructions. 4. After the setup has completed, the network printer drivers can be installed by opening the printer's HP folder in All Programs, clicking Printer Setup and Software , and selecting Connect a new printer. TIP: You can also set up wireless communication by entering or changing - HP Officejet Pro 276dw | HP Officejet Pro 276dw - User Guide - Page 235
printer secure from unauthorized use. For more information, visit www.hp prevent unauthorized access, the printer supports many common types of and employs 802.1X authentication with one of the standard Extensible Authentication Protocol (CCM) and supports the Independent Basic Service Set (IBSS) - HP Officejet Pro 276dw | HP Officejet Pro 276dw - User Guide - Page 236
you want to make configuration changes. • Turn off remote administrative HP software that came with the printer. Do not simply delete the printer application files from your computer. Make sure to remove them correctly using the uninstall utility provided when you installed the HP software. • Windows - HP Officejet Pro 276dw | HP Officejet Pro 276dw - User Guide - Page 237
/Change. Follow the on-screen instructions. 3. Disconnect the printer from your computer. 4. Restart your computer. NOTE: It is important that you disconnect the printer before restarting your computer. Do not connect the printer to your computer until after you have reinstalled the HP software - HP Officejet Pro 276dw | HP Officejet Pro 276dw - User Guide - Page 238
shortcut. NOTE: The features available in HP Utility vary depending on the selected printer. Ink level warnings and indicators provide estimates for planning purposes only. When you receive a low on ink message, consider having a replacement cartridge available to avoid possible printing delays. You - HP Officejet Pro 276dw | HP Officejet Pro 276dw - User Guide - Page 239
the web browser: http://123.123.123.123 • You can also open the HP EWS from the Windows printer driver. Open the Services tab and then click the Device and Supplies Status icon. • For Mac, the HP EWS can be opened from the HP Utility, or from System Preferences and then select Print & Scan. Click - HP Officejet Pro 276dw | HP Officejet Pro 276dw - User Guide - Page 240
: Displays current printer status. • Diagnostic: Provide links to diagnostic tasks. • ePrint: Displays the status of ePrint connection. • Fax Status: Displays the five most-recent entries in the fax log. • Ink Level Status: Displays ink level status. • Manage: Useful links for managing the HP EWS - HP Officejet Pro 276dw | HP Officejet Pro 276dw - User Guide - Page 241
as serial number, name and firmware version. ◦ Ink Gauge: See estimated ink levels, ink cartridge part numbers, and estimated printable pages remaining for each cartridge. ◦ Ink Settings: Change the threshold at which the printer provides the "Low on Ink" notification. • Reports ◦ Usage Report: View - HP Officejet Pro 276dw | HP Officejet Pro 276dw - User Guide - Page 242
users cannot change product configuration services as long as the Windows Internet Name Service Printer Daemon (LPD) refers to the protocol and programs associated with line-printer spooling services that may be installed product supports raw IP printing through TCP Port 9100. This HP-propriety TCP - HP Officejet Pro 276dw | HP Officejet Pro 276dw - User Guide - Page 243
Services Dynamic Discovery (WS Discovery) protocols or Microsoft Web Services for Devices (WSD) Print services supported on the product. These web services see www.hp.com/go/ folder via the Windows file sharing mechanism. supported. Certificates The embedded web server provides the ability to install - HP Officejet Pro 276dw | HP Officejet Pro 276dw - User Guide - Page 244
the ability to configure wireless networking via such 802.1x wireless enterprise authentication protocols as EAP-TLS, LEAP, and PEAP to support access control. The HP Embedded Web Server also provides the ability to configure wireless dynamic key encryption such as WEP encryption and WPA-PSK - HP Officejet Pro 276dw | HP Officejet Pro 276dw - User Guide - Page 245
F How do I? • Get started • Print • Scan • Copy • Fax • HP Digital Solutions • Work with ink cartridges • Solve a problem How do I? 241 - HP Officejet Pro 276dw | HP Officejet Pro 276dw - User Guide - Page 246
the following solutions. Solution 1: Turn the printer off and on. Turn off the printer, and then turn it on again. If the problem persists, contact HP support for service or replacement. For more information, see HP support. Cartridge Problem The ink cartridge identified in the message is missing - HP Officejet Pro 276dw | HP Officejet Pro 276dw - User Guide - Page 247
service or replacement. For more information about ink cartridge warranty, see Ink cartridge warranty information. If the problem persists after you replace the cartridge, contact HP support. For more information, see HP support. Paper Mismatch The paper size or type selected in the printer driver - HP Officejet Pro 276dw | HP Officejet Pro 276dw - User Guide - Page 248
information, see HP support. Ink cartridges depleted The cartridges listed in the message must be replaced to resume printing. HP recommends that you do not remove an ink cartridge until a replacement is ready to install. For more information, see Replace the ink cartridges. 244 Errors (Windows) - HP Officejet Pro 276dw | HP Officejet Pro 276dw - User Guide - Page 249
HP support. For more information, see HP support. Click here to go online for more information . Do not use SETUP cartridges New SETUP cartridges cannot be installed after the printer has been initialized. Install regular replacement cartridges. For more information, see Replace the ink cartridges - HP Officejet Pro 276dw | HP Officejet Pro 276dw - User Guide - Page 250
failure The ink sensor has failed and the printer can no longer print. Contact HP support. For more information, see HP support. Paper jam in automatic document feeder Clear a paper jam in ADF. For more information, see Clear paper jams. Problem with ink system Please remove the ink cartridges - HP Officejet Pro 276dw | HP Officejet Pro 276dw - User Guide - Page 251
installation 27 printer status report 150 turn on and off in driver 31 warranty 163 acoustic emissions 173 ADF (automatic document feeder) capacity 21 load originals 21 ADSL, fax setup with parallel phone systems 204 after the support period 100 align printhead 152 answer ring pattern change - HP Officejet Pro 276dw | HP Officejet Pro 276dw - User Guide - Page 252
change 81 parallel phone systems 206 dots or streaks, troubleshoot copies 113 dots, troubleshoot scan 119 double-sided printing 46 driver accessories settings 31 warranty 163 DSL, fax setup with parallel phone systems 204 duplexer clear jams 157 installation 27 media sizes supported 167 paper manual - HP Officejet Pro 276dw | HP Officejet Pro 276dw - User Guide - Page 253
report 108 printhead 151 replace ink cartridges 95 manual faxing receive 71 send 67, 68 margins setting, specifications 170 media ADF capacity 21 clear jams 157 duplexing 46 load tray 22 load tray 2 29 locking trays 30 skewed pages 111 specifications 167 supported sizes 167 troubleshoot feeding 110 - HP Officejet Pro 276dw | HP Officejet Pro 276dw - User Guide - Page 254
printer driver accessories settings 31 warranty 163 printer software (Windows) about 234 opening 34, 234 printer status report information on 149 print 150 printhead clean 151 printhead latch, locating 13 printhead, align 152 printheads ordering online 198 supported 165 printing slow, troubleshoot - HP Officejet Pro 276dw | HP Officejet Pro 276dw - User Guide - Page 255
71 blocking numbers 74 forwarding 73 manually 71 polling 73 rings to answer 81 troubleshoot 126, 129 recycle ink cartridges 185 redial options, setting 82 reduce fax 74 regulatory information 175, 181 regulatory model number 184 replace ink cartridges 95 report wireless test 231 reports - HP Officejet Pro 276dw | HP Officejet Pro 276dw - User Guide - Page 256
media 29 media sizes supported 167 paper types and weights supported 169 turn on and off in driver 31 trays capacities 169 clear jams 157 installation tray 2 28 load paper 22 locating 12 locking 30 media sizes supported 167 media types and weights supported 169 paper guides illustration 12 setting - HP Officejet Pro 276dw | HP Officejet Pro 276dw - User Guide - Page 257
warranty 163 Webscan 51 websites accessibility information 10 customer support 99 environmental programs 185 order supplies and accessories 198 supply yield data sheet 166 white bands or stripes, troubleshoot copies 113, 114 scans 118 Windows custom-size paper 42 print brochures 38 Print photos 40 - HP Officejet Pro 276dw | HP Officejet Pro 276dw - User Guide - Page 258
254 - HP Officejet Pro 276dw | HP Officejet Pro 276dw - User Guide - Page 259
- HP Officejet Pro 276dw | HP Officejet Pro 276dw - User Guide - Page 260
-
 1
1 -
 2
2 -
 3
3 -
 4
4 -
 5
5 -
 6
6 -
 7
7 -
8
-
9
-
10
-
11
-
12
-
13
-
14
-
15
-
16
-
17
-
18
-
19
-
20
-
21
-
22
-
23
-
24
-
25
-
26
-
27
-
28
-
29
-
30
-
31
-
32
-
33
-
34
-
35
-
36
-
37
-
38
-
39
-
40
-
41
-
42
-
43
-
44
-
45
-
46
-
47
-
48
-
49
-
50
-
51
-
52
-
53
-
54
-
55
-
56
-
57
-
58
-
59
-
60
-
61
-
62
-
63
-
64
-
65
-
66
-
67
-
68
-
69
-
70
-
71
-
72
-
73
-
74
-
75
-
76
-
77
-
78
-
79
-
80
-
81
-
82
-
83
-
84
-
85
-
86
-
87
-
88
-
89
-
90
-
91
-
92
-
93
-
94
-
95
-
96
-
97
-
98
-
99
-
100
-
101
-
102
-
103
-
104
-
105
-
106
-
107
-
108
-
109
-
110
-
111
-
112
-
113
-
114
-
115
-
116
-
117
-
118
-
119
-
120
-
121
-
122
-
123
-
124
-
125
-
126
-
127
-
128
-
129
-
130
-
131
-
132
-
133
-
134
-
135
-
136
-
137
-
138
-
139
-
140
-
141
-
142
-
143
-
144
-
145
-
146
-
147
-
148
-
149
-
150
-
151
-
152
-
153
-
154
-
155
-
156
-
157
-
158
-
159
-
160
-
161
-
162
-
163
-
164
-
165
-
166
-
167
-
168
-
169
-
170
-
171
-
172
-
173
-
174
-
175
-
176
-
177
-
178
-
179
-
180
-
181
-
182
-
183
-
184
-
185
-
186
-
187
-
188
-
189
-
190
-
191
-
192
-
193
-
194
-
195
-
196
-
197
-
198
-
199
-
200
-
201
-
202
-
203
-
204
-
205
-
206
-
207
-
208
-
209
-
210
-
211
-
212
-
213
-
214
-
215
-
216
-
217
-
218
-
219
-
220
-
221
-
222
-
223
-
224
-
225
-
226
-
227
-
228
-
229
-
230
-
231
-
232
-
233
-
234
-
235
-
236
-
237
-
238
-
239
-
240
-
241
-
242
-
243
-
244
-
245
-
246
-
247
-
248
-
249
-
250
-
251
-
252
-
253
-
254
-
255
-
256
-
257
-
258
-
259
-
260
 |
 |