HP Officejet Pro 276dw HP Officejet Pro 276dw - User Guide - Page 46
Print on special and custom-size paper
 |
View all HP Officejet Pro 276dw manuals
Add to My Manuals
Save this manual to your list of manuals |
Page 46 highlights
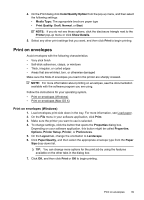
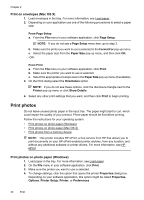
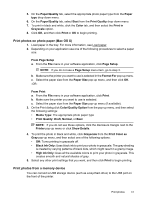
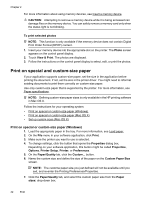
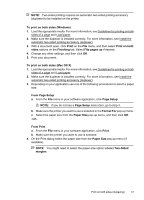
Chapter 2 For more information about using memory devices, see Insert a memory device. CAUTION: Attempting to remove a memory device while it is being accessed can damage files on the memory device. You can safely remove a memory card only when the status light is not blinking. To print selected photos NOTE: This function is only available if the memory device does not contain Digital Print Order Format (DPOF) content. 1. Insert your memory device into the appropriate slot on the printer. The Photo screen appears on the control panel display. 2. Touch View & Print. The photos are displayed. 3. Follow the instructions on the control panel display to select, edit, or print the photos. Print on special and custom-size paper If your application supports custom-size paper, set the size in the application before printing the document. If not, set the size in the printer driver. You might need to reformat existing documents to print them correctly on custom-size paper. Use only custom-size paper that is supported by the printer. For more information, see Paper specifications. NOTE: Defining custom-size paper sizes is only available in the HP printing software in Mac OS X. Follow the instructions for your operating system. • Print on special or custom-size paper (Windows) • Print on special or custom-size paper (Mac OS X) • Set up custom sizes (Mac OS X) Print on special or custom-size paper (Windows) 1. Load the appropriate paper in the tray. For more information, see Load paper. 2. On the File menu in your software application, click Print. 3. Make sure the printer you want to use is selected. 4. To change settings, click the button that opens the Properties dialog box. Depending on your software application, this button might be called Properties, Options, Printer Setup, Printer, or Preferences. 5. On the Paper/Quality tab, click the Custom... button. 6. Name the custom size and define the size of the paper on the Custom Paper Size screen. NOTE: The custome paper size you just defined will not be available until you exit, and re-enter the Printing Preferences/Properties. 7. Click the Paper/Quality tab, and select the custom paper size from the Paper sizes: drop-down box. 42 Print
-
 1
1 -
2
-
3
-
4
-
5
-
6
-
7
-
8
-
9
-
10
-
11
-
12
-
13
-
14
-
15
-
16
-
17
-
18
-
19
-
20
-
21
-
22
-
23
-
24
-
25
-
26
-
27
-
28
-
29
-
30
-
31
-
32
-
33
-
34
-
35
-
36
-
37
-
38
-
39
-
40
-
 41
41 -
 42
42 -
 43
43 -
 44
44 -
 45
45 -
 46
46 -
 47
47 -
 48
48 -
 49
49 -
 50
50 -
 51
51 -
52
-
53
-
54
-
55
-
56
-
57
-
58
-
59
-
60
-
61
-
62
-
63
-
64
-
65
-
66
-
67
-
68
-
69
-
70
-
71
-
72
-
73
-
74
-
75
-
76
-
77
-
78
-
79
-
80
-
81
-
82
-
83
-
84
-
85
-
86
-
87
-
88
-
89
-
90
-
91
-
92
-
93
-
94
-
95
-
96
-
97
-
98
-
99
-
100
-
101
-
102
-
103
-
104
-
105
-
106
-
107
-
108
-
109
-
110
-
111
-
112
-
113
-
114
-
115
-
116
-
117
-
118
-
119
-
120
-
121
-
122
-
123
-
124
-
125
-
126
-
127
-
128
-
129
-
130
-
131
-
132
-
133
-
134
-
135
-
136
-
137
-
138
-
139
-
140
-
141
-
142
-
143
-
144
-
145
-
146
-
147
-
148
-
149
-
150
-
151
-
152
-
153
-
154
-
155
-
156
-
157
-
158
-
159
-
160
-
161
-
162
-
163
-
164
-
165
-
166
-
167
-
168
-
169
-
170
-
171
-
172
-
173
-
174
-
175
-
176
-
177
-
178
-
179
-
180
-
181
-
182
-
183
-
184
-
185
-
186
-
187
-
188
-
189
-
190
-
191
-
192
-
193
-
194
-
195
-
196
-
197
-
198
-
199
-
200
-
201
-
202
-
203
-
204
-
205
-
206
-
207
-
208
-
209
-
210
-
211
-
212
-
213
-
214
-
215
-
216
-
217
-
218
-
219
-
220
-
221
-
222
-
223
-
224
-
225
-
226
-
227
-
228
-
229
-
230
-
231
-
232
-
233
-
234
-
235
-
236
-
237
-
238
-
239
-
240
-
241
-
242
-
243
-
244
-
245
-
246
-
247
-
248
-
249
-
250
-
251
-
252
-
253
-
254
-
255
-
256
-
257
-
258
-
259
-
260
 |
 |