HP Officejet Pro 276dw HP Officejet Pro 276dw - User Guide - Page 158
cartridges. Leaving the latch handle raised can result in incorrectly seated ink
 |
View all HP Officejet Pro 276dw manuals
Add to My Manuals
Save this manual to your list of manuals |
Page 158 highlights
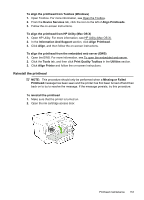
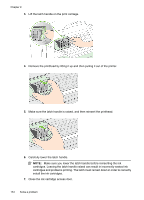
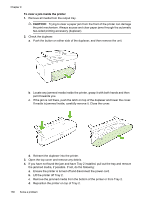
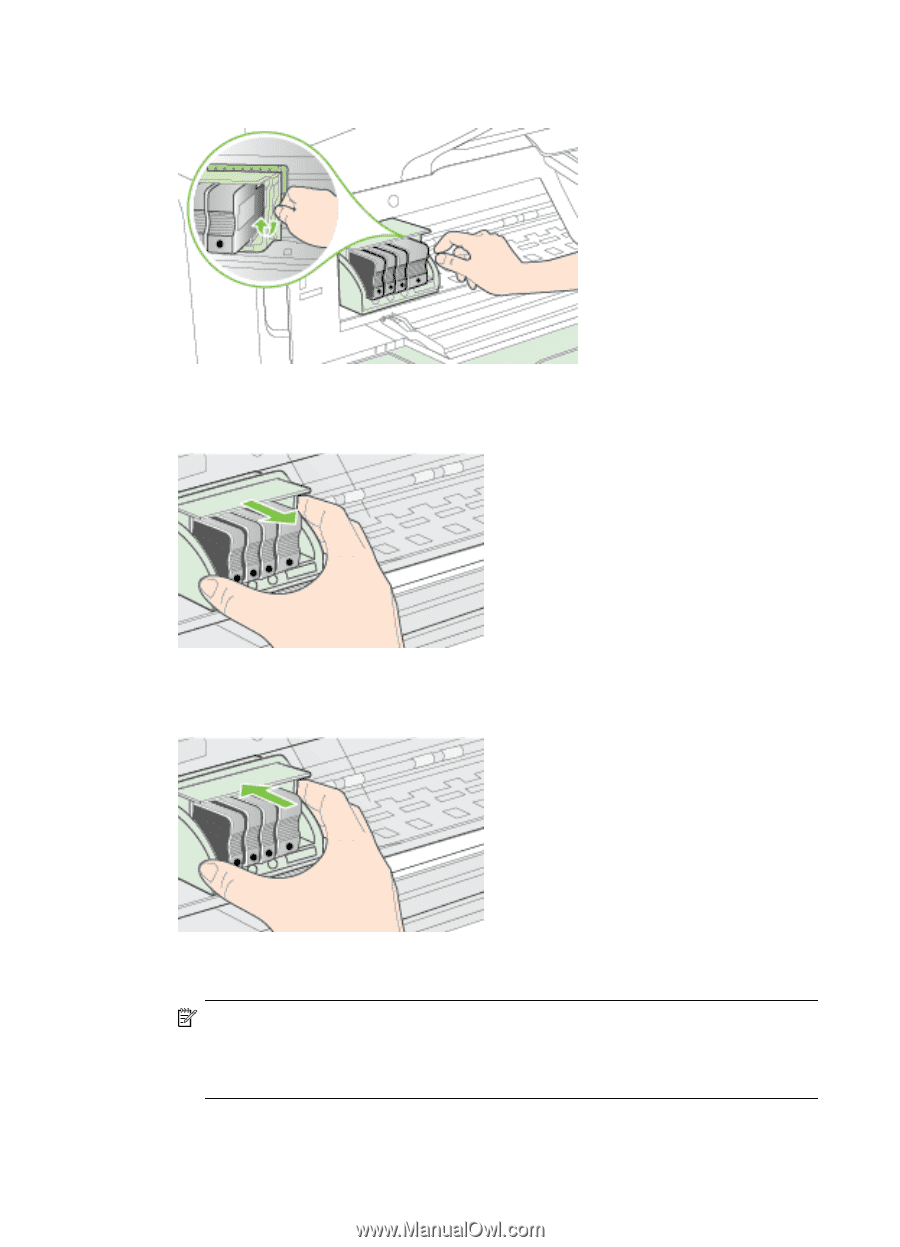
Chapter 9 3. Lift the latch handle on the print carriage. 4. Remove the printhead by lifting it up and then pulling it out of the printer. 5. Make sure the latch handle is raised, and then reinsert the printhead. 6. Carefully lower the latch handle. NOTE: Make sure you lower the latch handle before reinserting the ink cartridges. Leaving the latch handle raised can result in incorrectly seated ink cartridges and problems printing. The latch must remain down in order to correctly install the ink cartridges. 7. Close the ink cartridge access door. 154 Solve a problem
-
 1
1 -
2
-
3
-
4
-
5
-
6
-
7
-
8
-
9
-
10
-
11
-
12
-
13
-
14
-
15
-
16
-
17
-
18
-
19
-
20
-
21
-
22
-
23
-
24
-
25
-
26
-
27
-
28
-
29
-
30
-
31
-
32
-
33
-
34
-
35
-
36
-
37
-
38
-
39
-
40
-
41
-
42
-
43
-
44
-
45
-
46
-
47
-
48
-
49
-
50
-
51
-
52
-
53
-
54
-
55
-
56
-
57
-
58
-
59
-
60
-
61
-
62
-
63
-
64
-
65
-
66
-
67
-
68
-
69
-
70
-
71
-
72
-
73
-
74
-
75
-
76
-
77
-
78
-
79
-
80
-
81
-
82
-
83
-
84
-
85
-
86
-
87
-
88
-
89
-
90
-
91
-
92
-
93
-
94
-
95
-
96
-
97
-
98
-
99
-
100
-
101
-
102
-
103
-
104
-
105
-
106
-
107
-
108
-
109
-
110
-
111
-
112
-
113
-
114
-
115
-
116
-
117
-
118
-
119
-
120
-
121
-
122
-
123
-
124
-
125
-
126
-
127
-
128
-
129
-
130
-
131
-
132
-
133
-
134
-
135
-
136
-
137
-
138
-
139
-
140
-
141
-
142
-
143
-
144
-
145
-
146
-
147
-
148
-
149
-
150
-
151
-
152
-
 153
153 -
 154
154 -
 155
155 -
 156
156 -
 157
157 -
 158
158 -
 159
159 -
 160
160 -
 161
161 -
 162
162 -
 163
163 -
164
-
165
-
166
-
167
-
168
-
169
-
170
-
171
-
172
-
173
-
174
-
175
-
176
-
177
-
178
-
179
-
180
-
181
-
182
-
183
-
184
-
185
-
186
-
187
-
188
-
189
-
190
-
191
-
192
-
193
-
194
-
195
-
196
-
197
-
198
-
199
-
200
-
201
-
202
-
203
-
204
-
205
-
206
-
207
-
208
-
209
-
210
-
211
-
212
-
213
-
214
-
215
-
216
-
217
-
218
-
219
-
220
-
221
-
222
-
223
-
224
-
225
-
226
-
227
-
228
-
229
-
230
-
231
-
232
-
233
-
234
-
235
-
236
-
237
-
238
-
239
-
240
-
241
-
242
-
243
-
244
-
245
-
246
-
247
-
248
-
249
-
250
-
251
-
252
-
253
-
254
-
255
-
256
-
257
-
258
-
259
-
260
 |
 |
3.
Lift the latch handle on the print carriage.
4.
Remove the printhead by lifting it up and then pulling it out of the printer.
5.
Make sure the latch handle is raised, and then reinsert the printhead.
6.
Carefully lower the latch handle.
NOTE:
Make sure you lower the latch handle before reinserting the ink
cartridges. Leaving the latch handle raised can result in incorrectly seated ink
cartridges and problems printing. The latch must remain down in order to correctly
install the ink cartridges.
7.
Close the ink cartridge access door.
Chapter 9
154
Solve a problem