Kyocera TASKalfa 3501i Fax System (W) Operation Guide Rev-2.2013.1 - Page 114
Printing from a Polling Box, Deleting Originals in a Polling Box
 |
View all Kyocera TASKalfa 3501i manuals
Add to My Manuals
Save this manual to your list of manuals |
Page 114 highlights
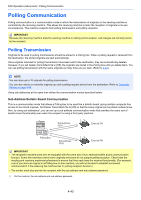
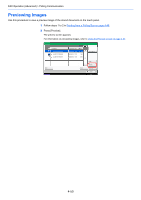
FAX Operation (Advanced) > Polling Communication Printing from a Polling Box Use this procedure to print an original stored in a Polling box. 1 Press [FAX Box] in the home screen, and then [Polling Box]. 2 Select an original by pressing a checkbox in the list. A tick appears in the checkbox for the selected original. NOTE To cancel a selection, press the checkbox again so that it is no longer ticked. To check the image of the originals, refer to the preview. For information on previewing images, refer to Previewing Images on page 4-50. For information on working with lists in a Polling box, refer to the machine's Advanced Operation Guide. 3 Press [Print]. Polling Box 0001 File Name doc20101010094533 doc20101010095022 doc20101010100011 Print Date and Time 02/02/2013 10:10 02/02/2013 10:10 02/02/2013 10:10 Size 23 KB 4 KB 5 KB 1/1 Search(Name) Detail Preview Delete Store File Status Close 02/02/2013 10:10 4 When the printing confirmation screen appears, press [Yes]. Printing begins. Deleting Originals in a Polling Box Use this procedure to delete an original stored in a Polling box. NOTE If Delete Transmitted File is set to [On], originals are automatically deleted following polling transmission. (4-44.) 1 Follow steps 1 to 2 in Printing from a Polling Box on page 4-48. 2 Press [Delete]. Polling Box 0001 File Name doc20101010094533 doc20101010095022 doc20101010100011 Print Date and Time 02/02/2013 10:10 02/02/2013 10:10 02/02/2013 10:10 Size 23 KB 4 KB 5 KB 1/1 Search(Name) Detail Preview Delete Store File Status Close 02/02/2013 10:10 3 When the deletion confirmation screen appears, press [Yes]. The original is deleted. 4-48
-
 1
1 -
2
-
3
-
4
-
5
-
6
-
7
-
8
-
9
-
10
-
11
-
12
-
13
-
14
-
15
-
16
-
17
-
18
-
19
-
20
-
21
-
22
-
23
-
24
-
25
-
26
-
27
-
28
-
29
-
30
-
31
-
32
-
33
-
34
-
35
-
36
-
37
-
38
-
39
-
40
-
41
-
42
-
43
-
44
-
45
-
46
-
47
-
48
-
49
-
50
-
51
-
52
-
53
-
54
-
55
-
56
-
57
-
58
-
59
-
60
-
61
-
62
-
63
-
64
-
65
-
66
-
67
-
68
-
69
-
70
-
71
-
72
-
73
-
74
-
75
-
76
-
77
-
78
-
79
-
80
-
81
-
82
-
83
-
84
-
85
-
86
-
87
-
88
-
89
-
90
-
91
-
92
-
93
-
94
-
95
-
96
-
97
-
98
-
99
-
100
-
101
-
102
-
103
-
104
-
105
-
106
-
107
-
108
-
 109
109 -
 110
110 -
 111
111 -
 112
112 -
 113
113 -
 114
114 -
 115
115 -
 116
116 -
 117
117 -
 118
118 -
 119
119 -
120
-
121
-
122
-
123
-
124
-
125
-
126
-
127
-
128
-
129
-
130
-
131
-
132
-
133
-
134
-
135
-
136
-
137
-
138
-
139
-
140
-
141
-
142
-
143
-
144
-
145
-
146
-
147
-
148
-
149
-
150
-
151
-
152
-
153
-
154
-
155
-
156
-
157
-
158
-
159
-
160
-
161
-
162
-
163
-
164
-
165
-
166
-
167
-
168
-
169
-
170
-
171
-
172
-
173
-
174
-
175
-
176
-
177
-
178
-
179
-
180
-
181
-
182
-
183
-
184
-
185
-
186
-
187
-
188
-
189
-
190
-
191
-
192
-
193
-
194
-
195
-
196
-
197
-
198
-
199
-
200
-
201
-
202
-
203
-
204
-
205
-
206
-
207
-
208
-
209
-
210
-
211
-
212
-
213
-
214
-
215
-
216
-
217
-
218
-
219
-
220
-
221
-
222
-
223
-
224
-
225
-
226
-
227
-
228
-
229
-
230
-
231
-
232
-
233
-
234
-
235
-
236
-
237
-
238
-
239
-
240
-
241
-
242
-
243
-
244
-
245
-
246
-
247
-
248
-
249
-
250
-
251
-
252
-
253
-
254
-
255
-
256
-
257
-
258
-
259
-
260
-
261
-
262
 |
 |
