Kyocera TASKalfa 3501i Fax System (W) Operation Guide Rev-2.2013.1 - Page 57
Selecting a Destination from the Address Book
 |
View all Kyocera TASKalfa 3501i manuals
Add to My Manuals
Save this manual to your list of manuals |
Page 57 highlights
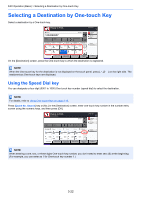
FAX Operation (Basic) > Selecting a Destination from the Address Book Selecting a Destination from the Address Book Select a destination registered in the Address Book. NOTE You can set the machine up so that the address book screen appears when you press the [Send] key. For details, refer to the Operation Guide for the machine. (8 Setup and Registration (System menu) > Send > Default Screen) 1 Press [Address Book] on the basic FAX screen. Enter Destination. ABCD Pause Space [email protected] 001/001 Backspace Destination Address Book FAX No. Entry On Hook Direct Chain Detail Delete Recall 0001 0002 0003 0004 0005 No. AAA BBB CCC DDD EEE Check Destinations 0006 0007 0008 FFF GGG HHH III 0009 0010 JJJ 1/100 Destination Status Quick Setup Org./Sending Data Format Image Quality Advanced Setup Program 02/02/2013 10:10 2 Select the destination from the list. You can select several destinations. The checkbox of the destination selected is checked. To use an LDAP address book, select [Ext Address Book] in the [Addr Book] pull-down menu. NOTE To cancel the selection, press the checkbox to erase the checkmark. For Extended Address Book, refer to the Command Center RX User Guide. Address Book Addr Book Address Book Dest. No. Type Name 0001 A OFFICE 0002 B OFFICE 0003 C OFFICE 0004 D OFFICE 0005 E OFFICE Sort Name Detail 1234567890 1234568907 1234569078 1234568790 1234568860 ABC DEF GHI JKL MNO PQRS TUV WXYZ 0-9 FAX Search(Name) Search(No.) 1/2 Add/Edit Address Book Detail Group Status Cancel OK 02/02/2013 10:10 3-19
-
 1
1 -
2
-
3
-
4
-
5
-
6
-
7
-
8
-
9
-
10
-
11
-
12
-
13
-
14
-
15
-
16
-
17
-
18
-
19
-
20
-
21
-
22
-
23
-
24
-
25
-
26
-
27
-
28
-
29
-
30
-
31
-
32
-
33
-
34
-
35
-
36
-
37
-
38
-
39
-
40
-
41
-
42
-
43
-
44
-
45
-
46
-
47
-
48
-
49
-
50
-
51
-
 52
52 -
 53
53 -
 54
54 -
 55
55 -
 56
56 -
 57
57 -
 58
58 -
 59
59 -
 60
60 -
 61
61 -
 62
62 -
63
-
64
-
65
-
66
-
67
-
68
-
69
-
70
-
71
-
72
-
73
-
74
-
75
-
76
-
77
-
78
-
79
-
80
-
81
-
82
-
83
-
84
-
85
-
86
-
87
-
88
-
89
-
90
-
91
-
92
-
93
-
94
-
95
-
96
-
97
-
98
-
99
-
100
-
101
-
102
-
103
-
104
-
105
-
106
-
107
-
108
-
109
-
110
-
111
-
112
-
113
-
114
-
115
-
116
-
117
-
118
-
119
-
120
-
121
-
122
-
123
-
124
-
125
-
126
-
127
-
128
-
129
-
130
-
131
-
132
-
133
-
134
-
135
-
136
-
137
-
138
-
139
-
140
-
141
-
142
-
143
-
144
-
145
-
146
-
147
-
148
-
149
-
150
-
151
-
152
-
153
-
154
-
155
-
156
-
157
-
158
-
159
-
160
-
161
-
162
-
163
-
164
-
165
-
166
-
167
-
168
-
169
-
170
-
171
-
172
-
173
-
174
-
175
-
176
-
177
-
178
-
179
-
180
-
181
-
182
-
183
-
184
-
185
-
186
-
187
-
188
-
189
-
190
-
191
-
192
-
193
-
194
-
195
-
196
-
197
-
198
-
199
-
200
-
201
-
202
-
203
-
204
-
205
-
206
-
207
-
208
-
209
-
210
-
211
-
212
-
213
-
214
-
215
-
216
-
217
-
218
-
219
-
220
-
221
-
222
-
223
-
224
-
225
-
226
-
227
-
228
-
229
-
230
-
231
-
232
-
233
-
234
-
235
-
236
-
237
-
238
-
239
-
240
-
241
-
242
-
243
-
244
-
245
-
246
-
247
-
248
-
249
-
250
-
251
-
252
-
253
-
254
-
255
-
256
-
257
-
258
-
259
-
260
-
261
-
262
 |
 |
