Lexmark Optra C710 Setup Guide - Page 66
packing material., Remove the orange tabs and any packing material
 |
View all Lexmark Optra C710 manuals
Add to My Manuals
Save this manual to your list of manuals |
Page 66 highlights
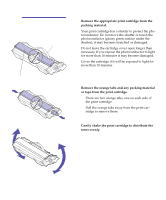
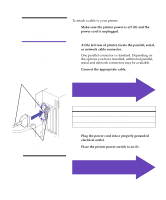
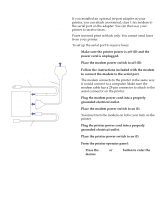
Warning! Lift, shake, and insert the print cartridge using the handle only. To prevent damage to the print cartridge, do not handle the shutter covering the photocondutor. Print cartridge handle 7 Remove the appropriate print cartridge from the packing material. Your print cartridge has a shutter to protect the photoconductor. Do not move the shutter or touch the photoconductor (glossy green surface under the shutter), it may become scratched or damaged. Do not leave the cartridge cover open longer than necessary. If you expose the photoconductor to light for more than 10 minutes it may become damaged. Cover the cartridge if it will be exposed to light for more than 10 minutes. Photoconductor shutter 8 Remove the orange tabs and any packing material or tape from the print cartridge. There are two orange tabs, one on each side of the print cartridge. Pull the orange tabs away from the print cartridge to remove them. 9 Gently shake the print cartridge to distribute the toner evenly. 62 Install the print cartridges
-
 1
1 -
2
-
3
-
4
-
5
-
6
-
7
-
8
-
9
-
10
-
11
-
12
-
13
-
14
-
15
-
16
-
17
-
18
-
19
-
20
-
21
-
22
-
23
-
24
-
25
-
26
-
27
-
28
-
29
-
30
-
31
-
32
-
33
-
34
-
35
-
36
-
37
-
38
-
39
-
40
-
41
-
42
-
43
-
44
-
45
-
46
-
47
-
48
-
49
-
50
-
51
-
52
-
53
-
54
-
55
-
56
-
57
-
58
-
59
-
60
-
 61
61 -
 62
62 -
 63
63 -
 64
64 -
 65
65 -
 66
66 -
 67
67 -
 68
68 -
 69
69 -
 70
70 -
 71
71 -
72
-
73
-
74
-
75
-
76
-
77
-
78
-
79
-
80
-
81
-
82
-
83
-
84
-
85
-
86
-
87
-
88
-
89
-
90
-
91
-
92
-
93
-
94
-
95
-
96
-
97
-
98
-
99
-
100
-
101
-
102
-
103
-
104
-
105
-
106
-
107
-
108
-
109
-
110
-
111
 |
 |
