Lexmark Optra C710 Setup Guide - Page 70
Use the table below, to locate your next step, Proceed to Step 10: Load the, paper tray
 |
View all Lexmark Optra C710 manuals
Add to My Manuals
Save this manual to your list of manuals |
Page 70 highlights
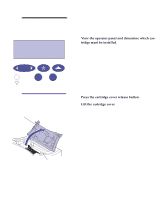
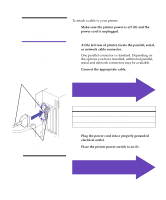
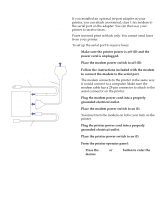
Note: Connect only one network cable even if the internal print server (sometimes called internal network adapter) has more than one network port. To attach a cable to your printer: 1 Make sure the printer power is off (O) and the power cord is unplugged. Caution! When connecting a cable to the printer from another powered component make sure you unplug that component before connecting any cables to the printer. 2 At the left rear of printer, locate the parallel, serial, or network cable connector. One parallel connector is standard. Depending on the options you have installed, additional parallel, serial and network connectors may be available. 3 Connect the appropriate cable. Standard parallel cable and connector Use the table below to locate your next step Optional cable and connector Do you need to... "Connect an external fax modem", see page 67 "Connect an infrared adapter", see page 70 "Continue with printer setup", see step 4 4 Plug the power cord into a properly grounded electrical outlet. 5 Place the printer power switch to on (I). Note: If you are installing a fax modem or infrared adapter, do not connect the power cord or turn on the printer at this time. Proceed to Step 10: "Load the paper tray" on page 73 66 Cable information
-
 1
1 -
2
-
3
-
4
-
5
-
6
-
7
-
8
-
9
-
10
-
11
-
12
-
13
-
14
-
15
-
16
-
17
-
18
-
19
-
20
-
21
-
22
-
23
-
24
-
25
-
26
-
27
-
28
-
29
-
30
-
31
-
32
-
33
-
34
-
35
-
36
-
37
-
38
-
39
-
40
-
41
-
42
-
43
-
44
-
45
-
46
-
47
-
48
-
49
-
50
-
51
-
52
-
53
-
54
-
55
-
56
-
57
-
58
-
59
-
60
-
61
-
62
-
63
-
64
-
 65
65 -
 66
66 -
 67
67 -
 68
68 -
 69
69 -
 70
70 -
 71
71 -
 72
72 -
 73
73 -
 74
74 -
 75
75 -
76
-
77
-
78
-
79
-
80
-
81
-
82
-
83
-
84
-
85
-
86
-
87
-
88
-
89
-
90
-
91
-
92
-
93
-
94
-
95
-
96
-
97
-
98
-
99
-
100
-
101
-
102
-
103
-
104
-
105
-
106
-
107
-
108
-
109
-
110
-
111
 |
 |
