NEC 870 User Guide - Page 43
Installing the Software - drivers
 |
UPC - 050927215162
View all NEC 870 manuals
Add to My Manuals
Save this manual to your list of manuals |
Page 43 highlights
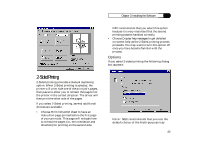
Chapter 3: Installing the Software To select a bitmap to be used as a graphic watermark, enter the path or select browse to locate the bitmap file. You can name your graphic separate from the file name in the Bitmap field. Use no more than 16 characters (in the Name field). The preview will display both the currently selected text and any selected bitmap. However, you can change the bitmap only in this dialog box. You may then change the darkness, scale, and position of your graphic watermark. Press the OK button when done. If you try to print using a bitmap watermark and the driver cannot locate the bitmap file at print time (it may have been moved, renamed, or deleted), the screen displays an alert. You can then choose to either print without the graphic or cancel the print job. Choosing Actual Size will place the graphic on the page at 100%. If the graphic is large, this can result in the image running off the edge of the paper, which will be reflected in the preview and can be corrected by resizing at a lower percentage. Note: The angle option available in the text watermark dialog box is not available for graphics. 43
-
 1
1 -
2
-
3
-
4
-
5
-
6
-
7
-
8
-
9
-
10
-
11
-
12
-
13
-
14
-
15
-
16
-
17
-
18
-
19
-
20
-
21
-
22
-
23
-
24
-
25
-
26
-
27
-
28
-
29
-
30
-
31
-
32
-
33
-
34
-
35
-
36
-
37
-
 38
38 -
 39
39 -
 40
40 -
 41
41 -
 42
42 -
 43
43 -
 44
44 -
 45
45 -
 46
46 -
 47
47 -
 48
48 -
49
-
50
-
51
-
52
-
53
-
54
-
55
-
56
-
57
-
58
-
59
-
60
-
61
-
62
-
63
-
64
-
65
-
66
-
67
-
68
-
69
-
70
-
71
-
72
-
73
-
74
-
75
-
76
-
77
-
78
-
79
-
80
-
81
-
82
-
83
-
84
-
85
-
86
-
87
-
88
-
89
-
90
-
91
-
92
-
93
-
94
-
95
-
96
-
97
-
98
-
99
-
100
-
101
-
102
-
103
-
104
-
105
-
106
-
107
-
108
-
109
-
110
-
111
-
112
-
113
-
114
-
115
-
116
-
117
-
118
-
119
-
120
-
121
-
122
-
123
-
124
-
125
-
126
-
127
-
128
-
129
-
130
-
131
-
132
-
133
-
134
-
135
-
136
-
137
-
138
-
139
-
140
-
141
-
142
-
143
-
144
-
145
-
146
-
147
-
148
-
149
-
150
-
151
-
152
-
153
-
154
-
155
-
156
-
157
-
158
 |
 |
