Panasonic HVX200A Operating Instructions - Page 102
Setup menu list continued
 |
UPC - 791871303351
View all Panasonic HVX200A manuals
Add to My Manuals
Save this manual to your list of manuals |
Page 102 highlights
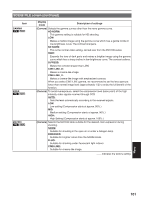
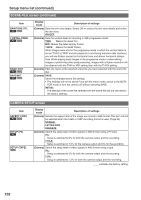
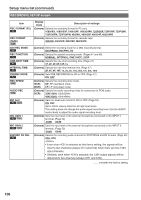
Setup menu list (continued) SCENE FILE screen (continued) Item SKIN TONE DTL P2 TAPE V DETAIL FREQ P2 TAPE NAME EDIT P2 TAPE SAVE/INIT P2 TAPE Display mode Description of settings (Camera) Sets the skin tone details. Select ON to reduce the skin tone details and soften the skin tone. ON OFF (Camera) Sets the vertical detail for shooting in 480i progressive mode. THIN : Makes the detail thin. MID : Makes the detail slightly thicker. THICK : Makes the detail thicker. When images were shot in the progressive mode in which the vertical detail is set as "THIN" or "MID" and are played on a monitoring television (60i interlace), you will see flickers caused on horizontal lines and almost horizontal oblique lines. When playing back images in the progressive mode or when editing images or performing other postprocessing, images with a higher resolution will be obtained with the THIN or MID setting than with the THICK setting. (Camera) Edits the name of the selected scene file you have selected with the scene file dial. (Camera) SAVE: Saves the changed scene file settings. • The settings will not be saved if you exit the menu mode, switch to the MCR/ VCR mode or turn the camera off without selecting SAVE. INITIAL: The settings of the scene file selected with the scene file dial are returned to the factory settings. CAMERA SETUP screen Item ASPECT CONV P2 TAPE SETUP (P2) P2 SETUP (TAPE) TAPE Display mode Description of settings (Camera) Selects the aspect ratio of the image you record in 480i format. This item cannot be selected when the 1080i or 720P recording format is used. (Page 44) NORMAL LETTER BOX SQUEEZE (Camera) Switch the setup level of video signals in 480i format using a P2 card. 0%: Setup is switched to 0% for both the camera output and the recording. 7.5%A: Setup is switched to 7.5% for the camera output and 0% for the recording. (Camera) Switch the setup level of video signals in 480i format using a tape. 0%: Setup is switched to 0% for both the camera output and the recording. 7.5%: Setup is switched to 7.5% for both the camera output and the recording. indicates the factory setting. 102
-
 1
1 -
2
-
3
-
4
-
5
-
6
-
7
-
8
-
9
-
10
-
11
-
12
-
13
-
14
-
15
-
16
-
17
-
18
-
19
-
20
-
21
-
22
-
23
-
24
-
25
-
26
-
27
-
28
-
29
-
30
-
31
-
32
-
33
-
34
-
35
-
36
-
37
-
38
-
39
-
40
-
41
-
42
-
43
-
44
-
45
-
46
-
47
-
48
-
49
-
50
-
51
-
52
-
53
-
54
-
55
-
56
-
57
-
58
-
59
-
60
-
61
-
62
-
63
-
64
-
65
-
66
-
67
-
68
-
69
-
70
-
71
-
72
-
73
-
74
-
75
-
76
-
77
-
78
-
79
-
80
-
81
-
82
-
83
-
84
-
85
-
86
-
87
-
88
-
89
-
90
-
91
-
92
-
93
-
94
-
95
-
96
-
 97
97 -
 98
98 -
 99
99 -
 100
100 -
 101
101 -
 102
102 -
 103
103 -
 104
104 -
 105
105 -
 106
106 -
 107
107 -
108
-
109
-
110
-
111
-
112
-
113
-
114
-
115
-
116
-
117
-
118
-
119
-
120
-
121
-
122
-
123
-
124
-
125
-
126
-
127
-
128
-
129
-
130
-
131
-
132
-
133
-
134
 |
 |
