Panasonic HVX200A Operating Instructions - Page 69
Deleting clips and formatting cards OPERATION
 |
UPC - 791871303351
View all Panasonic HVX200A manuals
Add to My Manuals
Save this manual to your list of manuals |
Page 69 highlights
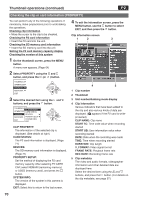
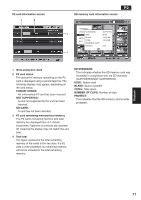
P2 Deleting clips and formatting cards (OPERATION) You can perform any of the following operations. If necessary, make preparations prior to undertaking the operations. Deleting clips • Select the clip to be deleted, and then press the button. Formatting P2 cards or SD memory cards • Insert the card to be formatted into the unit. • When a card is formatted, all its data will be deleted. Repairing defective clips • Select the defective clip (indicated by X ) to be repaired. (Clips indicated by the red defective clip indicator cannot be repaired.) 1 On the thumbnail screen, press the MENU button. A menu now appears. (Page 64) 2 Select OPERATION using the and button, and press the (or ) button. REPAIR CLIP: Select this to repair defective clips. Select YES to repair the clip or NO to cancel the repair, and press the button. EXIT: Select this to return to the last screen. 4 Press the MENU button to release the menu mode. • When clips have been copied by operating Explorer, for instance, the "!" indicator may appear on the clips. If this happens, "!" can sometimes be released by downloading the latest version of the P2 viewer from the web site given below, installing it in your computer, and copying the clips again. https://eww.pavc.panasonic.co.jp/pro-av/ 3 Select the desired item using the and buttons, and press the button. Playback DELETE: Select this to delete the selected clip. Select YES to delete the clip or NO to cancel the deletion, and press the button. FORMAT: Select this to format a P2 card or SD memory card. When you move to FORMAT, the card selection screen will appear. Select the P2 slot (SLOT1 or SLOT2) or select SD CARD, and press the button. Select YES to format the card or NO to cancel the formatting, and press the button. 69
-
 1
1 -
2
-
3
-
4
-
5
-
6
-
7
-
8
-
9
-
10
-
11
-
12
-
13
-
14
-
15
-
16
-
17
-
18
-
19
-
20
-
21
-
22
-
23
-
24
-
25
-
26
-
27
-
28
-
29
-
30
-
31
-
32
-
33
-
34
-
35
-
36
-
37
-
38
-
39
-
40
-
41
-
42
-
43
-
44
-
45
-
46
-
47
-
48
-
49
-
50
-
51
-
52
-
53
-
54
-
55
-
56
-
57
-
58
-
59
-
60
-
61
-
62
-
63
-
 64
64 -
 65
65 -
 66
66 -
 67
67 -
 68
68 -
 69
69 -
 70
70 -
 71
71 -
 72
72 -
 73
73 -
 74
74 -
75
-
76
-
77
-
78
-
79
-
80
-
81
-
82
-
83
-
84
-
85
-
86
-
87
-
88
-
89
-
90
-
91
-
92
-
93
-
94
-
95
-
96
-
97
-
98
-
99
-
100
-
101
-
102
-
103
-
104
-
105
-
106
-
107
-
108
-
109
-
110
-
111
-
112
-
113
-
114
-
115
-
116
-
117
-
118
-
119
-
120
-
121
-
122
-
123
-
124
-
125
-
126
-
127
-
128
-
129
-
130
-
131
-
132
-
133
-
134
 |
 |
