Panasonic HVX200A Operating Instructions - Page 106
RECORDING SETUP screen
 |
UPC - 791871303351
View all Panasonic HVX200A manuals
Add to My Manuals
Save this manual to your list of manuals |
Page 106 highlights
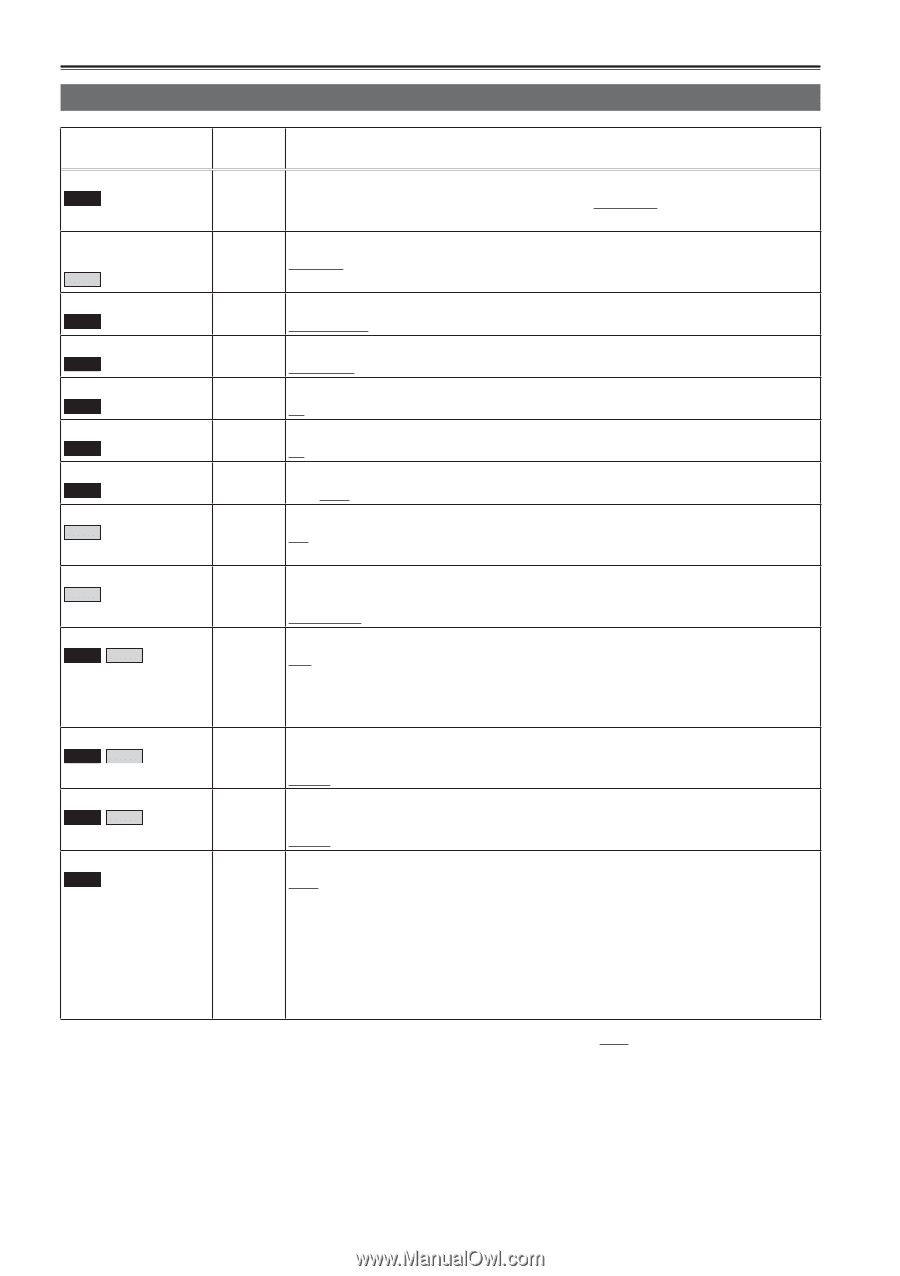
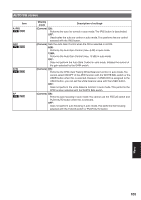
Setup menu list (continued) RECORDING SETUP screen Item REC FORMAT (P2) P2 REC FORMAT (TAPE) TAPE 480i REC MODE P2 REC FUNCTION P2 ONE-SHOT TIME P2 INTERVAL TIME P2 PREREC MODE P2 REC SPEED TAPE AUDIO REC TAPE MIC ALC P2 TAPE MIC GAIN 1 P2 TAPE MIC GAIN 2 P2 TAPE 25M REC CH SEL P2 Display mode Description of settings (Camera) Selects the recording format for P2 card. 1080i/60i, 1080i/30P, 1080i/24P, 1080i/24PA, 720P/60P, 720P/30P, 720P/24P, 720P/30PN, 720P/24PN, 480i/60i, 480i/30P, 480i/24P, 480i/24PA (Camera) Selects the recording format for cassette tape. 480i/60i, 480i/30P, 480i/24P, 480i/24PA (Camera) Select the recording mode for a 480i recording format. DVCPRO50, DVCPRO, DV (Camera) Selects the special recording mode. (Pages 47 and 48) NORMAL, INTERVAL, ONE SHOT, LOOP (Camera) Selects the one-shot recording time. (Page 47) 1F, 2F, 4F, 8F, 16F, 1s (Camera) Selects the one-shot interval time. (Page 47) 2F, 4F, 8F, 16F, 1s, 2s, 5s, 10s, 30s, 1m, 5m, 10m (Camera) Sets PRE RECORDING to ON or OFF. (Page 47) ON OFF (Camera) Selects the recording time mode. (VCR) SP: SP (standard) mode (DUB) LP: LP (long play) mode (Camera) Selects the audio recording mode for conversion to PCM audio. (VCR) 32K(12bit): 12bit/32kHz 48K(16bit): 16bit/48kHz (Camera) Sets mic level auto control to ON or OFF. (Page 53) ON OFF Set to ON to reduce distortion at high input levels. This setting does not change the audio signal recording level. Use the AUDIO control knob to adjust the audio signal recording level. (Camera) Sets the input level of the external microphone connected to the INPUT 1 terminal. (Page 52) -50dB -60dB (Camera) Sets the input level of the external microphone connected to the INPUT 2 terminal. (Page 52) -50dB -60dB (Camera) Selects the recording audio channel for DVCPRO25 and DV formats. (Page 52) 2CH, 4CH • Even when 4CH is selected as this item's setting, the signals will be input to two channels (always CH1 and CH2) when there are two 1394 input channels. • Similarly, even when 4CH is selected, the 1394 output signals will be delivered to two channels (always CH1 and CH2). indicates the factory setting. 106
-
 1
1 -
2
-
3
-
4
-
5
-
6
-
7
-
8
-
9
-
10
-
11
-
12
-
13
-
14
-
15
-
16
-
17
-
18
-
19
-
20
-
21
-
22
-
23
-
24
-
25
-
26
-
27
-
28
-
29
-
30
-
31
-
32
-
33
-
34
-
35
-
36
-
37
-
38
-
39
-
40
-
41
-
42
-
43
-
44
-
45
-
46
-
47
-
48
-
49
-
50
-
51
-
52
-
53
-
54
-
55
-
56
-
57
-
58
-
59
-
60
-
61
-
62
-
63
-
64
-
65
-
66
-
67
-
68
-
69
-
70
-
71
-
72
-
73
-
74
-
75
-
76
-
77
-
78
-
79
-
80
-
81
-
82
-
83
-
84
-
85
-
86
-
87
-
88
-
89
-
90
-
91
-
92
-
93
-
94
-
95
-
96
-
97
-
98
-
99
-
100
-
 101
101 -
 102
102 -
 103
103 -
 104
104 -
 105
105 -
 106
106 -
 107
107 -
 108
108 -
 109
109 -
 110
110 -
 111
111 -
112
-
113
-
114
-
115
-
116
-
117
-
118
-
119
-
120
-
121
-
122
-
123
-
124
-
125
-
126
-
127
-
128
-
129
-
130
-
131
-
132
-
133
-
134
 |
 |