Panasonic HVX200A Operating Instructions - Page 64
Thumbnail screen - green screen
 |
UPC - 791871303351
View all Panasonic HVX200A manuals
Add to My Manuals
Save this manual to your list of manuals |
Page 64 highlights
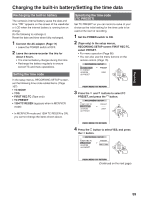
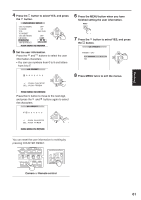
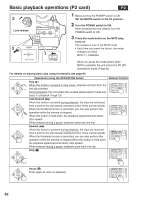
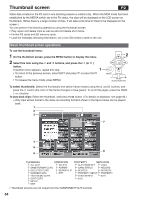
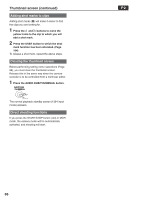
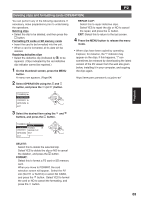
Thumbnail screen P2 Video data created on the P2 card in one shooting session is called a clip. When the MCR mode has been established by the MEDIA switch set to the P2 status, the clips will be displayed on the LCD screen as thumbnails. (When there is a large number of clips, it will take some time for them to be displayed on the screen.) You can perform the following operations using the thumbnail screen. • Play, repair and delete clips as well as add and delete shot marks. • Format P2 cards and SD memory cards. • Load the metadata (shooting information, etc.) from SD memory cards to the unit. Basic thumbnail screen operations To use the thumbnail menu: 1 On the thumbnail screen, press the MENU button to display the menu. 2 Select the item using the and buttons, and press the (or ) button. If another menu appears, repeat this step. 1 • To return to the previous screen, select EXIT and press or press the button. • To release the menu mode, press MENU. 2 SET MENU PAGE/ AUDIO MON/VAR To select thumbnails: Select the thumbnails (the yellow frame moves) using the and buttons, and press the button (the color of the frame changes to blue-green). To scroll the pages, press the PAGE (- or +) button. To play back clips: Select the thumbnail, and press the button. (For details on playback, see page 62.) x Only clips whose format is the same as recording format 6 shown in the figure below can be played back. 1 2 3 7 ! 4 5 8 6 THUMBNAIL OPERATION ALL CLIP DELETE SAME FORMAT CLIPS FORMAT SELECTED CLIPS REPAIR CLIP MARKED CLIPS EXIT TEXT MEMO CLIPS SLOT CLIPS SETUP EXIT PROPERTY META DATA CLIP PROPERTY LOAD CARD STATUS RECORD DEVICES INITIALIZE PROPERTY SETUP PROPERTY SYSTEM INFO EXIT EXIT • Thumbnail screens are not output from the COMPONENT OUT terminal. 64
-
 1
1 -
2
-
3
-
4
-
5
-
6
-
7
-
8
-
9
-
10
-
11
-
12
-
13
-
14
-
15
-
16
-
17
-
18
-
19
-
20
-
21
-
22
-
23
-
24
-
25
-
26
-
27
-
28
-
29
-
30
-
31
-
32
-
33
-
34
-
35
-
36
-
37
-
38
-
39
-
40
-
41
-
42
-
43
-
44
-
45
-
46
-
47
-
48
-
49
-
50
-
51
-
52
-
53
-
54
-
55
-
56
-
57
-
58
-
 59
59 -
 60
60 -
 61
61 -
 62
62 -
 63
63 -
 64
64 -
 65
65 -
 66
66 -
 67
67 -
 68
68 -
 69
69 -
70
-
71
-
72
-
73
-
74
-
75
-
76
-
77
-
78
-
79
-
80
-
81
-
82
-
83
-
84
-
85
-
86
-
87
-
88
-
89
-
90
-
91
-
92
-
93
-
94
-
95
-
96
-
97
-
98
-
99
-
100
-
101
-
102
-
103
-
104
-
105
-
106
-
107
-
108
-
109
-
110
-
111
-
112
-
113
-
114
-
115
-
116
-
117
-
118
-
119
-
120
-
121
-
122
-
123
-
124
-
125
-
126
-
127
-
128
-
129
-
130
-
131
-
132
-
133
-
134
 |
 |
