Panasonic HVX200A Operating Instructions - Page 24
Setting the calendar
 |
UPC - 791871303351
View all Panasonic HVX200A manuals
Add to My Manuals
Save this manual to your list of manuals |
Page 24 highlights
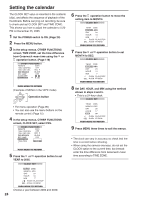
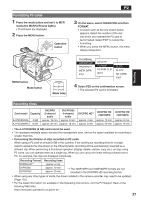
Setting the calendar The CLOCK SET value is recorded in the contents (clip), and affects the sequence of playback of the thumbnails. Before carrying out recording, be sure to check and set CLOCK SET and TIME ZONE. This shows you how to adjust the calendar to 5:20 PM on December 25, 2005. 1 Set the POWER switch to ON. (Page 20) 2 Press the MENU button. 3 In the setup menus, OTHER FUNCTIONS screen, TIME ZONE, set the time difference from Greenwich mean time using the or operation button. (Page 116) 6 Press the operation button to move the setting item to MONTH. 7 Press the or operation button to set MONTH to DEC. (Example of MENU in the TAPE mode) SET Operation button MENU • For menu operation (Page 96) • You can also use the menu buttons on the remote control. (Page 15) 4 In the setup menus, OTHER FUNCTIONS screen, CLOCK SET, select YES. 5 Press the or operation button to set YEAR to 2005. 8 Set DAY, HOUR, and MIN using the method shown in steps 4 and 5. • This is a 24-hour clock. 9 Press MENU three times to exit the menus. • The clock can vary in accuracy so check that the time is correct before shooting. • When using the camera overseas, do not set the CLOCK option to the current time, but instead enter the time difference from Greenwich mean time according to TIME ZONE. Choose a year between 2000 and 2030. 24
-
 1
1 -
2
-
3
-
4
-
5
-
6
-
7
-
8
-
9
-
10
-
11
-
12
-
13
-
14
-
15
-
16
-
17
-
18
-
 19
19 -
 20
20 -
 21
21 -
 22
22 -
 23
23 -
 24
24 -
 25
25 -
 26
26 -
 27
27 -
 28
28 -
 29
29 -
30
-
31
-
32
-
33
-
34
-
35
-
36
-
37
-
38
-
39
-
40
-
41
-
42
-
43
-
44
-
45
-
46
-
47
-
48
-
49
-
50
-
51
-
52
-
53
-
54
-
55
-
56
-
57
-
58
-
59
-
60
-
61
-
62
-
63
-
64
-
65
-
66
-
67
-
68
-
69
-
70
-
71
-
72
-
73
-
74
-
75
-
76
-
77
-
78
-
79
-
80
-
81
-
82
-
83
-
84
-
85
-
86
-
87
-
88
-
89
-
90
-
91
-
92
-
93
-
94
-
95
-
96
-
97
-
98
-
99
-
100
-
101
-
102
-
103
-
104
-
105
-
106
-
107
-
108
-
109
-
110
-
111
-
112
-
113
-
114
-
115
-
116
-
117
-
118
-
119
-
120
-
121
-
122
-
123
-
124
-
125
-
126
-
127
-
128
-
129
-
130
-
131
-
132
-
133
-
134
 |
 |
