Pioneer PDP-6010FD Owner's Manual - Page 18
Installing the Pioneer speaker - parts
 |
View all Pioneer PDP-6010FD manuals
Add to My Manuals
Save this manual to your list of manuals |
Page 18 highlights
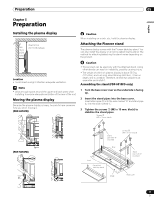
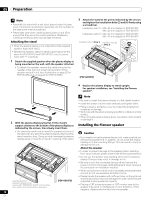
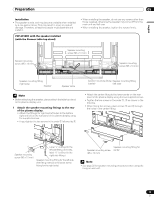
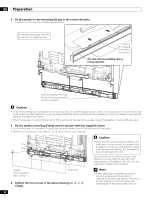
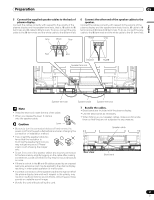
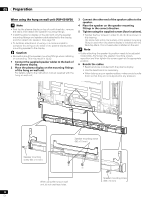
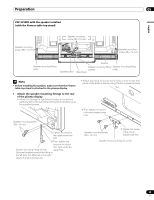
05 Preparation Note • Assemble the stand with a soft sheet placed under the base cover. If a sheet is not laid before assembly, the front surface of the base cover may be scratched. • Please take care when installing stand pipes (L) and (R) to ensure that they are in the correct positions. Mistakenly installing the stand pipes may damage the stand. Attaching the stand • When the plasma display is mounted without the supplied speaker, begin with step 2. • Besides the speaker, steps for attaching the stand are the same for PDP-6010FD and PDP-5010FD (use the screw holes with "T" inscribed). 1 Detach the supplied speaker when the plasma display is being mounted on the wall, with the speaker attached. • To detach the speaker, remove the cable wiring for the speaker at the rear and screws at the bottom of the speaker and pull it out (see illustrations on page 22 for PDP-6010FD and on page 26 for PDP-5010FD). 3 Attach the stand at the points indicated by the arrows and tighten the installation bolts (2) and (1) firmly using a screwdriver. Installation bolt (1): M8 x 23 mm (black) for PDP-5010FD M6 x 20 mm (black) for PDP-6010FD Installation bolt (2): M8 x 40 mm (black) for PDP-5010FD M6 x 20 mm (black) for PDP-6010FD Installation bolts (1) (Step 1) Installation bolts (2) (Step 2) (PDP-6010FD) 4 Replace the plasma display to stand upright. For speaker installation, see "Installing the Pioneer speaker". Note • Be sure to install the plasma display in a flat, stable location. • Insert the screws into the holes vertically and tighten them. • Place a sheet or protective cover to protect the display from scratches or damage. • Work only with the plasma display lying flat on a table or similar surface. • When lying the plasma display down, be careful not to scratch or damage it. 2 With the plasma display lying flat, fit the stand's support columns to the bottom of the plasma display as indicated by the arrows, then slowly insert them. Installing the Pioneer speaker • Be extremely careful not to insert the support columns of the stand into any part of the plasma display other than the stand insertion slots. Doing so might damage the plasma display panel or its ports or result in warping of the stand. Caution • If you want to move the plasma display unit, make sure that you remove the speaker first. In addition, do not move the display holding on to the mounting fittings. This can result in injury or damage to the unit. About the speaker • In order to prevent damage to the speaker system resulting from input overload, please observe the following precautions: • Do not use the speaker with anything other than the plasma display. Doing so may result in damage or fire. • Be sure to turn the connected devices off and remove the power cord from the power outlet beforehand when changing the connection or installation method. • When using a tone control function to greatly emphasize treble sounds, do not use excessive amplifier volume. Insert the stand into the plasma display so that an arrow with "FRONT/FACE AVANT" mark inscribed at the bottom of the stand indicates downward. (PDP-6010FD) • Please handle the speaker with sufficient care, as the grille net and the cabinet can become damaged or broken when they are subjected to strong external impacts. • Placing a CRT computer screen or CRT monitor near to the speaker may result in interference or color distortion. If this happens, distance the monitor from the speaker. 18 En
-
 1
1 -
2
-
3
-
4
-
5
-
6
-
7
-
8
-
9
-
10
-
11
-
12
-
 13
13 -
 14
14 -
 15
15 -
 16
16 -
 17
17 -
 18
18 -
 19
19 -
 20
20 -
 21
21 -
 22
22 -
 23
23 -
24
-
25
-
26
-
27
-
28
-
29
-
30
-
31
-
32
-
33
-
34
-
35
-
36
-
37
-
38
-
39
-
40
-
41
-
42
-
43
-
44
-
45
-
46
-
47
-
48
-
49
-
50
-
51
-
52
-
53
-
54
-
55
-
56
-
57
-
58
-
59
-
60
-
61
-
62
-
63
-
64
-
65
-
66
-
67
-
68
-
69
-
70
-
71
-
72
-
73
-
74
-
75
-
76
-
77
-
78
-
79
-
80
-
81
-
82
-
83
-
84
-
85
-
86
-
87
-
88
-
89
-
90
-
91
-
92
-
93
-
94
-
95
-
96
-
97
-
98
-
99
-
100
-
101
-
102
-
103
-
104
-
105
-
106
-
107
-
108
-
109
-
110
-
111
-
112
-
113
-
114
-
115
-
116
-
117
-
118
-
119
-
120
-
121
-
122
-
123
-
124
-
125
-
126
-
127
-
128
-
129
-
130
-
131
-
132
-
133
-
134
-
135
-
136
-
137
-
138
-
139
-
140
-
141
-
142
-
143
-
144
-
145
-
146
-
147
-
148
-
149
-
150
-
151
-
152
-
153
-
154
-
155
-
156
-
157
-
158
-
159
-
160
-
161
-
162
-
163
-
164
-
165
-
166
-
167
-
168
-
169
-
170
-
171
-
172
-
173
-
174
-
175
-
176
-
177
-
178
-
179
-
180
-
181
-
182
-
183
-
184
-
185
-
186
-
187
-
188
-
189
-
190
-
191
-
192
-
193
-
194
-
195
-
196
-
197
-
198
-
199
-
200
-
201
-
202
-
203
-
204
-
205
-
206
-
207
-
208
-
209
-
210
-
211
-
212
-
213
-
214
-
215
-
216
-
217
-
218
-
219
-
220
-
221
-
222
-
223
-
224
-
225
-
226
-
227
-
228
-
229
-
230
-
231
-
232
-
233
-
234
-
235
-
236
-
237
-
238
-
239
-
240
-
241
-
242
-
243
-
244
-
245
-
246
-
247
-
248
-
249
-
250
-
251
-
252
-
253
-
254
-
255
-
256
-
257
-
258
-
259
-
260
-
261
-
262
-
263
-
264
-
265
-
266
-
267
-
268
-
269
-
270
-
271
-
272
-
273
-
274
-
275
-
276
-
277
-
278
-
279
-
280
-
281
-
282
-
283
-
284
-
285
-
286
-
287
-
288
-
289
-
290
-
291
-
292
-
293
-
294
-
295
-
296
-
297
-
298
 |
 |
