Pioneer PDP-6010FD Owner's Manual - Page 49
Setting your favorite channels, Setting up closed captions
 |
View all Pioneer PDP-6010FD manuals
Add to My Manuals
Save this manual to your list of manuals |
Page 49 highlights
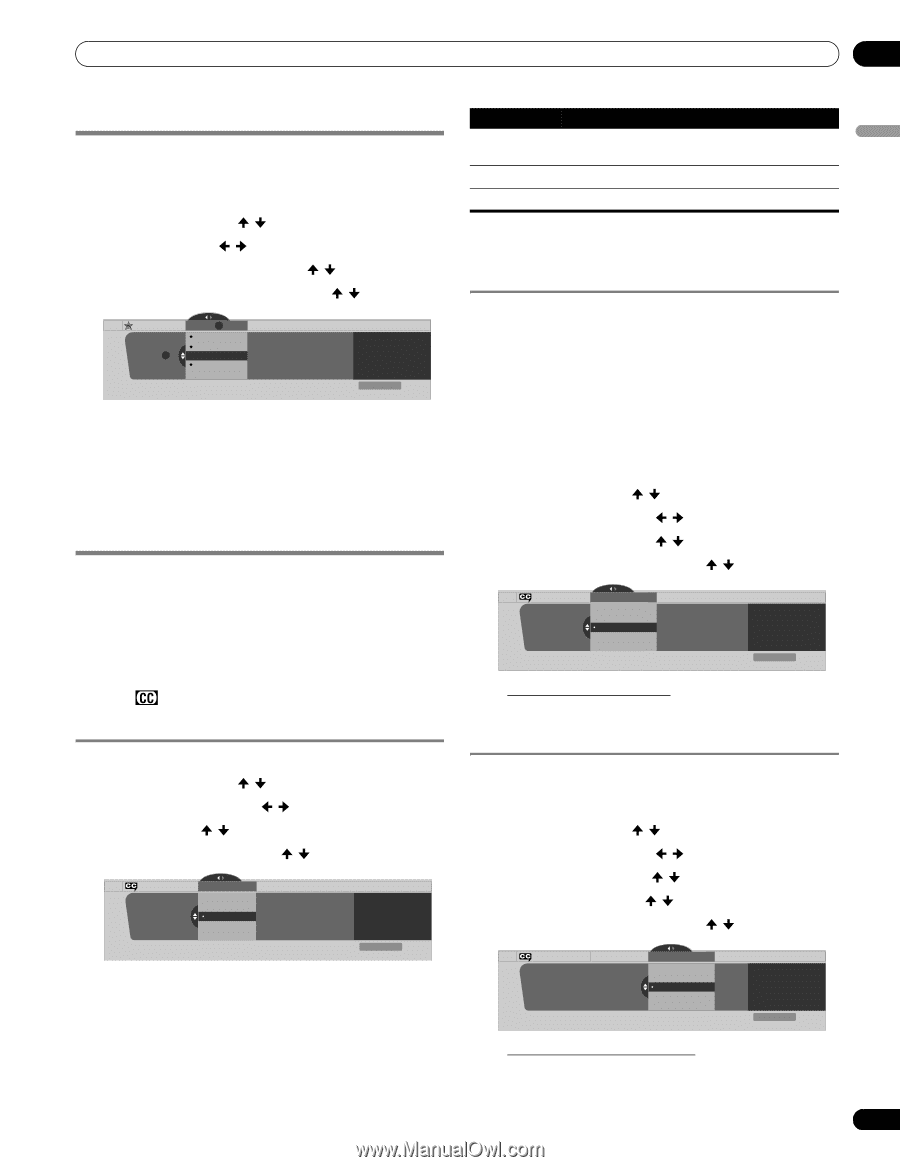
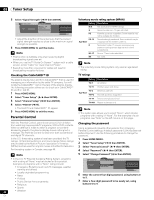
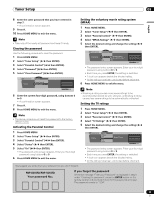
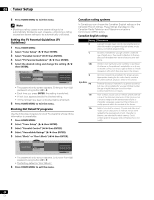
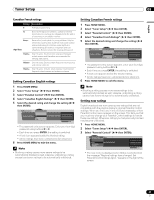
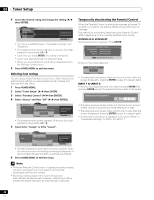
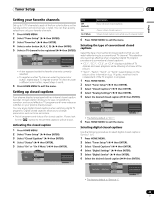
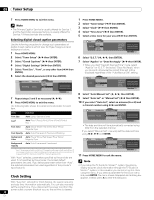
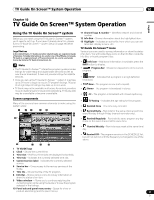
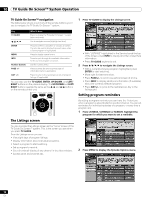
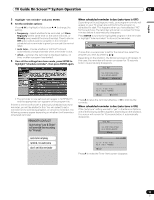
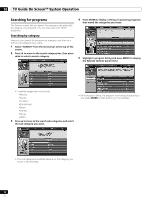
Tuner Setup 09 English Setting your favorite channels Set up to 10 TV channels to each of the four color buttons on the remote control unit (40 channels in total). You can then quickly select from only your favorite channels. 1 Press HOME MENU. 2 Select "Tuner Setup" ( / then ENTER). 3 Select "Favorites" ( / then ENTER). 4 Select a color button (A, B, C, D) ( / then ENTER). 5 Select a TV channel to be registered ( / then ENTER). Favorites Favorites A Favorites A B 8.0 A 9.0 B 9.0 A 11.0 B 11.0 Current Favorites A Line Up B0008.000 A0009.000 A0011.000 xxxxxxxxxxxxxxxxxxxxx xxxxxxxxxxxxxxxxxxxxx xxxxxxxxxxxxxxxxxxxxx Home Menu Exit • A star appears beside the favorite channels currently selected. • To register another TV channel under the same color button, repeat step 5. To register another TV channel under a different color button, repeat steps 4 and 5. 6 Press HOME MENU to exit the menu. Setting up closed captions Your plasma display is equipped with an internal closed caption decoder. Closed caption allows you to view conversations, narration, and sound effects in TV programs and home videos as subtitles on your plasma display screen. You may enjoy digital closed captions when watching digital TV programs. Digital closed captions allow you to change parameters such as fonts and colors. • Not all programs and videos offer closed caption. Please look for the " " symbol to ensure that captions will be shown. Activating the closed caption 1 Press HOME MENU. 2 Select "Tuner Setup" ( / then ENTER). 3 Select "Closed Captions" ( / then ENTER). 4 Select "Status" ( / then ENTER). 5 Select "On" or "On If Mute" ( / then ENTER). Closed Captions Status Status Off On On If Mute xxxxxxxxxxxxxxxxxxxxx xxxxxxxxxxxxxxxxxxxxx xxxxxxxxxxxxxxxxxxxxx Home Menu Exit Item Off (default) On On If Mute Description Does not show closed captions Always shows closed captions Shows closed captions only while sound is being muted 6 Press HOME MENU to exit the menu. Selecting the type of conventional closed captions Select the type of conventional closed captions that you will watch after tuning to a conventional TV channel. This selection also becomes effective when a selected digital TV program provides only conventional closed captions. • "CC 1", "CC 2", "CC 3", or "CC 4" displays subtitles of TV dramas and news programs while allowing a full view of the picture. • "Text 1", "Text 2", "Text 3", or "Text 4" superimposes on the picture other information (e.g. TV guide, weather) that is independent of the TV program in progress. 1 Press HOME MENU. 2 Select "Tuner Setup" ( / then ENTER). 3 Select "Closed Captions" ( / then ENTER). 4 Select "Analog Settings" ( / then ENTER). 5 Select the desired closed caption ( / then ENTER). Closed Captions Analog Settings Analog Settings CC1 CC2 CC3 CC4 Text 1 xxxxxxxxxxxxxxxxxxxxx xxxxxxxxxxxxxxxxxxxxx xxxxxxxxxxxxxxxxxxxxx Home Menu Exit • The factory default is "CC 1". 6 Press HOME MENU to exit the menu. Selecting digital closed captions Use the following procedure to select digital closed captions: Service 1 to 6. 1 Press HOME MENU. 2 Select "Tuner Setup" ( / then ENTER). 3 Select "Closed Captions" ( / then ENTER). 4 Select "Digital Settings" ( / then ENTER). 5 Select "Digital Service" ( / then ENTER). 6 Select the desired closed caption ( / then ENTER). Closed Captions Digital Settings Digital Settings Digital Service Digital Service Service 1 Service 2 Service 3 Service 4 Service 5 xxxxxxxxxxxxxxxxxxxxx xxxxxxxxxxxxxxxxxxxxx xxxxxxxxxxxxxxxxxxxxx Home Menu Exit • The factory default is "Service 1". 49 En
-
 1
1 -
2
-
3
-
4
-
5
-
6
-
7
-
8
-
9
-
10
-
11
-
12
-
13
-
14
-
15
-
16
-
17
-
18
-
19
-
20
-
21
-
22
-
23
-
24
-
25
-
26
-
27
-
28
-
29
-
30
-
31
-
32
-
33
-
34
-
35
-
36
-
37
-
38
-
39
-
40
-
41
-
42
-
43
-
 44
44 -
 45
45 -
 46
46 -
 47
47 -
 48
48 -
 49
49 -
 50
50 -
 51
51 -
 52
52 -
 53
53 -
 54
54 -
55
-
56
-
57
-
58
-
59
-
60
-
61
-
62
-
63
-
64
-
65
-
66
-
67
-
68
-
69
-
70
-
71
-
72
-
73
-
74
-
75
-
76
-
77
-
78
-
79
-
80
-
81
-
82
-
83
-
84
-
85
-
86
-
87
-
88
-
89
-
90
-
91
-
92
-
93
-
94
-
95
-
96
-
97
-
98
-
99
-
100
-
101
-
102
-
103
-
104
-
105
-
106
-
107
-
108
-
109
-
110
-
111
-
112
-
113
-
114
-
115
-
116
-
117
-
118
-
119
-
120
-
121
-
122
-
123
-
124
-
125
-
126
-
127
-
128
-
129
-
130
-
131
-
132
-
133
-
134
-
135
-
136
-
137
-
138
-
139
-
140
-
141
-
142
-
143
-
144
-
145
-
146
-
147
-
148
-
149
-
150
-
151
-
152
-
153
-
154
-
155
-
156
-
157
-
158
-
159
-
160
-
161
-
162
-
163
-
164
-
165
-
166
-
167
-
168
-
169
-
170
-
171
-
172
-
173
-
174
-
175
-
176
-
177
-
178
-
179
-
180
-
181
-
182
-
183
-
184
-
185
-
186
-
187
-
188
-
189
-
190
-
191
-
192
-
193
-
194
-
195
-
196
-
197
-
198
-
199
-
200
-
201
-
202
-
203
-
204
-
205
-
206
-
207
-
208
-
209
-
210
-
211
-
212
-
213
-
214
-
215
-
216
-
217
-
218
-
219
-
220
-
221
-
222
-
223
-
224
-
225
-
226
-
227
-
228
-
229
-
230
-
231
-
232
-
233
-
234
-
235
-
236
-
237
-
238
-
239
-
240
-
241
-
242
-
243
-
244
-
245
-
246
-
247
-
248
-
249
-
250
-
251
-
252
-
253
-
254
-
255
-
256
-
257
-
258
-
259
-
260
-
261
-
262
-
263
-
264
-
265
-
266
-
267
-
268
-
269
-
270
-
271
-
272
-
273
-
274
-
275
-
276
-
277
-
278
-
279
-
280
-
281
-
282
-
283
-
284
-
285
-
286
-
287
-
288
-
289
-
290
-
291
-
292
-
293
-
294
-
295
-
296
-
297
-
298
 |
 |