Pioneer PDP-6010FD Owner's Manual - Page 81
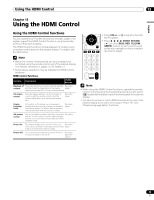
Setting the HDMI Control
 |
View all Pioneer PDP-6010FD manuals
Add to My Manuals
Save this manual to your list of manuals |
Page 81 highlights
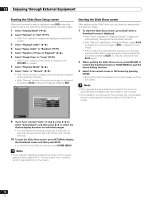
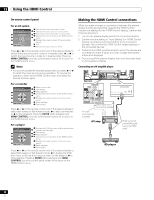
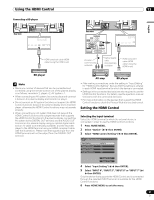
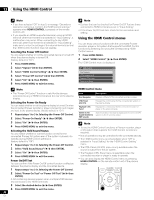
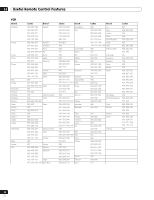
Using the HDMI Control 13 English Connecting a BD player 4 5 Rear view 4 5 Rear view 4 5 HDMI compliant cable (HDMI cable having the HDMI mark) AV cable (commercially available) Optical digital cable (commercially available) HDMI compliant cable (HDMI cable having the HDMI mark) BD player Note • Maximum number of devices that can be connected and controlled using the remote control unit of the plasma display is as follows: recorder x 2, player x 2, AV system x 1. • When connecting an AV system, be sure to place and connect it between the plasma display and recorder or player. • Do not connect an AV system that does not support the HDMI Control functions between the plasma display and a recorder/ player, otherwise the HDMI Control functions may not operate properly. • When connecting an AV system that does not support the HDMI Control functions and a player/recorder that supports the HDMI Control functions to the plasma display, connect the AV system to the DIGITAL OUT terminal and the AUDIO OUT terminal on the plasma display using an optical digital cable and an AV cable (commercially available), and the recorder/ player to the HDMI terminal using an HDMI compliant cable (see the illustration). Please note that signals input from the HDMI terminals will not be output from the DIGITAL OUT terminal. AV amp BD player • After making connections, enter the setting in "Input Setting" for "HDMI Control Setting". Be sure that the setting is entered in each HDMI input terminal to which the device is connected. • Settings in the connected device(s) are also required to use the HDMI Control functions. For details, see the operation manual that came with the connected device(s). • For more information on the devices that support the HDMI Control functions, check the Pioneer Web site (see back cover). Setting the HDMI Control Selecting the input terminal Select the HDMI terminal to which the external device is connected in order to use the HDMI Control functions. 1 Press HOME MENU. 2 Select "Option" ( / then ENTER). 3 Select "HDMI Control Setting" ( / then ENTER). HDMI Control Setting Input Setting Power Off Control Power-On Ready Hold Sound Status INPUT 4 On On Off Power On Test Power Off Test 4 Select "Input Setting" ( / then ENTER). 5 Select "INPUT 4", "INPUT 5", "INPUT 6" or "INPUT 7" ( / then ENTER). Only the device that supports the HDMI Control and is connected through the selected INPUT terminal is available for the HDMI Control functions. 6 Press HOME MENU to exit the menu. 81 En
-
 1
1 -
2
-
3
-
4
-
5
-
6
-
7
-
8
-
9
-
10
-
11
-
12
-
13
-
14
-
15
-
16
-
17
-
18
-
19
-
20
-
21
-
22
-
23
-
24
-
25
-
26
-
27
-
28
-
29
-
30
-
31
-
32
-
33
-
34
-
35
-
36
-
37
-
38
-
39
-
40
-
41
-
42
-
43
-
44
-
45
-
46
-
47
-
48
-
49
-
50
-
51
-
52
-
53
-
54
-
55
-
56
-
57
-
58
-
59
-
60
-
61
-
62
-
63
-
64
-
65
-
66
-
67
-
68
-
69
-
70
-
71
-
72
-
73
-
74
-
75
-
 76
76 -
 77
77 -
 78
78 -
 79
79 -
 80
80 -
 81
81 -
 82
82 -
 83
83 -
 84
84 -
 85
85 -
 86
86 -
87
-
88
-
89
-
90
-
91
-
92
-
93
-
94
-
95
-
96
-
97
-
98
-
99
-
100
-
101
-
102
-
103
-
104
-
105
-
106
-
107
-
108
-
109
-
110
-
111
-
112
-
113
-
114
-
115
-
116
-
117
-
118
-
119
-
120
-
121
-
122
-
123
-
124
-
125
-
126
-
127
-
128
-
129
-
130
-
131
-
132
-
133
-
134
-
135
-
136
-
137
-
138
-
139
-
140
-
141
-
142
-
143
-
144
-
145
-
146
-
147
-
148
-
149
-
150
-
151
-
152
-
153
-
154
-
155
-
156
-
157
-
158
-
159
-
160
-
161
-
162
-
163
-
164
-
165
-
166
-
167
-
168
-
169
-
170
-
171
-
172
-
173
-
174
-
175
-
176
-
177
-
178
-
179
-
180
-
181
-
182
-
183
-
184
-
185
-
186
-
187
-
188
-
189
-
190
-
191
-
192
-
193
-
194
-
195
-
196
-
197
-
198
-
199
-
200
-
201
-
202
-
203
-
204
-
205
-
206
-
207
-
208
-
209
-
210
-
211
-
212
-
213
-
214
-
215
-
216
-
217
-
218
-
219
-
220
-
221
-
222
-
223
-
224
-
225
-
226
-
227
-
228
-
229
-
230
-
231
-
232
-
233
-
234
-
235
-
236
-
237
-
238
-
239
-
240
-
241
-
242
-
243
-
244
-
245
-
246
-
247
-
248
-
249
-
250
-
251
-
252
-
253
-
254
-
255
-
256
-
257
-
258
-
259
-
260
-
261
-
262
-
263
-
264
-
265
-
266
-
267
-
268
-
269
-
270
-
271
-
272
-
273
-
274
-
275
-
276
-
277
-
278
-
279
-
280
-
281
-
282
-
283
-
284
-
285
-
286
-
287
-
288
-
289
-
290
-
291
-
292
-
293
-
294
-
295
-
296
-
297
-
298
 |
 |